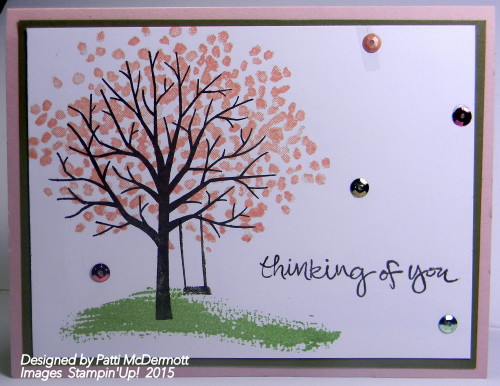
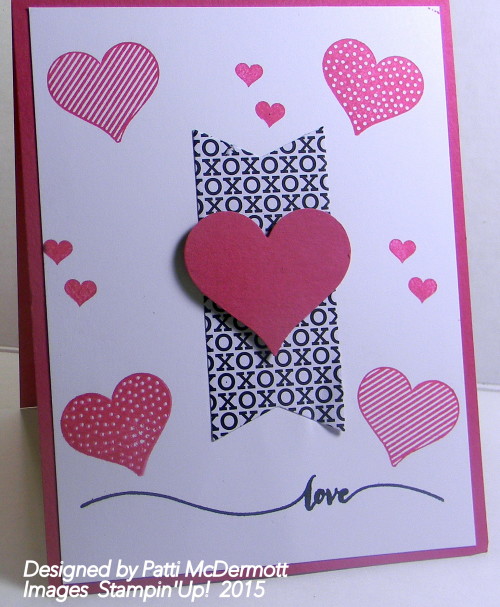
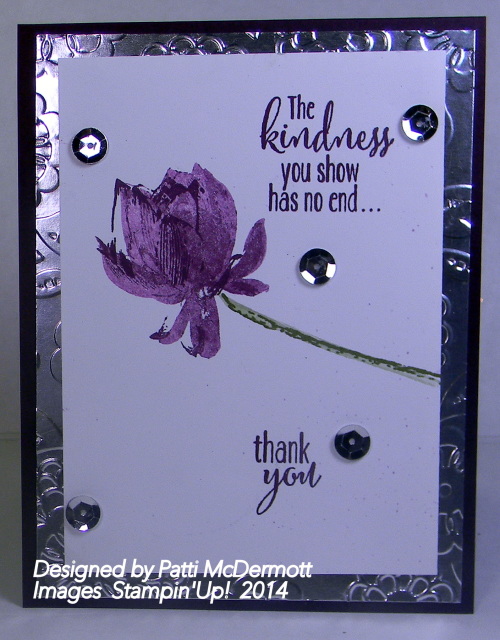
This stamp set you can get as a hostess benefit from the OC if you have a workshop of $150 or more. It is only available for hostesses and at the end of this catalog they will be gone. I posted this card earlier but changed the back ground color to Pink pirouette. I used the pink & gold bakers twine from this month’s Paper Pumpkin.

Today I’m so excited to share a fun background technique with you! My desk is a graveyard of coffee and water cups. By happy accident I noticed a cup ring on a sheet of cardstock. I thought that it would be so cute to use this on a card background with our Perfect Blend Stamp Set!!

This technique is simple and fun! The best part is that the look is intended to be messy . . . so you really can’t make a mistake.
You’ll need rubbing alcohol, a coffee cup, a paper plate, Soft Suede Classic Stampin’ Ink Refill, an Aqua Painter, the Crumb Cake Classic Stampin’ Pad, and a Stamping Sponge.

I stamped a background image on my cardstock using Crumb Cake ink. In this sample I used the Dictionary Background Stamp.

This technique really is the “perfect blend” for this card! Take a closer look.
")
")
")
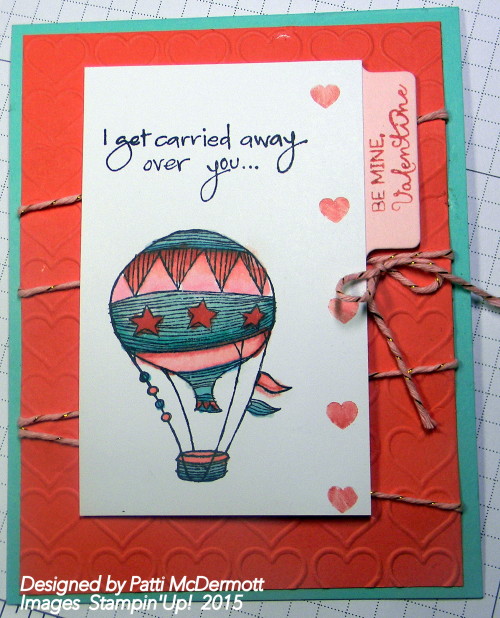
After creating this card, I wanted to make a couple more samples using the same technique. I loved the look and had so much fun creating that I got carried away! Here are four more cards for you to see.


I hope I’ve inspired you to find the creative in everything . . . even that little coffee cup stain! Thank you for reading—and have a creative day!
Krista Frattin
2014–2015 Artisan Design Team
Perfect Blend Stamp Set (item # 131392)
Soft Suede Classic Stampin’ Ink Refill (item #115663)
Crumb Cake Classic Stampin’ Pad (item # 126975)
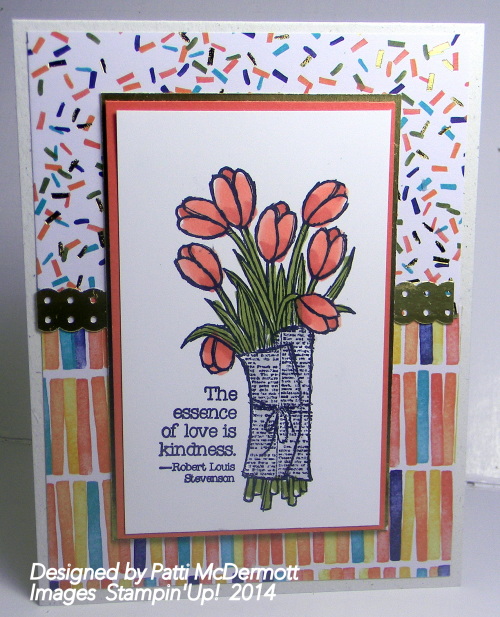
I used some of the items from this month’s paper pumpkin on this card. However, the main images are from the hostess set found on page 51 of the OC. This set is awesome for coloring with markers or blendabilities. I used the embossing folder, Happy Heart Textured Impressions on page 9 and I cut the tab out with our Edgelits File tabs found on page 229 of the AC.
Have you ever made a refrigerator magnet using a clothespin? Just put some Designer Series Paper on the back of the clothespin using Sticky Strip (I used the Stacked with Love Designer Series Paper Stack). Then adhere a magnet to the other side of the clothespin. That’s it! These would be great for leaving love notes (coupons, movie tickets) on the fridge for Valentine’s Day.


Clothespins are also great for making a quick and easy wreath! Just purchase an 11-1/2″ wire wreath (or any size you want) in the floral section of the craft store, then clip on the clothespins. (I spray painted the wreath gold, first.)

I kind of liked the way the wreath looked without a whole lot of ornamentation—just a few die-cut hearts and a stamped sentiment.

If you’re wondering how to get the white-on-black chalkboard look: stamp using VersaMark ink, cover the ink using White Stampin’ Emboss Powder, then heat the stamped image with a Heat Tool. (Be sure to first rub the Embossing Buddy across the paper; this will prevent the embossing paper from sticking anywhere but the ink.)
Here’s a different look:

I love huge stamps. This sentiment is from the Big on You photopolymer set.

You, could, of course, cover ALL of the clothespins with Designer Series Paper strips. And it would be super-easy to change the clothespin wreath’s look to suit any holiday.

Just for fun, I thought I’d throw in a few ideas for Valentine’s Day gifting. (No clothespins, this time . . . but Stampin’ Up!’s clothespin embellishments would have looked great with these!)

Got any fun ideas for projects using clothespins? Share them with us below!
Cindy B.
Sr. Staff Writer
Stacked with Love Designer Series Paper Stack (item # 137779)
Basic Black Cardstock (item #121045)
White Stampin’ Emboss Powder (item # 109132)
Big on You Stamp Set (item # 137151)
Calypso Coral Pompom Trim (item # 137898)
Happy Easter Bunny Stamp (item # 137152)
You Plus Me Stamp Set (item # 138594)
Sale-A-Bration is more than just our biggest sales event of the year, it’s also the perfect time to introduce you to some of our newest products! We thought there was no better way to do that than by showing you just a few of the possibilities you can make with these fantastic new products. So without further adieu, we want to introduce you to this week’s Sale-A-Bration product of the week—the Lotus Blossom Stamp Set.
This gorgeous stamp set makes anyone feel like an artist in three quick steps. It creates a beautiful flower that looks painted, but it is amazingly easy. The individual stamps have a tab at the top to help you align them, and the tabs are numbered so you will know which part of the flower to stamp first, second, and third. Try playing around using one ink pad with the stamping off technique, or multiple different ink pads to create many different looks.


We want to thank our talented artists, Mary Ellen Byler and Sarah Klass. Show us what you have made with the Lotus Blossom Stamp Set by using #sabproductoftheweek on your favorite social network.
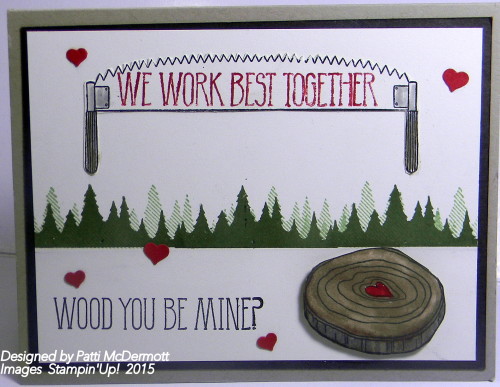
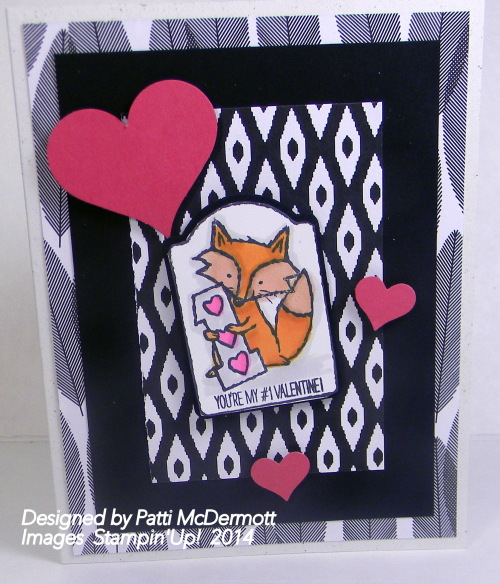
This is another Valentine made with the set, Wood you Be Mine, page 7 in the OC. I am in love with this set it is so versatile. I love the sentiments too. The hearts I punched out with the Confetti Heart Border Punch found on page 5. We have really covered Valentine’s Day, for you and yours, with our new Occasions catalog. Contact me HERE if you don’t have a catalog.
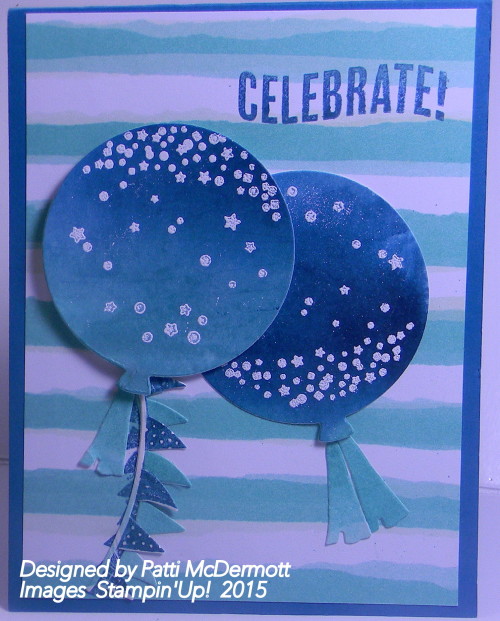
This is the neatest set, Celebrate Today found on page 11 of the OC. I used the DSP from SAB catalog (Best Year Ever, page 4) to go with it. I embossed in white, the balloons with a matching stamp and added Island Indigo with Coastal Cabana to deepen the color on the background. The balloons are cut out with the matching framelits, also found on page 11. You can get this stamp set and framelits at a 15% savings if you purchase the bundle. The DSP you can get FREE with a $50 purchase of merchandise before shipping and taxes.
|


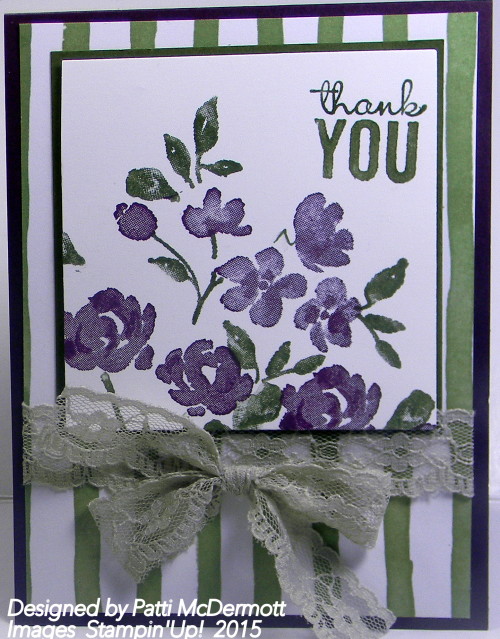
I love this stamp set called Painted Petals, page 19 of the OC. It looks just like it was water colored. I used the DSP call Painted Blooms (same page) that is shown with this set. Some of the DSP actually is painted on the paper and can be used all by itself, it is so beautiful! I also used our new lacey Trim, Sahara Sand found on page 43. I think it gives this card a vintage look. Love it!
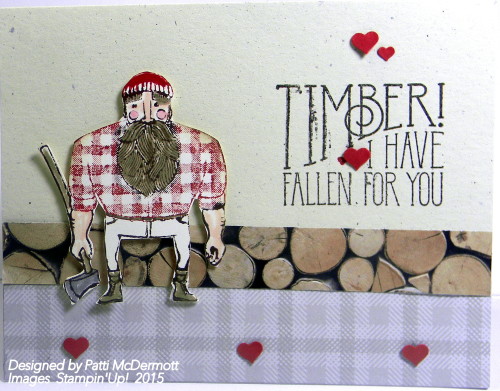
This set, Wood You Be Mine, is found on page 7 of the OC. It is so cool. I swear everyone has gone wild over this set. Of course you can use it for more than Valentine’s day. Father’s Day and Birthdays are also good choices. The DSP is from the paper stack called Adventure Bound found on page 40. Hope you like it!
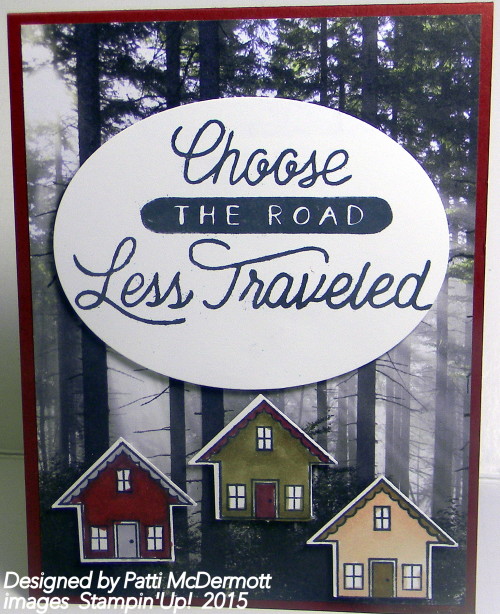
This set has the best sentiments. You can find it on page 41 of the OC and the background paper, Adventure Abound paper stack on page 40. I also used the SAB set, You Brighten My Day, found on page 11 of the SAB catalog. There is a matching punch called “What’s Up”, perfect for punching out the house on page 222 of the AC.
Better Than E-Mail
Have you ever wished for more Angel Policy* stamp options? Have you given us feedback saying that our Angel Policy stamp options are too limited?
Well, we listened and are excited to announce Stampin’ Up!’s January photopolymer stamp set, Better Than E-Mail—our newest Angel Policy stamp set! (What’s better than e-mail? How about a handstamped card, personalized tag, or handcrafted home décor gift?)
Once a month, Stampin’ Up! employees dedicate an entire day to being creative and innovative. In August 2014, Demonstrator Support discussed feedback and suggestions received over the past year regarding the need for more Angel Policy stamps. To meet this need, we challenged department members to come up with ideas that would be versatile and fun for demonstrators and customers.

Although this set was designed with the Angel Policy in mind, it can also be used in a variety of other ways. The images are so versatile! Check out the samples below to get your innovative juices flowing.

The samples above show these images on tags, cards, and envelopes. You can also see the images used with or without the Stampin’ Up! copyright.
What do you think about this new set? How do you plan to use it? We can’t wait to see what creative ideas you come up with!
* Stampin’ Up!’s images are copyrighted, which means that they cannot be copied without permission. To help protect that copyright, all items for sale using our images must be marked with an official Stampin’ Up! Limited License stamp set. Click here for more information about Stampin’ Up!’s Angel Policy.
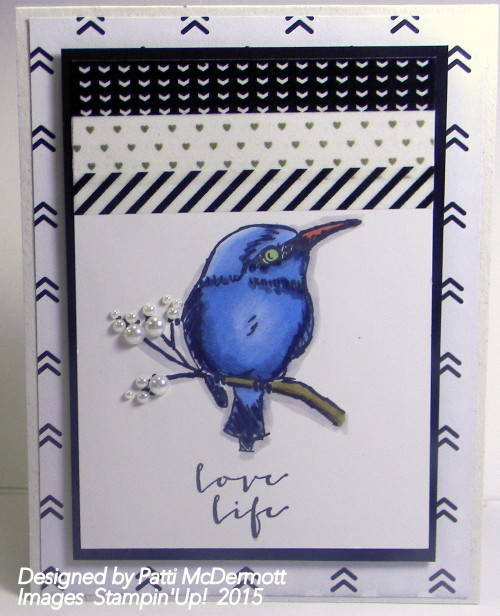
Love Life! I love this stamp set. If you are into our Blendabilities or our Aqua Painters, you will love using this set. It is one of my favorites from the SAB collection and can be found on page 19. I used the new Washi tape, Stacked with Love found on page 5 of the OC. I used Night of Navy to color the bird. Just another set you can get FREE during SAB. Good through March 31, 2015.
|
|
|
|
||||||||
|
|
|
|


I created this card using the stamp set on page 22 of the OC. There is so much you can do with this set. I have said this before but I love a stamp set that contains both images and sentiments. They are great for making a collection of all Occasion cards while you are traveling. A couple of clear blocks and some ink and you are good to go.
This is a really cool masculine card. I love this set on page 12 SAB, that you can get FREE with a $50 purchase. I used the Back to Black DSP and embossed with white embossing powder and then colored the embossed Celebrate with Pool Party Blendabilities. Hope you like it.

You can get this set, Best Day Ever, page 3 of the SAB catalog, or A Happy Thing, page 19 (SAB), FREE with a $50 purchase from any of our catalogs. Remember that when SAB is over, you will not be able to get these sets anymore, so if you want them, now is the time to get the ones you want.
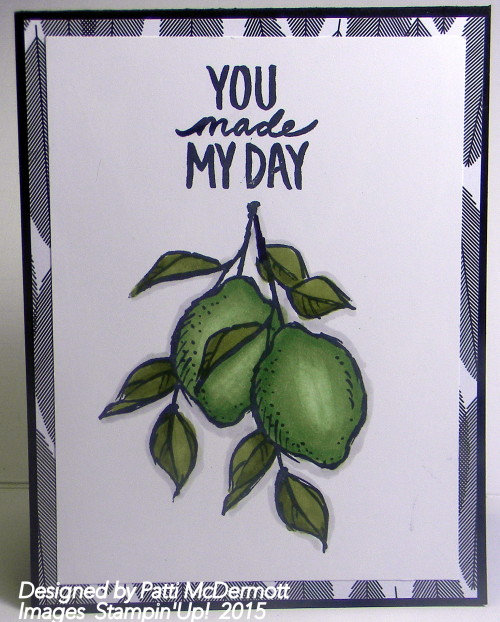
I thought I would go outside the box on this one and make them into limes instead of lemons. I used the blendabilities, Old Olive and Wild Wasabi to color them. The background paper is Back to Black.
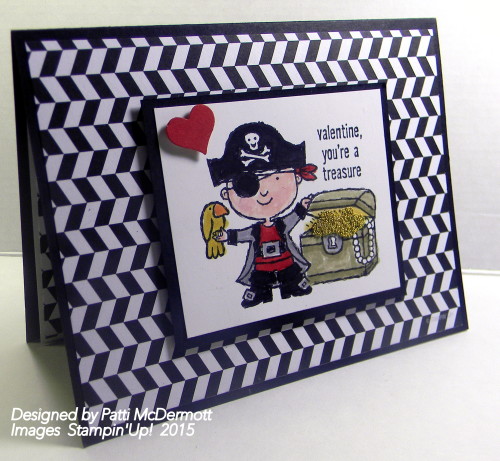
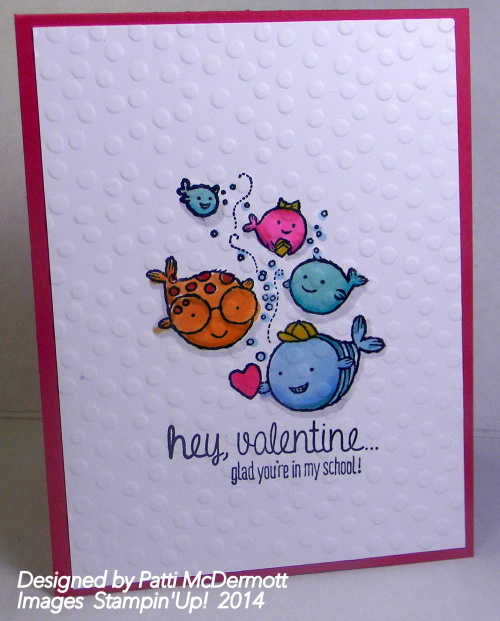
We made this card at my Wednesday morning Hostess club. Everyone loved it. This image is from the set “Hey, Valentine”, found on page 8 of the OC. I used the DSP, Back to Black, found in the Annual Catalog (AC). We colored this little guy with our Stampin’Write Markers. This is the coolest set if you have small children that need to have cards for their friends at school or to even for loved ones. I had some gold tiny beads left over from a project a few years back and added Crystal Effects to the gold in the trunk and then put the beads over it. Took about an hour to dry but I thought it was a cute effect.
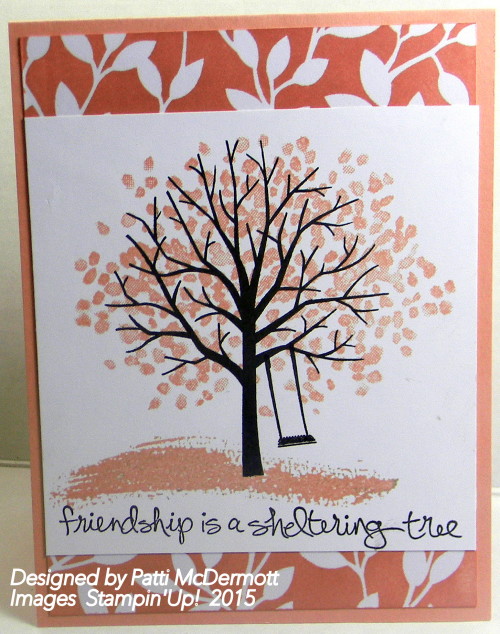
Does this stamp remind you of one we used to have a couple of years back. Cannot recall the name of it but I remember I was disappointed when they retired it. So glad they have come back with a similar stamp set. I used the Cantaloupe Crisp ink and Early Espresso ink for this card. What really sets it off is the DSP background paper, Irresistibly Yours, found on page 15 of the Sale-A-Bration catalog (SAB). It is a type of resist paper that has lovely patterns for every event. I used the Brayer to roll the ink on the background and then used a paper towel to remove the ink that laid on the top of the resist.
This is one of the first sets I purchased from the new Occasions catalog (OC). You can find it on page 6 and the DSP is from Stacked with Love on page 5. I used Melon Mambo Ink and Black Mememto ink. Very simple card yet so pretty. What do you think?
|
|
|
|
||||||||
|
|
|
|


I created this card from the same stamp set that I previously use, Hey Valentine, on page 8 in the SC. It is so stinkin’ cute. So easy to use with either Blendabilities, our markers, or our aqua painters. I love stamps that have good lined images so I can color them in myself. So much fun and wonderful therapy. I punched the image out with our Note Tag punch which is carried over from the HC. See page 49 for other items that have been carried over.
Isn’t this a pretty card? This set from the SC, page 26, can be purchased with the bundle and a 15% discount. The butterfly thinlit dies are awesome! You will flip over them. I certainly did. I didn’t use them on this card but keep posted as I will be using them soon. This set is the BOMB!

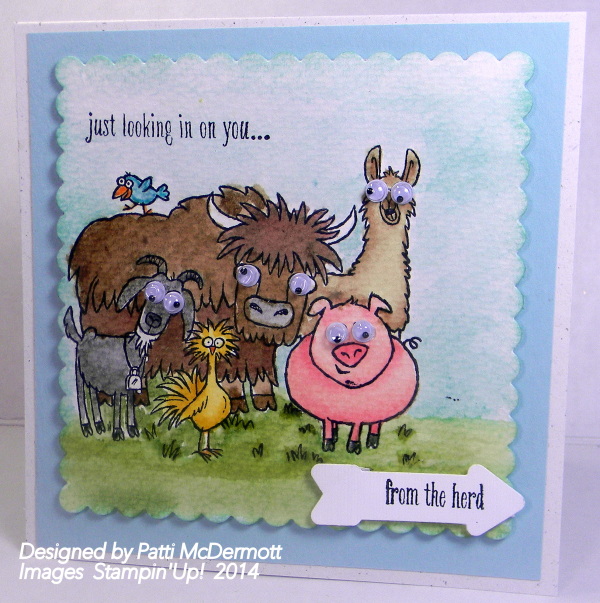
This card I created using the new set, From the Herd, found on page 15 of the SC. I made it for one of the ladies I do Water Aerobics with so we could all sign it. I think she will get a kick out of it and hopefully it will boost her spirits. She is going through Chemo so your prayers are welcomed.
Well if you have the new spring catalog (SC), you know this is one of the sets from that catalog. This is a great stamp set, not only for children but for adults. I used the blendabilities on this card and ran it through the embossing folder Decorative dots. This set can be found on page 8 of the SC.
I hope all my stamping friends have a wonderful and prosperous New Year.
I am really looking forward to all the new stuff SU has in this new SC. This set, Lotus Blossom, can be found in the Sale-a-Bration catalog. You cannot buy this set but you can get it FREE with a $50 purchase of merchandise from any of our current catalogs. This is kinda like a 3 step stamping and so much fun to play with. I tried all of our colors and it looks great with most of them. This is one of those stamps sets where you go from Dark to light, in stead of light to darker, like you did with our 2 step stamping.
FAUX RUSTED METAL EMBELLISHMENTS

I love all things shabby and vintage, and although this passion doesn’t surface much in my papercrafting projects, it’s always fun to play. A little while ago I visited an absolutely fabulous salvage yard where I found loads of rusted metal filing cabinets, signage, and almost anything else you could think of. My mind was spinning! How could I translate these beautiful, rusty, and worn pieces into my papercrafting? Well, after a little bit of thinking and a lot of playing in my stamp studio, I’m ready to show you how you can transform a simple piece of paper into ultra-fab, faux rusted metal embellishments. And, of course, what better way to show you than with a video tutorial?

For the faux rusted embellishment on this card I used the Sweetheart Punch and punched out six hearts from Basic Gray Cardstock. I then glued them one on top of another to create a thick embellishment that would look more like a real chunk of metal.

When creating a faux rusted embellishment that has some dimension (like this fabulous 3D star!) make sure you do all of your scoring and folding before you begin applying the layers of ink and embossing powder.

Want to create a faux rusted metal stamped image? Easy! Stamp on top of faux rusted metal using the Jet Black StazOn Ink Pad. Now you can create faux rusted metal images with all of your favorite Stampin’ Up! stamps! Oooh . . . I need to try flowers next!
I hope you’ll give this technique a try!
Allison Okamitsu
2014–2015 Artisan Design Team
Sweetheart Punch (item # 133786)
Basic Gray 8 1/2″ x 11″ Cardstock (item #121044)
Metallic Gold Encore Pad (item #132141)
Cajun Craze Classic Stampin’ Pad (item #126965)
Soft Suede Classic Stampin’ Pad (item #126978)
Gold Stampin’ Emboss Powder (item #109129)
Pool Party Stampin’ Emboss Powder (item #129398)
Heat Tool (item #129053)
Stampin’ Sponges (item # 101610)
YOU TUBE VIDEO HERE:
https://www.youtube.com/watch?v=tqCOLsa45PM
|


Hey Stampers, I am sure by now you have ripped opened your gifts, you are still stuffed from Christmas dinner (like me maybe? planning to join Weight Watchers after the 1st), and enjoying your friends and family this blessed time of the year.
Well, I am going to enjoy my time with my family and then be back to business, posting on a daily basis, as soon as possible. Have fun. Hopefully y’all got some nice SU surprises under the tree! Have fun and keep in tuning in!
Wishing y’all a blessed Christmas. If you are driving to be with loved ones, safe travels.
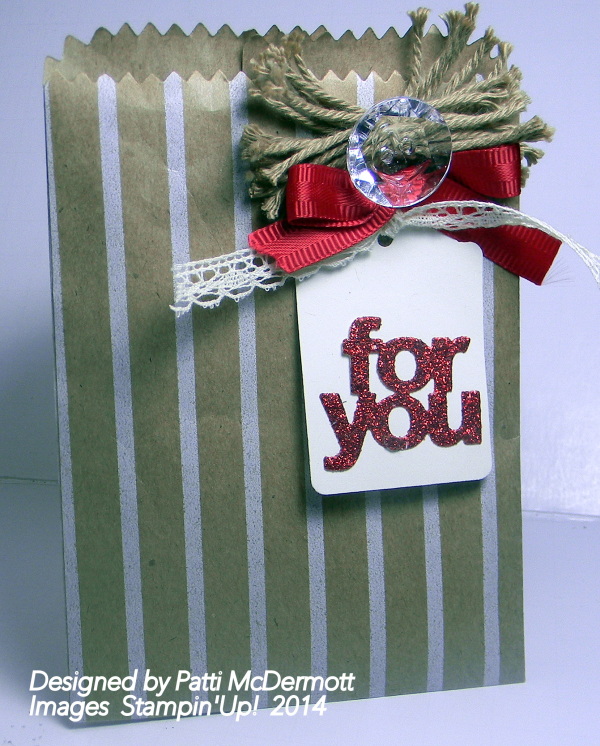
This is a little gift bag made with our new Mini Treat Bag framelits. You can find them on page 9 of the Spring Occasions catalog! I made this with our gorgeous wrapping paper found in the Holiday catty on page 10. This craft paper is so pretty and it’s reversible so you can stamp the other side if you prefer.
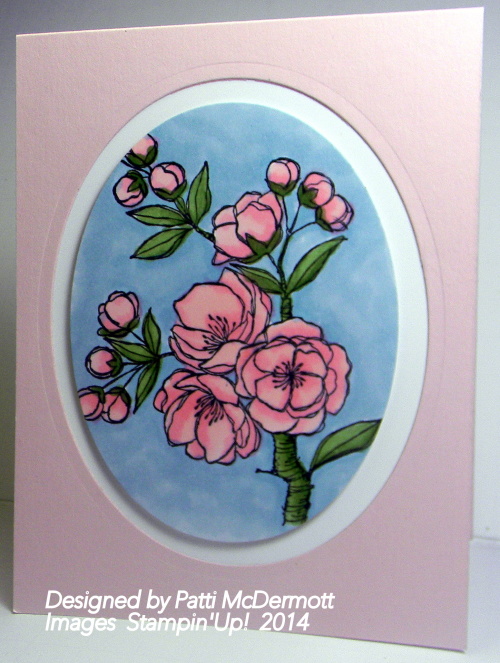
Again this is from the new catty. It is specifically an Easter Stamp set but you can use flowers for anything, right? I used our very new Blendabilities on this card. You will love our new colors. This is soft Sky, Wild Wasbi and Pink Pirouette inks. I also used our Oval Framelits on this card.
|
|
|
|
||||||||
|
|
|
|


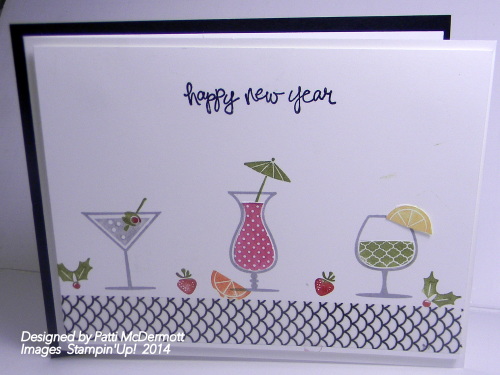
Just in case you got too busy to make and send out cards for Christmas, why not send them for New Years? This is a really cool set that we have had for a long time and can be found in the Annual catalog on page 135, Happy Hour. So versatile and can be used for a variety of events.