FREE SHIPPING April 6-10

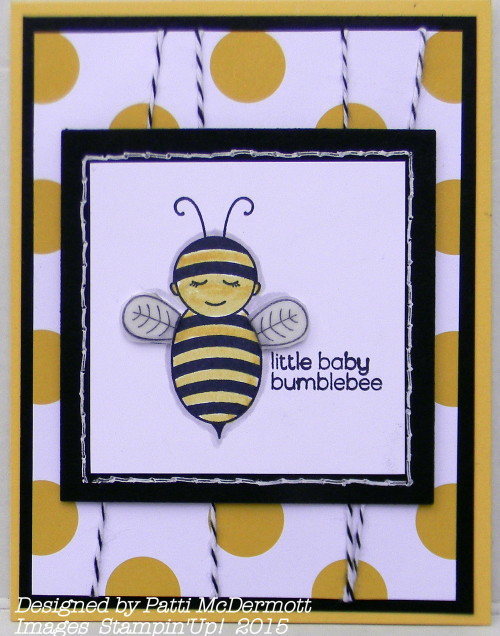
I love this little bumble bee. It is so stinkin’ cute. You can find it in the OC on page 39 along with all the other stuff for baby. Only stay tuned, I will be using it on all different projects other than babies. It is so awesome, all the DSP, the washi tape, buttons and ribbon.
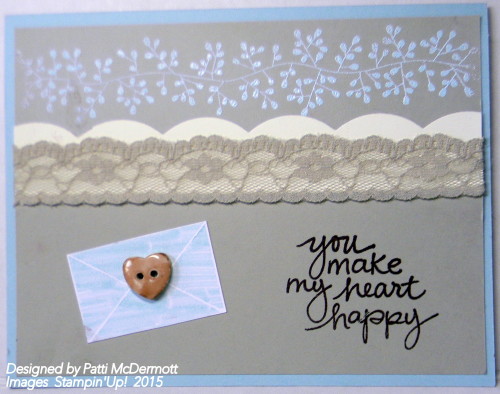
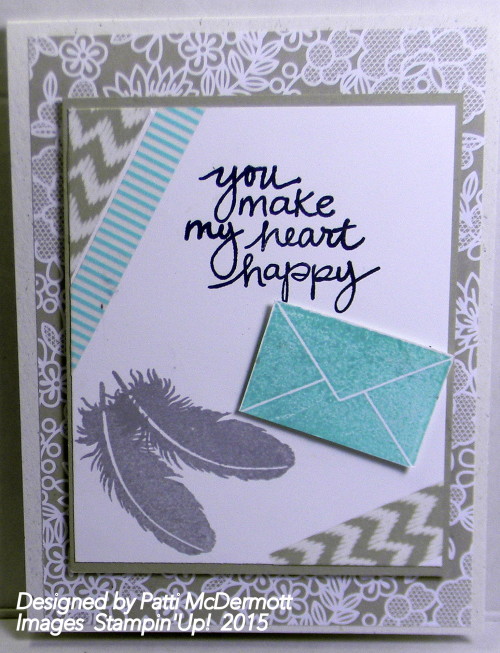
This set has the best sentiments and I love the script they used. You have probable noticed how much I have used this set. It is the Photopolymer set for March 2015 and still available #140594. I embossed the vine (Bordering Blooms, page 162 in the AC) with Pool Party EP. The beautiful accessories on this card can be found on page 39 & 43 of the OC. I colored the heart button with Alcohol Inks (Sharpies).
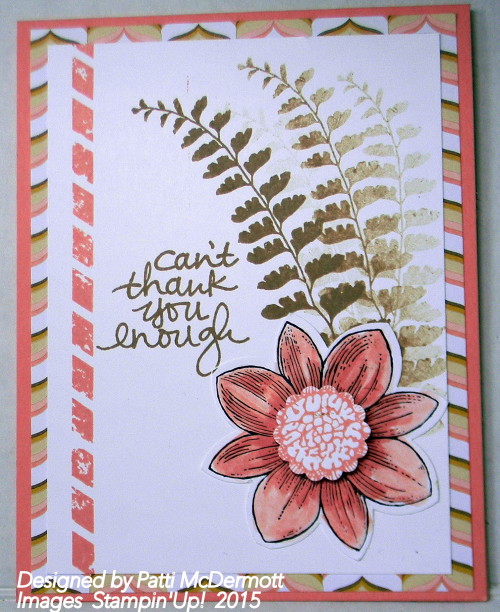
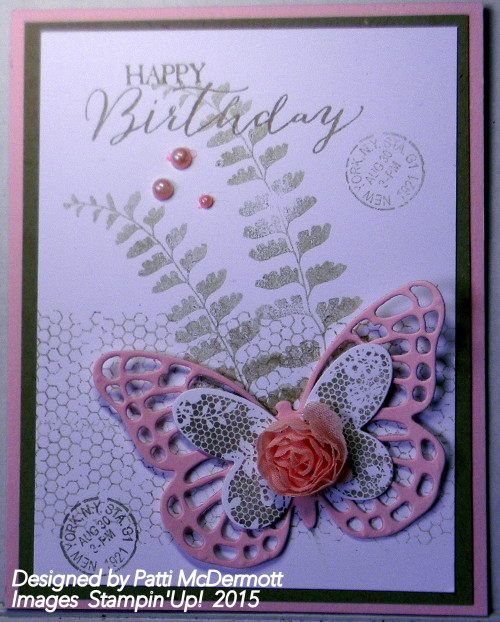
This card was created using the set Petal Potpourri with the matching Flower Medallion Punch, found on page 23 of the OC. I used the Butterfly Basics set also in the OC with Crisp Cantaloupe and Baked Brown Sugar inks. I am going to be sad to see these colors go when the new Annual catalog comes out in June. DSP is Lullaby on page 187 of the AC.
Do you struggle with how to use the Project Life cards? Do you have a collection of cards that you haven’t even opened yet? Hopefully I can inspire you to open up your package and put it to good use! I love how versatile the Love Story Project Life Card Collection by Stampin’ Up! (item # 135308) is! These cards are in shades of white, gray, and black.


After creating this collection of cards, I definitely had a few favorites. I bet you have a few favorites, too! These are mine.

Now that I have this collection of cards, I’m ready to create whenever I feel inspired—whether it’s a Project Life page, a card, or a pretty tag for a gift. I hope you feel inspired today to put your hands to paper and create!
Sarah Sagert
2014–2015 Artisan Design Team
Not too early to start thinking about those May graduations coming up. I used the Stamp set, Celebrate Today found on page 11 of the OC. I also used the matching framelit dies also on same page. You can get both of these items for 15% off regular price by purchasing the bundle. Such a great deal for such a versatile set.

Although you cannot get Sale-A-Bration items anymore, you can always used ideas. Please enjoy!


|
|
|
||||||
|
|
|
||||||
|
I really like the Hooray, It’s Your Day Card Kit (item # 139166). The colors are so bright and fun, the masks are great (and can be used long after the kit has been assembled), and I love the “hello” wood elements.

Many creative people, including myself, often push the boundaries of creativity to make something unique. Here are a few additional ideas to spark YOUR creativity.
First of all, I used the mask on a notecard and added my own tag. I wanted to make a card for another occasion other than a birthday. There are lots of greetings from Crazy about You Photopolymer Stamp Set (item # 137137) that work great with the “hello” element. A few Strawberry Slush sequins from the 2013–2015 In Color Sequin Assortment (item # 133631) make this happy card really shine.
Next, I used the starburst mask a second time on our Polka Dot Kraft Tag a Bag Gift Bag (item # 135503) using Whisper White Craft ink (item # 101731). This is a fun way to use the coordinating stamp set and elements from the kit to wrap up a small gift or treat.

Lastly, I turned the kit’s matchbook card into a little gift box. To create the box, I scored the card back in half at approximately 2-11/16″. Then I created a second score line on the card front at 2-11/16″ from the original score line. This creates a four-sided box, open on both ends.
I created “ends” on my box by cutting two squares at 3-11/16″; then I scored at 1/2″ on all four sides. I attached the ends’ inside flaps on all sides (except the top flaps). This allows my box to open. Use the edge of the card with the closure for the front of the box.

Whether you need to give a gift, a card, a treat, or just say hello, there are so many ways to show you care with Hooray It’s Your Day!
I love giving handmade cards. I especially love the “Wow, how did you do that?” factor.
And I wish I could always make cards from scratch, but sometimes I just don’t have the time. That’s one of the reasons I’m so happy that Stampin’ Up! offers card kits.
One of my recent favorites has been the Hooray It’s Your Day Project Kit (item # 139166). This kit is an amazing value. You get all of the paper supplies you’ll need to make 20 cards, five each of four designs.
The kit also includes cardstock envelopes (they’re so bright and beautiful!), two spritzing masks, and two Stampin’ Spritzers. (The masks and Stampin’ Spritzers can be used over and over even after you finish making everything in your kit.) In addition to what the kit comes with, you’ll also need scissors, ink, adhesive, and the Hooray It’s Your Day Photopolymer Stamp Set (item # 137164).

Just because the cards are designed doesn’t mean you have to make them the way they’re featured! For instance, I love spritzing, but I need to be in the right space (literally) to do it. So . . . I decided to use Sponge Daubers (item # 133773) this time. I also used a few other products I had lying around, but I didn’t stray too much from the kit. Here’s what I came up with!


I also love all the cool folds featured in this kit!


I feel so much better about giving a gift card when it’s enclosed in a cute, handmade card!
So, buy this kit today, get down, and get inky! You’ll have so much fun . . . I promise!
Andrea W.
Demonstrator Training

When I was in Taiwan last year, we had the chance to make cute miniature clay figures. I wanted to make some more of them but I didn’t have clay. Then it hit me—the Simply Pressed Clay (item # 130685) would be perfect! The best part is that I can color the clay using Classic Stampin’ Ink Refills to create any color I want.

These little bears are super-easy to make. Just form the clay into simple shapes to build the bear. There is no glue holding the bears together—the clay simply sticks to itself. If you find that the clay has already dried a little before you put your critter together, a quick swipe of an Aqua Painter will do the trick to make the pieces stick together.

These bears are so cute! They would be perfect for a little one’s birthday, a baby shower, or “just because.” The colors in the Sweet Dreams Designer Series Paper(item # 137782) complimented the colors of the bears for an easy banner that could be customized for any occasion with the Skinny Mini Alphabet Stamp Set (item # 133665). So, what critter are you going to make with Simply Pressed Clay?
Kaitlyn Zumbach
2014–2015 Artisan Design Team
Sale-A-Bration is more than just our biggest sales event of the year, it’s also the perfect time to introduce you to some of our newest products! We thought there was no better way to do that than by showing you just a few of the possibilities you can make with these fantastic new products. So without further adieu, we want to introduce you to this week’s Sale-A-Bration product of the week—the In Color Accessory Pack.
Combine buttons and twine for a real good time! The exclusive, limited-time In Color Accessory Pack gives you 25 yards (total) of Thick Baker’s Twine and 30 buttons (total) in our 2014-2016 In Colors: Blackberry Bliss, Hello Honey, Lost Lagoon, Mossy Meadow, and Tangelo Twist. Accent your projects, add bows to your packages, and revel in our sweet In Colors!


We want to thank our talented artist, Janet Wakeland. Show us what you have made with the In Color Accessory Pack by using #sabproductoftheweek.
|
|
|
||||||
|
|
|
We demonstrators try to get together every couple of months and do what we call a SHOE BOX SWAP. It is a sort of make and take that everyone brings so that we can all have hands on experience making a card designed by each demonstrator. It is pretty amazing what all the demos come up with and tons of fun.
This month’s shoe box was catered by one of the Demos who also caters on the side along with being a flower designer for a local florist shop. She is also an incredible artist and designs the coolest cards. I have all her information if you are interested in having someone create the perfect wedding, Anniversary or birthday celebration.
This card below is my contribution to the shoe box.
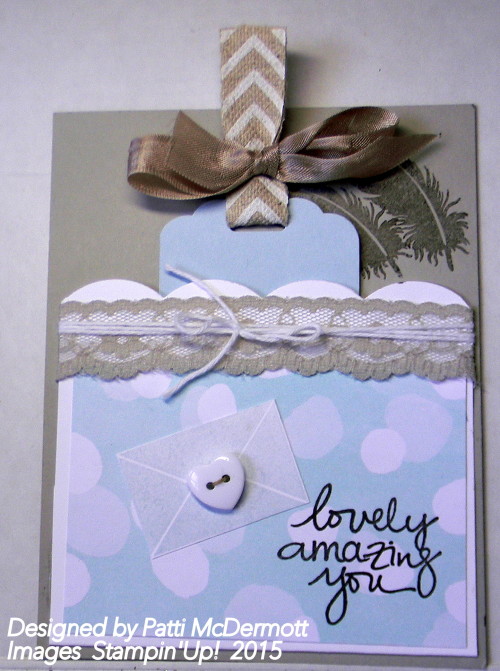
I got the inspiration for this pocket card from a card designed by Pamela Subjek, another fabulous Demonstrator. She used her card for our shoe box swap for Demonstrators held every couple of months and I fell in love with it as soon as I spotted it.
I did use quite a bit of embellishments on this card. However, I think it turned out pretty well. The colors I used were Sahara Sand, Soft Sky and crumb cake. The stamp set I used is Lovely Amazing You, and the DSP is from SAB, Best Year Ever. You can still get that DSP FREE with a $50 purchase until the end of this month. Contact me here if you need a catalog. Thank you Pamela for your wonderful inspiration.
Who has all the time in the world to craft whenever they want?! (Anyone raising their hand?! Anyone?!) I know I certainly don’t! As a mom to three young children, my time is very limited. But creating is important to me, so I make it happen. And when I do create, I make it count.
I LOVE using Stampin’ Up! kits. They make things fun, easy, and quick. AND I get to create something beautiful! What’s not to love?
For my latest kit creation, I used the Stampin’ Up! Chalkboard Banner Kit (item # 133795). I LOVE banners. They make my heart happy. I love hanging them from my mantel, and I have been trying to make one for each occasion. Remember those three kids I mentioned earlier? Yeah . . . well I don’t always get my banners made. So I sat down with the Chalkboard Banner Kit one day to figure out a way to make that kit work for me all year long. And VOILÀ! My All-Occasions Chalkboard Banner was created!

I chose the word “family” for this banner because that is definitely a word that goes with any occasion. Then I added interchangeable banners on each end of the word with a clothespin.

So now I can EASILY change my banner for any occasion! No re-stringing the banner and no making a new banner. Just unclip the last occasion and clip on the new occasion. Easy, peasy.

The Chalkboard Banner Kit truly is AMAZING! It comes with SO MUCH product and the colors in the kit are so bright and cheery. And here’s the best part: the kit can be used for all occasions. This specific banner was designed using just half the kit! All I added was a bit of coordinating cardstock (in the kit colors), some ribbons, and the clothespins.
I hope you love this project! I’m hosting a night at my house with some friends and we’re all going to make it. You should make one, too! Everyone needs one of these in their home!

Look how happy and special my sweet daughter felt on her birthday to have the birthday banner up!
Ashley V.
Stampin’ Up! Demonstrator
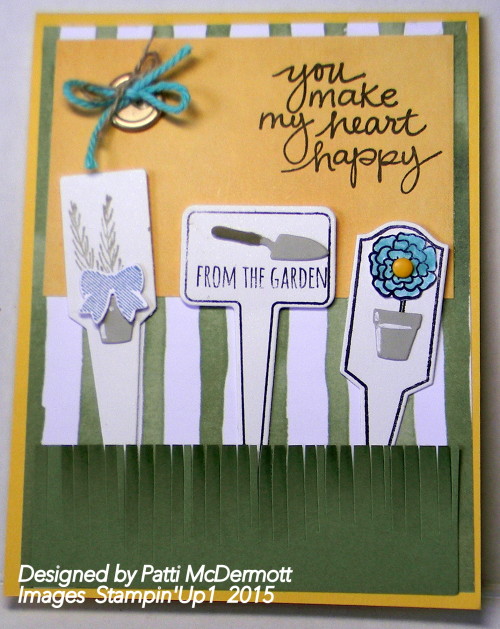
I created this card with the stamp set From the Garden found on page 20 of the OC. I used the matching Framelits also on page 20 to cut out the images. So much fun. Right now you can get this as a bundle and receive a 15% discount. Pretty versatile set.
In addition, I used this month’s new photopolymer set, Lovely Amazing You #140594 for the sentiment. Love the font on this set.
Sale-A-Bration is more than just our biggest sales event of the year, it’s also the perfect time to introduce you to some of our newest products! We thought there was no better way to do that than by showing you just a few of the possibilities you can make with these fantastic new products. So without further adieu, we want to introduce you to this week’s Sale-A-Bration product of the week—the For Being You Stamp Set.
Share big thanks with the oversized sentiments in the For Being You Stamp Set. This stamp set is perfect for use with gift tags or packaging, as well as cards, scrapbook pages, and more! Layer the images, then color. This stamp set also coordinates with the Hearts Border Punch (AC p. 222), making it simple to punch out rows of adorable little hearts.


We want to thank our talented artists, Winona Semler and Stampin’ Up! Show us what you have made with the For Being You Stamp Set by using #sabproductoftheweek.
Sale-A-Bration is more than just our biggest sales event of the year, it’s also the perfect time to introduce you to some of our newest products! We thought there was no better way to do that than by showing you just a few of the possibilities you can make with these fantastic new products. So without further adieu, we want to introduce you to this week’s Sale-A-Bration product of the week—the For Being You Stamp Set.
Share big thanks with the oversized sentiments in the For Being You Stamp Set. This stamp set is perfect for use with gift tags or packaging, as well as cards, scrapbook pages, and more! Layer the images, then color. This stamp set also coordinates with the Hearts Border Punch (AC p. 222), making it simple to punch out rows of adorable little hearts.
Sale-A-Bration is more than just our biggest sales event of the year, it’s also the perfect time to introduce you to some of our newest products! We thought there was no better way to do that than by showing you just a few of the possibilities you can make with these fantastic new products. So without further adieu, we want to introduce you to this week’s Sale-A-Bration product of the week—Nature’s Perfection Stamp Set.
Nothing is more perfect than nature. Share that perfection with the Nature’s Perfection Stamp Set. This five-piece set coordinates perfectly with our Sheer Perfection Designer Vellum Stack (Item 138639) and is ideal for coloring. You can also easily punch out the butterfly image using the Elegant Butterfly Punch (AC p. 219).


We want to thank our talented artists, Patty Bennett and Sharlene Meyer. Show us what you have made with the Nature’s Perfection Stamp Set by using #sabproductoftheweek.
|
I’m old. There, I said it! I don’t always love the aches and pains that come with getting older, but I do have an appreciation for my age. I especially like to gather with my long-time friends on occasion to chat and catch up on life. We talk about the good, the bad, and definitely the ugly, but we always end up laughing together.
I designed the Just Kidding Stamp Set to honor my incredible friends . . . and to share with you some of the things we say to keep each other laughing and enjoying the journey of life.

I hope you have an amazing set of friends like I do and that you’ll enjoy creating projects with this stamp set—to help them when they’re feeling discouraged, or are celebrating their 29th birthday for the 30th year in a row, or just when they need a laugh!
Kathy P.
Lead Illustrator
Many of you may already be aware that we have experienced a quality issue with our Blendabilities product line, and we thank you for your patience as we’ve worked through this sensitive matter.
We’ve done everything possible to work with our manufacturer; unfortunately, with no solution in sight, we’ve had to make the difficult decision to discontinue this popular product line.
We have provided you with a Q & A in the hopes that this will answer any questions or concerns you may have.
Thank you for your support as we continue to look for products that will meet our customer’s needs and provide you with the quality that you have come to expect from Stampin’ Up!
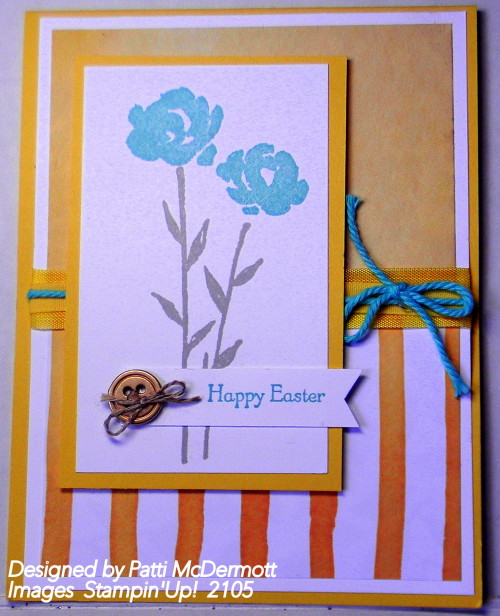
I created card using this month’s new Photopolymer stamp. It will only be available while supply last. The item number is posted above if you feel the need to order. Don’t wait too long, you know how that goes.
I used the washi tape from Sweet Dreams on page 39 in the OC, Coastal Cabana Ink with Sahara Sand. I love this combination together. In addition, I used the DSP Something Borrowed on page 42.
I thought you may be getting tired of the DSP, Something Borrowed, although, not me, it is my fav in the OC. This DSP is Back to Black, in the AC, page 187. I used the border stamp from Butterfly Basics and the sentiment from Build a Bouquet found on page 29 of the OC.

I was inspired to create this card from a video that, our Co-Founder, Shelli Gardner created at Leadership. I changed it up a bit and except for lining up the washi tape, the card is pretty simple. This washi tape can be found on page 39 of the OC and the sentiment is from Painted Petals, page 19.
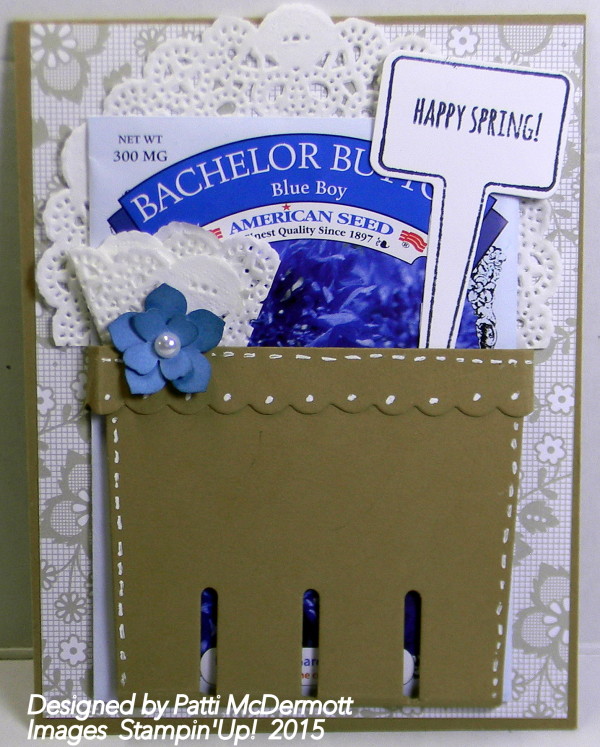
Last Thursday it was 82º and it was so beautiful outside. I said “Thank You Lord for this beautiful weather.” However, the next day the temp drop 40º but I know it’s not going to stay cold for very long. Spring and Summer is my favorite times of the year. I can’t take the cold weather….I need heat!
I guess that is why I just had to have this new Berry Basket Die, page 21 of the OC, the stamp set, From the Garden, page 20 with the matching Framelits. I used the DSP Something Borrowed, page 42, Baked Brown Sugar Card Stock and the white gel pen. This keeps the thought of spring around the corner.
|
|
|
|
||||||||
|
|
|
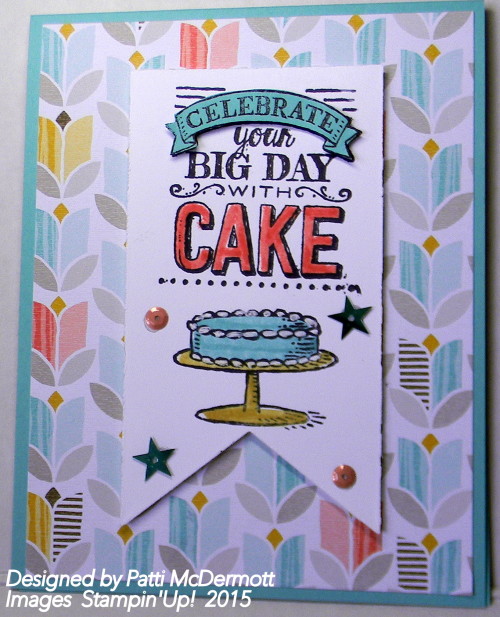
You can get this beautiful DSP or this fantastic stamp when you spend $50 on merchandise through the end of this month. In fact with $100 order you can get them both. The paper is Best Year Ever on page 4 of the SAB catalog and the stamp set, Big Day, is on page 12. Contact me HERE if you need a catalog.
I have lost track of how many cards I have designed with this set. It has to be the most versatile set ever. I used Pink Pirouette and Crumb Cake. I colored the pearls with Pink Pirouette Blendabilities. This is one of the cards we made at the last camp. Everyone loved it, hope you do too!
WARNING: I had something happen with this set. The little stamp that says New York is gone. I think I threw it out with the trash when I cleaned up the dinning room table. It is so small that it is easily missed so be careful when you are stamping with these little stamps, especially if they are photopolymer. I love this set so much I will buy another one because I have to have that missing stamp.
The flowers on this card were from the Crazy About you Set on page 31 in the OC. I used Lost Lagoon and punched them out with the Scalloped Circle punch and the new punch, Flower Medallion, on page 23. The DSP is Something Borrowed on page 42. The sentiments are from Indescribable Gift, page 35.
 By now you know all about Sale-A-Bration—the best time of the year at Stampin’ Up! But, have you heard about the easiest way to earn your FREE products? With just one purchase, you’ll receive three months of total papercrafting paradise and a free product!
How might you ask? It’s easy—with a 3-month Paper Pumpkin Prepaid Subscription. It gets even better because right now it’s on sale for just $54.85 USD/$68.85 CAD—the perfect price to instantly qualify for your free product.
If you haven’t subscribed to Paper Pumpkin yet, here are a few things you’ve missed:
It’s never too late to get in on all the fun!
But why limit yourself to just three months? With a 12-month prepaid subscription you’ll save $2 every month (that’s a free month every year), get FOUR free Sale-A-Bration products, host dollars, and 12 whole months of skipping to the fun!
Sale-A-Bration is more than just our biggest sales event of the year, it’s also the perfect time to introduce you to some of our newest products! We thought there was no better way to do that than by showing you just a few of the possibilities you can make with these fantastic new products. So without further adieu, we want to introduce you to this week’s Sale-A-Bration product of the week—the Sheer Perfection Designer Vellum Stack.


We want to thank our talented artists, Patty Bennett and Sharlene Meyer. Show us what you have made with the Sheer Perfection Designer Vellum Stack by using #sabproductoftheweek.
|
|
|
|
||||||||
|
|
|
|