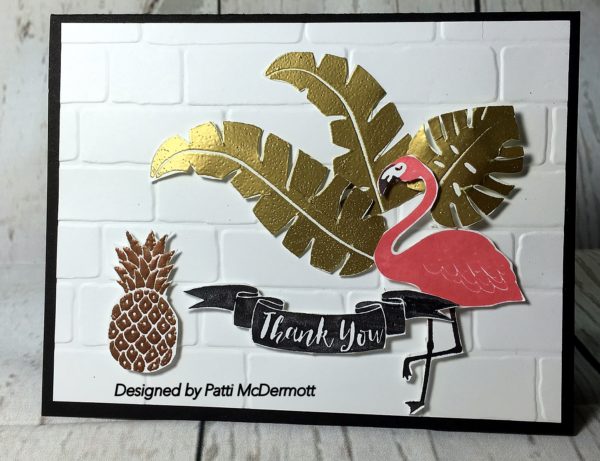
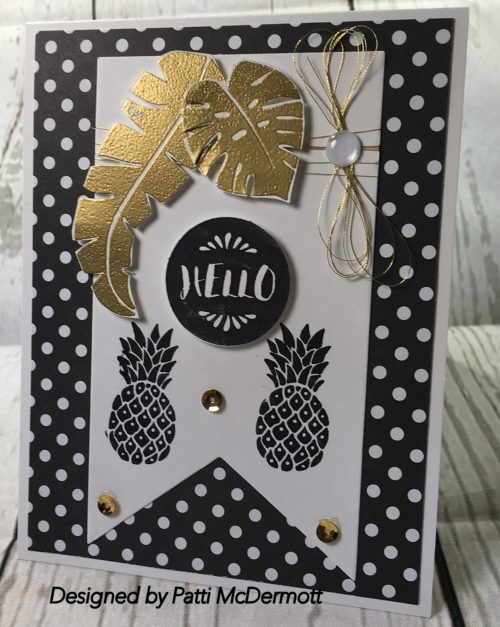
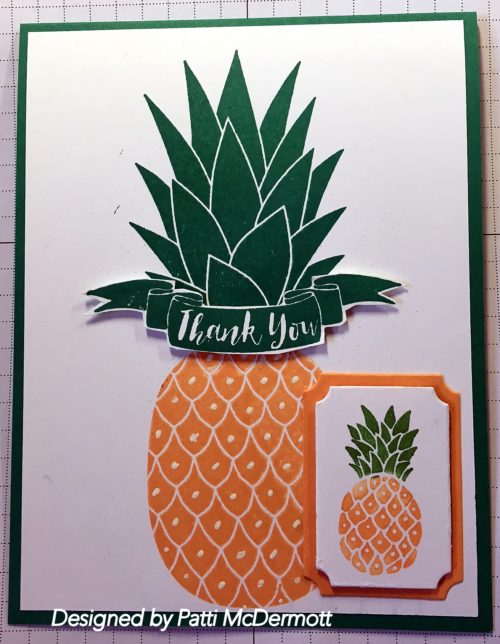
On this card I used both gold and copper embossing. I am so glad that SU came back with copper embossing powder. I used it on the pineapple. This set, Pop of Paradise, page 85 in the new AC is so adorable. I used the new in-color Flirty Flamingo on the bird, and the background I used the embossing folder, Brick Wall, page 195, in the new AC.
")
You have lots of men in your life and lots of reasons to celebrate them! All you need is a little help—the Many Manly Occasions kit will definitely get the job done. Our Paper Pumpkin subscribers are all set for Father’s Day, birthdays, or any day that ends in “y.” The laser-cut cards, corrugated cardstock, and epoxy star stickers work together nicely to create a simple, understated masculine vibe. There are stamps for brother, dad, grandpa, uncle, son, friend, and love.

But, you know we never stop at the intended use projects. We love to give you even more ideas for your kits—it’s just how the Paper Pumpkin rolls.

First up, here’s a bold birthday card that brings that corrugated cardstock to the forefront. Use the supplies right from the kit to recreate this card.

Next, we used the Butterfly Thinlits Dies to cut out a beautiful butterfly. Again, we brought that awesome orange corrugated cardstock front and center. Isn’t it lovely?

This next project proves that you can have your cake and eat it too (because it says so—right on the tag). With the Cutie Pie Thinlits Dies, you can make easy, adorable gifts for all your friends. Talk about a piece of cake!

You’re all set for every occasion headed your way. We can’t wait to see what you create with the #ManyManlyOccasionsKit. See the full kit in action on our YouTube channel, and order your refills, while supplies last.
This is one of the nicest sets in the new upcoming catalog. Pop of Paradise is another versatile set with both images and sentiments and can be used in a variety of ways. This card I created also has some of the Botanical Blooms, also carried over to the new catty. There are no thinlits with this set but it is easy to fussy cut the leaves if you want to add a little demension, as I have here. I used the new incolor, Flirty Flamingo, Old Olive and Very Vanilla.

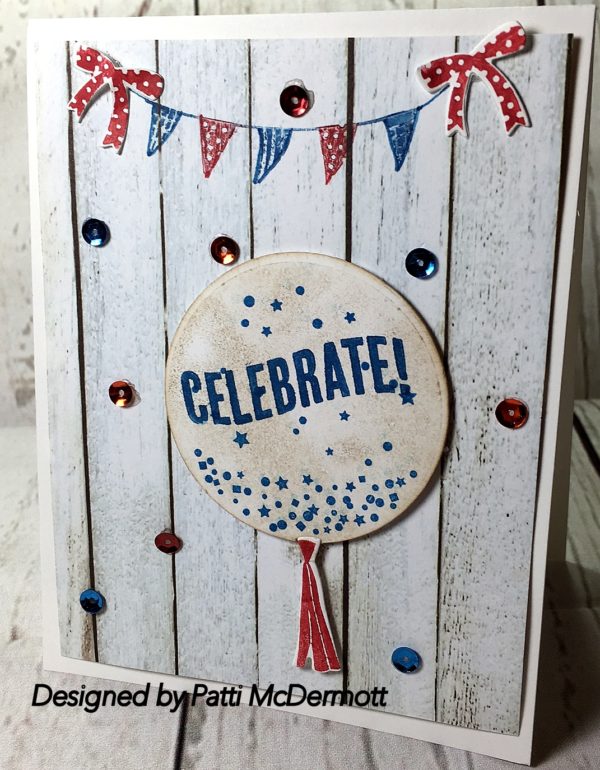
I created this card with the set Celebrate Today, page 102 AC, and used the Colors Real Red, Whisper White and Pacific Point. My favorite colors for a patriotic theme. I also used the bright sequins to embellish a little more. Right now you can buy this set as a bundle saving 15% from the current catalog. However, with the new catalog of June 1st you will not be able to bundle this set and must buy separately. This set and the balloon framlits have also been carried over.
 C
C
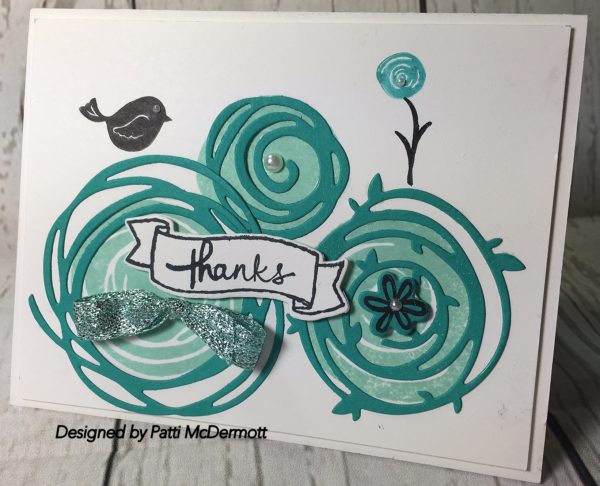
Yesterday the card I posted was made with this same set. As I mentioned it can be purchased as a bundle with the Thinlit dies, Swirly Scribbles. I have used them in this card, along with the cute little bird. This is also a Two Step stamping set. The possiblilites are endless with this set.
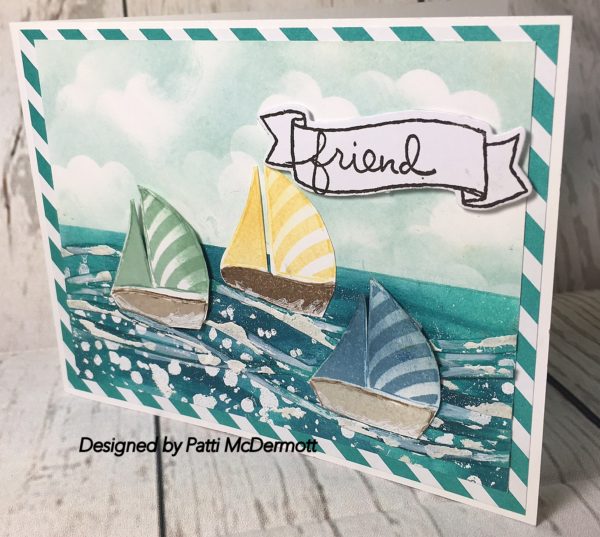
Another set from the new catalog, Swirly Birds which can be purchased as a bundle at a discount. You can make so much out of this set because it is so versatile. Here I made the sail boats. The sentiment is from Endless Thanks, a carried over set.
Brandy is our newest million-milestone achiever, and we’re so excited to welcome her to an elite group of demonstrators! Brandy is humble enough to tell you this milestone is an entire family effort. She’ll also tell you her husband is her partner in business. I’ll never forget meeting him on the sidewalk one year at convention and how he couldn’t stop bragging about her…so sweet! We’re looking forward to spending time with Brandy and Doug when they come to celebrate.
For those of you who know Brandy, you recognize that this over-the-top card Sara and I sent her matches her personality—bright and cheerful! Congratulations Brandy and big hugs for an incredible accomplishment!


Thank you Shelli and Sara for this FABULOUS and BEAUTIFUL card!!! Its amazing and absoultely perfect!!! Thank you for all the love and kindness you’ve shown my family and I.
Yes, my hubby he was so proud to have met Shelli before me… but he was too nervous to ask for a selfie. Lol!!!
I feel honored and so Blessed to be apart of something bigger than us all. Thank you for all you do… you give all demonstrators the opportunity to find joy in paper crafting, sharing and creating. Thank You!!
Beautiful Card for Blooms and Butterflies!!! Yay!!!
Artisan Design Team member:
With June just around the corner, I’ve got Father’s Day on my mind. It’s a holiday that many paper crafters struggle with, as masculine cards can be a challenge for us all!
One of my favorite stamp sets for occasions like this is Guy Greetings (item 137178), and I’m SO glad to see that it’s not on the retiring list! I wanted to share some cards with you to inspire you to create for the men in your life. With that said, I’m also a big believer in first impressions, and that’s what your envelope is for—so let’s fancy that up a bit, shall we??

When I found my much-loved Typeset Designer Series Paper (item 133704) on the retiring list this year, I decided I was going to work to use it all before it expired. I really wanted to give it some extra love one last time! It’s a brilliant vintage, classic, neutral paper and it pairs so well with the fabulous vintage images in Guy Greetings. Using the Envelope Punch Board (item 133774), I whipped up an envelope with one of the sheets to add an extra-special touch.

Many of us give gift cards to the men in our life because (let’s face it!) they can be a bit difficult to buy for. Luckily, the measurement table on the Envelope Punch Board goes all the way down to gift card size! Using the beautiful striped paper in the Neutrals Designer Series Paper Stack (item 138435), I created a tiny, little envelope. (Tip: If you don’t like the other side of the paper—I found the florals on the other side decidedly unmasculine!—you can cut and score two pieces of paper and glue them back-to-back to create your choice of print for the inside.)

A belly band perfectly decorates the gift and holds the envelope closed without adhesive, and you can decorate both sides!

While you’ve got your Designer Series Paper Stack and your Envelope Punch Board out, you may as well create one more. This fabulous nautical card and envelope are a perfect pair!

Square cards and envelopes are a nice change from rectangles for an extra-special touch. And don’t forget—metallics are manly, too!

I hope these projects inspired you today to create for your fathers, brothers, husbands, and sons, and to use your favorite Designer Series Paper and Envelope Punch Board to make a beautiful first impression!

Cheers!
Shannon Lane
Artisan Design Team 2015–2016
We made this card at our Friday night club. It is a large stamp from the new catalog to be released on the 1st of June. Please contact me if you need one. On this one I used Crushed Curry and Emerald Envy. In addition, I used the metallic sequin emellishments. The corners were cut out with the Curvy Corner Trio punch. This punch is retiring and you can still get it on the retiring list through the end of May.

Every couple of months we get together with with our downlines and sidelines. We discuss and exchange ideas for our businesses and we have a blast! We all love the shoe box type swap but we also do regular swaps too.
The shoe box is where everyone designs a card, and they provides all the pieces, etc., for those participating, to make that card. Each Demo brings their own glue and scissors and goes home with tons of samples which they made.
If you think this is something you would like to do, then please join my team. It’s a wonderful way to socialize with others that love doing what we do. Whether you are a hobby crafter, and want it to pay for your supplies, or if you want to be your own boss, and make it into a profitable business. You decide.
Here are some of the samples from my downline:

This was my shoe box swap with my downline and sidelines this past Sunday. We had lots of wonderful samples made with items from the new catalog. I will post some of them in the next few days. This was created with the set, Pop of Paradise. I love to use Gold, white and black together. Hope you like it!
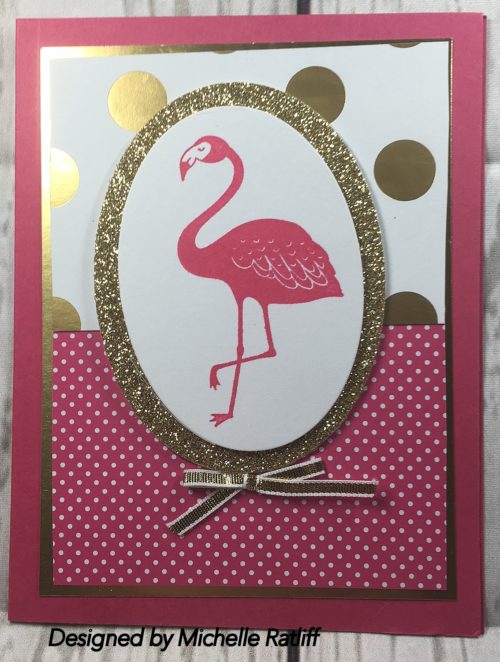
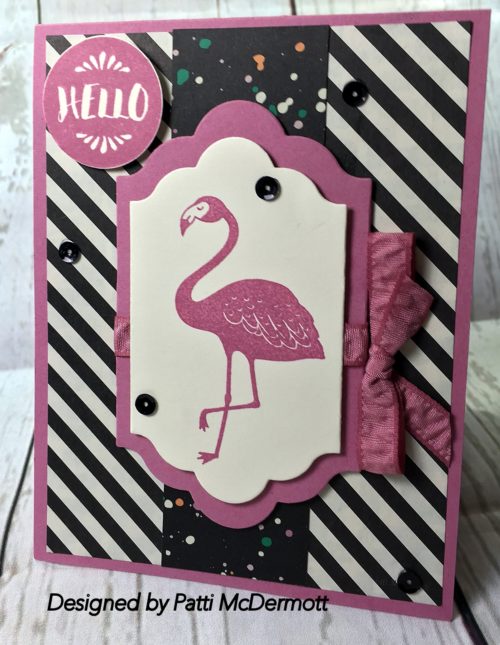
That is the name of this set. Another Sneak Peek! It is one of the new sets that you will be able to purchase on June 1st. I love Flamingos and on this one I used a new In-color, Sweet Sugarplum. Don’t you just love it? Matching Ruched ribbon is so easy to use and make bows with. In addition, the DSP that matches this set is a dynamite paper stack with all the new in-colors.
I have some people who tell me their favorite color is Melon Mambo. I love it too and that is why I used it on this card. All of the images below, including the sentiment, is being carried over to the new catalog. However, the polka dot DSP is new and you are going to love this pack. Colors are white, black and Melon Mambo. So cool!
This is a stamp from the new catalog. In addition, two new In-colors, Peakaboo Peach and Emerald Envy. I think y’all are really gooing to love this new catalog. Remember, if you want any of the sets that are going to be carried over into the new catalog, you can still get it at a 15% discounted bundled price. Once it goes over to the new catalog, it will be sold individually. If you want a catalog, please contact me here.

Olivia turned fourteen a few days ago, and this was the gift box we took to her birthday dinner with birthday money enclosed…not a very creative gift, but bright and fun packaging to match Olivia’s personality!

I saw this posted on my upline’s blog and thought it was a terrific video for tying ribbons. Hope you like it. Credit for this video goes to:
Jessie Hurley’s video, Tying the Perfect Bow!
THANK YOU TO JESSIE HURLEY for showing us this great technique!
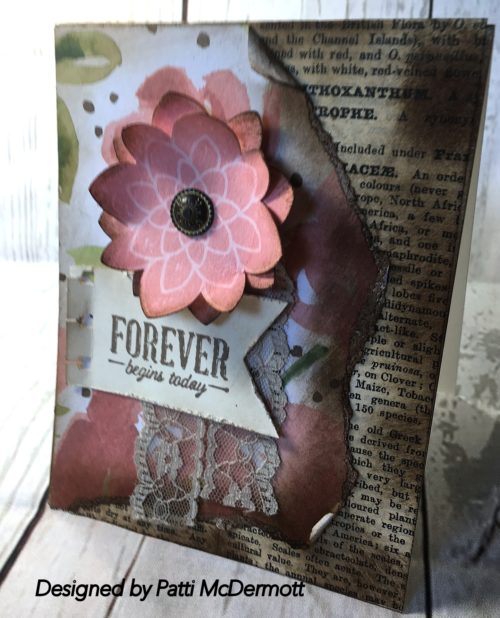
Y’all know how I love vintage…….well this card just screams vintage! I used the DSP, English Garden, page 142 and typeset, also in the AC. I punched the flowers out with the Flower Medallion punch, page 167 AC, and used a vintage brad in the center. Ribbon is Sahara Sand 7/8″ Lace trim, page 159 AC. Sentiment is from Suite Sayings, page 41 of the OC (being carried over to new catty).
This was one of my favorite stamp sets, Nice cuppa, with matching framelits in the OC. I am very sorry to see it go. In fact, it was so popular that it has sold out in the retiring list. Right now I am planning on keeping this bundle but if I do decide to sell it, I will let y’all know first before I put it on eBay.
I have used the DSP Typeset and the sentiment is from the set, Number of years, page 11 & 12 in the OC, to be carried over to the new catalog. Caviat here: Right now you can get the bundle of this set with 15% off with the matching framelits. However, after the new catalog come out on June 1st, there will be no bundle price. They will both be sold individually,

This is Connie Collins, Artisan Design Team member and she has the perfect Mother’s day Greeting for you. Hope you like it as much as I do.
I have another card made with the beautiful Helping Me Grow stamp set. I am happy to say that this set will be returning in the new catty because it is definitely one of my favorites…especially this daisy stamp. I did alter this particular stamp by cutting apart the two main flowers to create two separate stamps. It made it much easier to work with. This is a photopolymer set, so if I want to use it the way it was originally intended, it will be very easy to do.
This was originally intended to be a one layer card, but I got a little heavy-handed with the distressing and dulled the flowers, so I covered them with an additional flower layer. I adhered them in the center and allowed the petals to naturally curve away from the card front for a more realistic feel. I also allowed the bottom left flower to hang over the edge of the panel, but I had to offset the panel to the right in order to do so. This is what I call a “happy accident”!
In Real Life
I fell in love with this sympathy card when my designer sent a photo of the card to me for approval, but when I actually saw the card in person, I realized that photos really can’t do justice to stamps, ink, and paper (and some fun accessories) in real life! The design, the rich colors, and the textures…it’s beautiful!


It’s that time again: we’re getting ready to retire stamps and accessories from both the annual and occasions catalogs. As sad as it is to see these products go, there’s still time for you to get them. Plus, retiring products* have discounts up to 50% off! We’re excited to offer this amazing opportunity, so be sure to get these products before they’re gone.*Retiring products will only be available until May 31 or while supplies last.
On the background of this card I used the set Watercolor Wash, page 129 of the AC. I used Pool Party and Top Top Taupe ink and Washi tape and enamel dots for embellishments. The image is from Number of years, page 11 and the suite sayings, page 41 both of them in the OC.

This is a new technique that Ruth Trice showed on the connection using our Fine Tip Glue pen. I covered the flower and leaf areas and let them dry. Then I sponged the area with Island Indigo ink leaving some areas lighter than others. It creates a resist affect where the glue was applied. I used Timeless Treasures, page 29, and Birthday Blooms, page 9, both in the OC, on the background. Thank you Ruth for your inspiration.

This set that is called Everything, was included with this month’s Paper Pumpkin, over and above the set that came with the project. It was to celebrate 3 years and over 1,000,000 paper pumpkin sales. I love this set. I used it here with Watermelon Wonder and Mossy Meadow. In addition, I used in color DSP and Iced Rhinestone embellishments.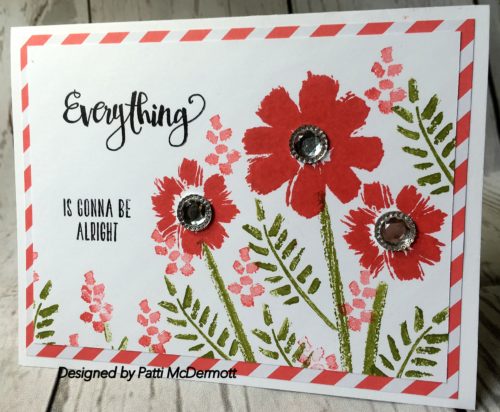
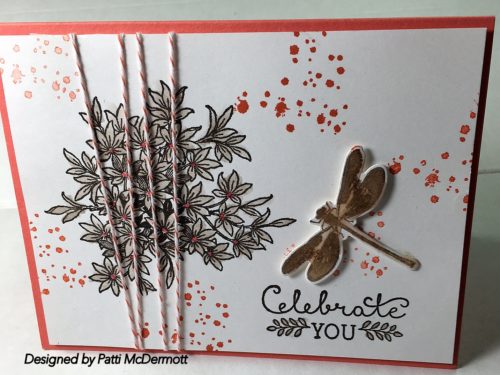
This set is being carried over into the new catalog. I used thin line glue to cover the cross and dove instead of crystal Effects, which is being retired after this catalog. It really worked perfectly and did not take as long to dry as Crystal Effects. The sentiment is also from this set. I like when our sets contain both images and sentiments. You get so much more use out of them. This set can be found on page 35 in the AC.

Project Life Gallery Wall
Hello, my friends, and thank you for stopping by. Today I have a quick and easy idea to share—so you and I can jump on the “gallery wall” bandwagon and update our home décor together!

Armed with a few inexpensive frames and your favorite Project Life by Stampin’ Up! Accessory Pack, you can create a stunning gallery wall! I’ve been working on my wedding album recently, so I had some leftovers from the Love Story Accessory Pack (item 135310) that I knew would be perfect for this project.

The foil printed cards in this accessory pack add an instant WOW factor to your gallery pieces. And there are eight foil specialty cards for you to choose from, so you have lots of variety!

Because the Project Life by Stampin’ Up! Accessory Packs are SO full of awesome embellishments, I added very few additional items—just a little bit of Watercolor Paper (item 122959), Bermuda Bay Baker’s Twine (item 134575), and some Metallic Foil Doilies (item 138392).

My Aqua Painter (item 103954) is always within arm’s reach, so I went to work adding just a few pops of my favorite colors (Bermuda Bay, Daffodil Delight, and Melon Mambo) to the stickers in the accessory pack to really make some statement pieces.
There are so many great Project Life by Stampin’ Up! Accessory Packs to choose from. I know you’ll find the perfect one to create your gallery wall!
Happy Stampin’!
Allison Okamitsu
Artisan Design Team 2015–2016
")
Say hello to the Lovely Little Wreath! This adorable accent is the perfect addition to your springtime décor and makes a great gift for special occasions like Mother’s Day.Usually we show three extra ideas for the kit, but this time our artist had so much fun that she came up with FIVE projects! So, what do a cactus, dinosaur, and Christmas have in common? Let’s find out.

It’s never too early to start thinking about Christmas, right? It’s easy to turn the Lovely Little Wreath into a holiday décor item. Simply swap out the yellow flowers for holly berries and use a holiday stamp on the chalkboard sign.

Next, with Mother’s Day right around the corner, add some festive foliage to create a glamorous gift box for Mom. Use the chalkboard tags and Very Vanilla Craft Stampin’ Spot from the kit.

Raise your hand if you’ve picked up on the cactus trend. They’re everywhere, right? Create some eye-catching cacti with beautiful desert blooms with the extra flowers and leaves from your kit.

The bent leaves on the branches pop right off this prehistoric card. And, might we say . . . the end result is dino-mite!

Finally, keep it simple with a smaller version of the wreath to create a stunning centerpiece for a card front.
")
It’s always amazing to see what you can do with your Paper Pumpkin kit. Whether you want to change it up completely, or just use up the extra parts and pieces, the end result is always fun! If you’ve fallen in love with the Lovely Little Wreath, be sure to stock up on refills, while supplies last.
How do you like the FREE All about Everything Stamp Set that came with your April kit? Check out our YouTube channel for some project ideas and then use #allabouteverything to share your projects with us.
The Number of Years Stamp Set (item 140653) and coordinating Large Numbers Framelits Dies (item 140622) are not only perfect for creating personalized birthday and anniversary cards, but they’re also great for graduation cards.

I love to personalize graduation cards by making them with the graduate’s school colors and adding the graduation year. One of our local high school’s colors are blue and gold, so I used Crushed Curry and Night of Navy with some touches of gold for this card.
I started by applying a watercolor wash to a piece of Watercolor Paper (item 122959). To do this, I used a large paintbrush and applied a light wash of water to the paper. I then dipped the wet brush into some drops of Crushed Curry Classic Stampin’ Ink Refill (item 131158) and lightly brushed it on the wet paper, letting the ink go where it wanted. Once the paper dried, I splattered some Gold Wink of Stella Glitter Brush ink (item 141898) on the card.

I gently squeezed the brush so that some of the gold ink pooled at the bottom of the brush, then added a single drop of water to the end of the brush. Then, holding the brush with one hand, I tapped the brush with the other, letting the splatters fly onto the paper.
After that dried, I stamped the “Congrats to You” sentiment from the Tin of Cards Stamp Set (item 138946) in the bottom right corner using Night of Navy ink (item 126970).
I punched some Gold Foil Sheets (item 132622) stars using the Confetti Stars Border Punch (item 135861) and adhered them randomly to the card with the Fine-Tip Glue Pen (item 138309).
I made the numbers using the Large Numbers Framelits Dies and Night of Navy Cardstock (item 100867). To create the banner over the numbers, I embossed the outline of a stamp from the Number of Years set using Gold Stampin’ Emboss Powder (item 109129). I stamped “The Class of” with the Alphabet Rotary Stamp (item 133769), and cut out the banner with a die from the Large Numbers Framelits Dies.

I stamped an image from the Gorgeous Grunge Stamp Set (item 130517) in Night of Navy ink on the side of the Whisper White Thick Cardstock (item 140272) base; then I adhered the watercolor panel to it using Stampin’ Dimensionals (item 104430). I rounded the corners on the right side of the card using the Project Life Corner Punch (item 135346) to finish the card.
You can make similar cards in any school colors for all of your graduation needs.
Amy O’Neill
Artisan Design Team 2015–2016
This reminds me of some of the fish we saw underwater on our cruise. Actually these colors look pale compared to the real thing. We did see a turtle off the back of the ship when we were leaving Key West.
The images from this card are from By the Tide, page 82 and From Land to Sea, page 83 in the AC. Unfortunately, By the Tide is retiring this month so if you want it, you need to order it before it is gone.

If you are interested in purchasing this DSP, Typeset, page 142 in the AC, you should do it asap because it is another item that is being retired. Hopefully most of you have seen the retired list by now. I must admit that I have loved using this DSP the last couple of years but I knew it couldn’t last forever. There really isn’t anything in the new catalog that replaces this type DSP. The set I used is from the OC, Grateful Bunch, page 22. Both the Corrugated paper and the Burlap ribbon is also on it’s way out. As you can see, I loved using that for embellishments also. The sentiment is from Endless Thanks, which is being carried over.

This set can be found on page 125 of the AC. You will be happy to know that is is being carried over to the new catalog. I used Calypso Coral and Soft Suede on this card and the sentiment is from Suite Sayings, page 41 of the OC, also being carried over.
From Artisan Design team member:
Lots of my friends are expecting little girls and boys this month, so recently I’ve been involved in a series of “baby projects,” creating little gifts which my friends will be able to use during their first year as moms of newborns. I hope these gifts will allow them to keep memories of this year full of changes and emotions!

To make this project, I created a box using the Gift Box Punch Board (item 135863); the final box measures 3-1/4″ x 3-1/4″ x 1-3/4″. (Start at line “L” and fold on the “S” diagonal line.)

I used the 2-7/16″ square from the Squares Collection Framelits Dies (item 130921) to create a little window at the bottom of the box.

Then I created a mini album by cutting 3″ x 3″ squares from the following: Night of Navy Cardstock (item 100867), Whisper White Cardstock (item 100730), Window Sheets (item 142314), and Vellum Cardstock (item 101856).

I created one page for each month and decorated them with images from different stamps sets : Au fil des ans (item 141197), Bonjour bébé (item 140140), Fait avec amour (item 140120), and Be the Star (item 135731). I added supplementary pages so that they can add extra pictures or memories of those unforgettable moments.
Since I’m totally in love with Stampin’ Emboss Powder, I used it a lot in different colors, including Cherry Cobbler (item 122949) and Whisper White (item 109132).

Finally, I decorated the box with a nice little “ribbon” and a perfect bow that I made using the Bow Builder Punch (item 137414).
I really hope that you liked this tutorial and will enjoy this little project. Of course you can adapt it to your liking for any occasion or special event in your life.
Now, it’s your turn to have fun!
Rachel Grandin-Torchet
Artisan Design Team 2015–2016
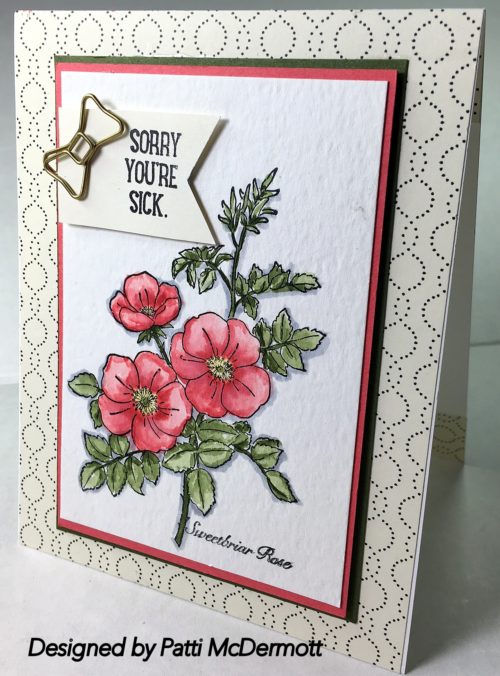
I used an aqua painter on this image from the set, Sweetbriar Rose, page 115 in the AC. I stamped it onto watercolor paper with Stazon ink. The DSP on the background is from Timeless Elegance page 143.
Hey Crafters and Stampers,
Sorry that I have not posted anything for a few days, but since I have been back, I have been trying to correct tons of things that went wrong when we were on our annual Family Disney Cruise. Way too much to go onto into a post, but just let me say that this was the trip from H-LL. With that said, we did really have a great time.
Postings to come.
(For the English readers, there is a translate section on the top of the right sidebar) Hi! Nice to see you come take a look at our Artisan Design Team Blog Hop! As you are accustomed to, there is every two weeks, a hop that you can follow. Today, it is with me in the character of a real ‘spring’ card. Outside the storm, the sun is already been well and the clock has now been rescheduled for the summer time. So I have the “flowers” but again caught out of the closet … It has become a busier card than what I’m used myself. It may come from the fact that I’ve worked with DSP as background instead of a white background which I often use. But I find this English Garden DSP so much fun! The overflow of the blue from light to dark certainly has a nice effect. I’ve decided to keep the card more quiet and work only in white and blue tones.