Do you love a great sale? If so, we’ve got one for you! From November 21-28 you can save up to 40% on select products during Online Extravaganza. To make things even better, there will be 24-hour sales on the first and last day of the promotion, featuring special products available for that day only. Check out all the great products you can get at a discount, including several that are on the holiday catalog retiring list. Make sure to get everything you want before it’s gone!
Do you love a great sale? If so, we’ve got one for you! From November 21-28 you can save up to 40% on select products during Online Extravaganza. To make things even better, there will be 24-hour sales on the first and last day of the promotion, featuring special products available for that day only. Check out all the great products you can get at a discount, including several that are on the holiday catalog retiring list. Make sure to get everything you want before it’s gone!
Saturday, November 26, 2016
10 – 12:30PM
994 Governors Road
Snee Farm – Mount Pleasant
Registration fee: $25 or
FREE if placing an order of $40 or more
(Registration fee includes all supplies. Snacks & Beverages will be provided)
We will be doing 3 cards and a 3D item
————————————————————————————————
Registration is required as space is limited
Name_________________________________________
Guest__________________________________
Please include $25 for each guest (843) 881-2586
Stitched Shapes Made Simple
I have been stamping and paper crafting for seventeen years, so believe me when I tell you that the new Stitched Shapes Framelits Dies (item 145372) are destined to be an essential item in your die cutting arsenal. So how could something so simple be so amazing? Because they are so simple! The set includes four sizes of three fundamental shapes (circles, squares, and rectangles). You use them just like you would any other circle, square, or rectangle die. The stitching on the edges adds so much interest to your basic shapes that you will want to use them on practically every project you create. Let me show you some things I made using this incredible die set.

The sentiment on this card was stamped using the Tin of Tags Stamp Set (item 142180) and die cut using one of the circles in the Stitched Shapes Framelits Dies. Then I placed it on a scalloped circle from the Layering Circles Framelits (item 141705) before attaching it to my card. Notice how the Layering Circles, Layering Squares (item 141708), and Layering Ovals (item 141706) Framelits Dies work perfectly with the Stitched Shapes Framelits.

They also look great when you add them to our other products. The box on the left was made using the White Gift Boxes (item 142000).

Notice how I paired them with the Birthday Banners Stamp Set (item 141506) and the Bunch of Banners Framelits Dies (item 141488). I love how the stitching on the banner coordinates with the stitching on the dies. The box on the right was made from the clear acetate sleeves that come with the boxes. I just made a bottom and top from cardstock and then decorated it using the Warmth & Cheer Designer Series Paper Stack (item 141991). I also used the Number of Years Stamp Set (item 140653) along with the Large Numbers Framelits Dies (item 140622) to turn them into great Advent gift boxes.
Here’s a project you can make just using the squares from the Stitched Framelits and a few additional supplies. Isn’t this little Christmas tree adorable?

Here is how I made this fun holiday décor piece.

I started by using hot glue to add a 6″ skewer to a vintage thread spool.

Then I cut four squares of each size, marked the centers, then punched holes in the centers. Next, I turned them over and added some distressing to the edges with Early Espresso ink (item 126974) and a Stamping Sponge (item 141337).

Then it was just a matter of sliding on the squares from largest to smallest and tying pieces of ribbon between each layer. I cut two stars with the Stars Framelits Dies (item 133723) to cover the pointed tip of the skewer. Streamers made with Linen Thread (item 104199) add a nice touch. Finally, I added a stitched circle to the base for stability and a Delicate White Doily (item 141701) as a tree skirt. Mica Flakes (item 141998) make great snowy accents when sprinkled on top and around the base.

Order your Stitched Shapes Framelits Dies today! I know you’re going to love them as much as I do!
Connie Collins
Artisan Design Team 2015–2016
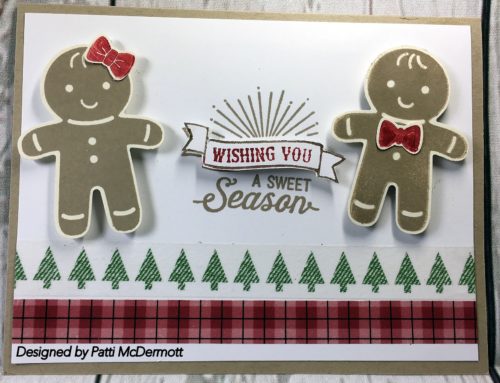
This set you can bundle and save 10% on the cost. It is called Santa’s Sleigh and Thinlits Dies, page 24 of the HC. There are actually 15 stamps and 12 different thinlits in this bundle so it is certainly worth the money. You will enjoy using this for your holiday cards. I also used the Washi tape Warmth and Cheer, page 13. The sentiment if from Oh, What Fun, page 31 of the AC.
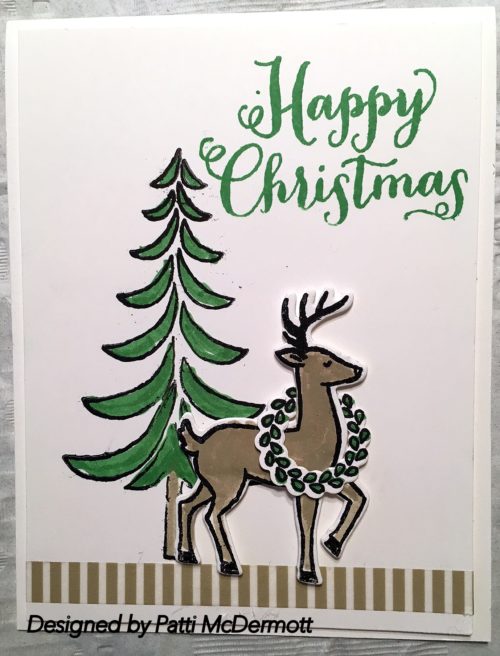
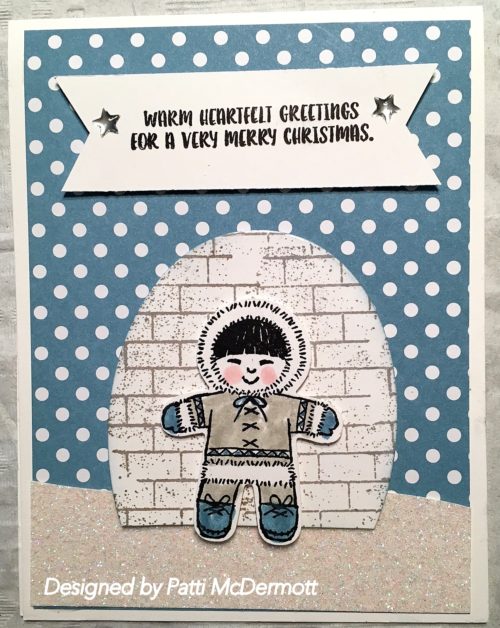
Another card created with this set found on page 6 of the HC. I used the stamp set, Goulish Grunge, page 52 of the HC, to make the Igloo and cut it out with our oval layered dies, page 193 of the AC. I used our Dazzling Diamonds Glimmer paper for the snow and the background is with our DSP Subtles collection, page 171 of the AC.
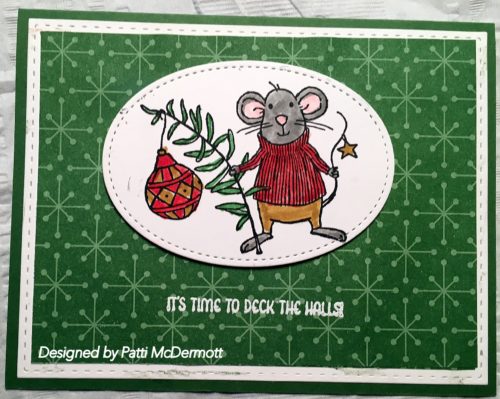
I love this stamp set with these cute little mice. You can find the Merry Mice on page 23 of the Holiday catalog. The background paper, This Christmas Secialty DSP is from the AC, page 172. I used our new stitched oval die for the image. The stitched rectangle die, I am sorry to say is contraband. However, I am hoping that SU will come out with one of those for us soon.
I wanted to keep all of you up to date on my husband’s condition. He has been transferred from the hospital to Sandpiper Rehab here in Mount Pleasant. They have Physical Therapists working with him on walking and he is progressing slow but steady. However, he is not out of the woods yet.
They may still have to remove more toes but we are praying that does not happen. Would love to have y’all continue to pray for him, we appreciate all your prayers, they really do help.
Jack says the food is great at Sandpiper and he likes his room and all of the nurses and staff that are helping him. Not quite sure how long he will have to stay before he is released to come home, but I do know he will have to master the stairs before that happens.
Thanks for all your cards, well wishes and prayers. I love you my dear friends and family. You keep me going.
Use the Stitched Shapes Framelits with the Tin of Tags stamp set and make your Christmas cards and tags one of a kind. #stampinup #stichedwithlove | Pinterest

Use the Stitched Shapes Framelits with the Tin of Tags stamp set and make your Christmas cards and tags one of a kind. #stampinup #stichedwithlove | Pinterest
For my second “wow” project as a Stampin’ Up! Artisan Design Team member, I decided to do something seasonal—and thought I’d go with pumpkins! They’re easy to make, are quite versatile, and they can be used for many occasions. Think: fall, Halloween, or all year round if the color matches your décor.

Here’s how to make them: Just cut eight identical circles using the Big Shot (item 143263) and one of the circle dies from the Layering Circles Framelits Dies (item 141705).

Now fold them in half and adhere them together using Multipurpose Liquid Glue (item 110755).

To make it look like a pumpkin, cut the bottom of the circles.

For the stem, cut a small strip from Kraft Cardstock (item 133674).

Coil the strip from the wide side, twist it, then push it into the top of the pumpkin.

Next, make the curly vine. Cut a small strip from Whisper White Cardstock (item 100730) and wrap it around a pen to curl it.

Now adhere the vine to the stem using Mini Glue Dots (item 103683). Our pumpkin is done!

You can, of course, create this pumpkin in different sizes or shapes—such as ovals, for example, using the Layering Ovals Framelits dies (item 141706). You could also make apples; just use small leaves instead of a curly vine.
I hope you liked this little tutorial and that you’ll have fun using it!
Steffi Helmschrott
Artisan Design Team 2015–2016
*Steffi Helmschrott, from Germany, is one of our talented Artisan Design Team members.

Not only are stitches a classic trend, they illustrate the quality, precision, and extra care taken when creating a piece. When you give a stitched gift it shows just how much you value that relationship. Starting November 1, you can purchase Stitched Shapes Framelits ahead of their official release in the 2017-2018 annual catalog! With Stitched Shapes Framelits you can make thoughtful paper stitches in seconds, turning any project into one that is stitched from the heart. And during the month of November, coordinating stamp sets are 25% off! But don’t worry…Stitched Shapes Framelits will still be available for purchase after November 30.
| Item | Description | Retail Price | Sale Price |
| 145372 | Stitched Shapes Framelits Dies—set of 12 dies which includes four circles, ovals, and squares | $30 USD/ $40 CAD | No discount |
| 142069 (HC p. 11) | Greetings From Santa Wood-mount Stamp Set | $27 USD/ $35 CAD | $20.25 USD/ $26.25 CAD |
| 143269 (HC p. 11) | Greetings From Santa Clear-mount Stamp Set | $19 USD/ $25 CAD | $14.25 USD/ $18.75 CAD |
| 142114 (HC p. 15) | Hang Your Stocking Photopolymer Stamp Set | $21 USD/ $26 CAD | $15.75 USD/ $19.50 CAD |
| 142049 (HC p. 19) | Christmas Pines Photopolymer Stamp Set | $35 USD/ $43 CAD | $26.25 USD/ $32.25 CAD |
| 142142 (HC p. 23) | Merry Mice Wood-mount Stamp Set | $23 USD/ $30 CAD | $17.25 USD/ $22.50 CAD |
| 142145 (HC p. 23) | Merry Mice Clear-mount Stamp Set | $17 USD/ $22 CAD | $12.75 USD/ $16.50 CAD |
| 142180 (HC p. 33) | Tin of Tags Photopolymer Stamp Set | $21 USD/ $26 CAD | $15.75 USD/ $19.50 CAD |
| 142206 (HC p. 43) | Suite Season Wood-mount Stamp Set | $28 USD/ $36 CAD | $21 USD/ $27 CAD |
| 142209 (HC p. 43) | Suite Season Clear-mount Stamp Set | $20 USD/ $27 CAD | $15 USD/ $20.25 CAD |
| 140386 (AC p. 31) | Oh, What Fun Photopolymer Stamp Set | $21 USD/ $26 CAD | $15.75 USD/ $19.50 CAD |
| 141859 (AC p. 61) | Baby Bear Photopolymer Stamp Set | $26 USD/ $32 CAD | $19.50 USD/ $24 CAD |
| 141784 (AC p. 139) | Blooms & Wishes Photopolymer Stamp Set | $21 USD/ $26 CAD | $15.75 USD/ $19.50 CAD |
*AC refers to the annual catalog; HC refers to the holiday catalog.
Details:
- Stitched Shapes Framelits available beginning November 1, 2016
- November 1-30, 2016: select stamp sets 25% off
- Stamp sets also available in French
- Ordering Deadline (25% off stamp sets): November 30, 2016, by 11:50 PM (MT)
Please copy and paste this into your browser.
https://www.stampinup.com/ecweb/default.aspx
to purchase your Stitched Shapes Framelits and stamp sets today!
Three Thank You Cards
If you’re looking for a few cool thank you cards, look no more! And these are perfect for the men in your life…or a great gift for the men in your life to send.


Hello, friends! Autumn is here—leaves are changing, there’s a chill in the air, and Halloween (a favorite at our house!) is just around the corner. And if you happen to be looking for a different look this Halloween, I’ve got you covered! November 1 is the first day of a Mexican holiday known as Día de los Muertos or Day of the Dead (celebrated to honor loved ones who have passed) and the colors associated with it are bright and festive.

In fact, sugar skulls—a traditional symbol of Día de los Muertos—have taken over Halloween decorations in the last year or two, and since the holiday catalog’s Mr. Funny Bones Stamp Set (item 142245) includes a teeny tiny sugar skull—it got my gears turning. I decided to whip up a party theme based around Day of the Dead décor—the bright colors, the bold sugar skulls—and it’s so much fun! Halloween doesn’t have to be dark and spooky; why not make it bright and colorful?

I started with a color pallet, and for me, there’s no better way to go bright than with one of my all-time favorite color combinations: Melon Mambo, Daffodil Delight, and Bermuda Bay. A few touches of silver and black—with Basic Black Metallic Thread (item 141695), Silver 3/8″ Glitter Ribbon (item 142015), and Silver Glimmer Paper (item 135314)—added some bling. (Because no party is complete without bling!) And all of my stamps are from the fabulous Mr. Funny Bones Stamp Set; that tiny sugar skull stamp inspired it all!

One of my favorite ways to add texture and dimension to a project is with decorative masks—and this fabulous teardrop design from Seasonal Decorative Masks (item 141848) is perfect for Halloween. Doesn’t it remind you of ghosts?

The Layering Circle Framelits Dies (item 141705) were integral in creating each of the items featured here—I used them for every single project! The tiny scalloped edge in a contrasting color makes for such a sharp frame, and these Framelits make them perfectly in a variety of sizes.

I’ve used another of my favorite tricks throughout this collection as well—custom-made black embossing powder. Simply stamp your image in Basic Black Archival ink (item 140931), cover with Clear Stampin’ Emboss Powder (item 109130), shake off the excess, and heat set. Voilà! A bright, shiny, crisp black image.

Thank you so much for joining me today. I hope Mr. Funny Bones has inspired YOU to change up your Halloween party décor this year!
Cheers!
Shannon Lane
Artisan Design Team 2015–2016
While you could use these Framelits with just about any stamp, I’ve chosen to feature the coordinating Shooting Star Stamp Set (item 141619) and create a little galaxy-inspired theme to share with you today.

I started with a panel of Watercolor Paper (item 122959) and applied a wash of Tempting Turquoise (item 126952) and Elegant Eggplant (item 126969) inks using an Aqua Painter (item 103954). Once the paper was completely dry, I stamped a few of the small stars in Whisper White Craft ink (item 101731) and then cut the arch track.
I embellished the card using the Confetti Celebration Stamp Set (item 142034) star, which was stamped on Shimmery White Cardstock (item 101910) in Tempting Turquoise ink and then fussy cut. I also added the “It’s your day!” from this same set stamped in Elegant Eggplant ink.
The shooting star and moon were stamped on Shimmery White Cardstock in VersaMark ink (item 102283) and embossed using Silver Stampin’ Emboss Powder (item 109131) and the Heat Tool (item 129053).
I added a little more watercoloring to the tail of the star, plus some Silver Sparkle Dazzling Details (item 127845). Then I followed this great tutorial by Stampin’ Up! to put everything together
This card was so much fun to make that I decided to try one with a full circle track, too.

This time I cut the tail off the star to help it spin more smoothly and not get caught on my layered embellishments and Silver Metallic Thread (item 138402) loops in the center.
I hope you’ve enjoyed these fun designs and that they inspire you to give your own spinner cards a try!
Jennifer Frost
Artisan Design Team 2015–2016
The Season of Gratitude Kit includes everything you need to shake things up with eight fabulous fall shaker cards! They say you should “throw kindness around like confetti,” but we think it would be fun to “throw gratitude around like falling leaves” too—this is the kit to help you do that!

Watch a quick video on our YouTube channel to see how fun it is to create these cards. You can follow the instructions to complete your Paper Pumpkin project as shown in the video, or you can use your creativity to come up with something new. Here are some ideas to get you started.First, if you fold the card base, you can create a tiny treat bag and a shaker tag. This project uses all supplies from the kit.

We’re going totally nuts over this next project! Tie in some of your favorite Stampin’ Up! products like the Acorn Builder Punch and the Serene Scenery Designer Series Paper Stack to create a cute little acorn card.

Finally, be sure you hang on to your stamp set so you can keep on creating with it long after you finish your kit. The sentiments in this set work for so many occasions!

Raise your hand if you are falling for the Season of Gratitude kit? We totally get it! Pick up your refills here, while supplies last, and make it the best season ever!
Hello everybody,
Wanted to update you on my husband and let you know why I haven’t posted anything since the 18th. As most of you know, Jack is a diabetic and he has neuropathy in his feet. Jack goes to the Wound Clinic about twice a week for open wounds on his legs (related to diabetes) and they found a hole in his left foot. He may have stepped on a nail, or something, who knows. They were treated it but it got worse and infected so they admitted him to Roper-St.Francis, Mt Pleasant Hospital.
After a questionable MRI, the vascular doctor went through vessels from the groin area to see how bad the circulation to the foot was. He had zero circulation from the knee down in the left leg and about 50% in the right leg. They tried to open the veins but were not successful when they got to the foot.
The Doctor determined that he needed to have part of his foot and big toe removed because there was no blood going to it and it would never heal unless there was circulation. So they removed it on Friday, the 21st. He has been in the hospital since the 14th. He is in Intensive Care but they expect to move him to a regular floor today or tomorrow. He will then need to go to rehab so they can work with him in Physical therapy to be able to walk, and yes, he will need assistance.
Anyway, it has been pretty hectic with me going up to the hospital about twice a day. He is lonely and wants company. He also has Mersa, an infection, that when you go to visit him you must wear a gown and gloves. They were just allowing family up while he is in ICU. On a lighter note, he will call me around 5AM, in the morning and want to know what am I doing? Hah! like what do you normally do at 5 in the morning…………….SLEEP!
Jack is on everyone’s prayer list and We sure do appreciate all the prayers and well wishes. Will keep you informed and hope to get back to posting some cards soon. It is hard to be creative when there is so much on your mind.
If anyone knows of a reliable construction company that installs bathrooms, etc., let me know. It looks like I am going to give up my beautiful craft room for a full bath and bedroom. The stairs just aren’t going to work anymore. Hugs, Patti
Hey Stampers and crafters,
I have been quite busy this week with Jack being in the hospital, and going back and forth. In addition, I think every appointment from the Hurricane week that was cancelled was rescheduled for this week and I have appts right through Friday.
In view of this I will be rescheduling my stamp camp to the 4th Saturday of the month and NOT the normal 3rd Saturday. We will be doing Holiday cards and a 3D project. Look for my flyer later in the week. Hugs, Patti
Hey Crafters,
No posting of cards or projects yet, but soon I hope. Right after the cleaning up of Hurricane Matthew, my husband Jack landed in the hospital and we could sure use your prayers.
He has Diabetes and has developed an infection in the bone of his foot. So much has been going on here that I have not had time to create anything. Keep checking back with me. I am really looking forward to be able to stamp and have some fun. Hugs, Patti
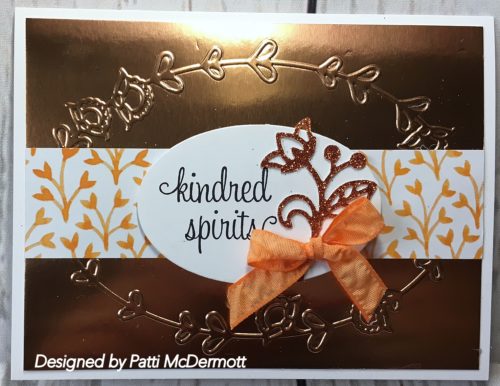
I embossed the copper foil paper, page 47 in the HC, with the embossing folder, Pretty Paisleys, same page. The DSP is Fruit Stand from the AC on page 173. In addition, from the same catalog, page 194, I used a die from the Flourish Thinlits, on the Pumpkin Pie Glimmer paper, page 55 of the HC. I added that to the sentiment, from the Set, First Sight page 46 of the AC. The 3/8″ Ruched ribbon can be found on page 178, also in the AC.
This card we made at our Wednesday morning club. The set, Christmas Magic, is the perfect set to add to your collection. It has beautiful images and wonderful sentiments. If you have been keeping track, I have used it several times in my blog. I think I will certainly get my money’s worth on this one.
I did the sky on Whisper White card stock, in Dapper Denin, and splattered white craft ink refill, page 180 of the AC, mixed with a little water using a paint brush. The sentiment is a banner cut out and held with our Bow Paper Clip embellishments found on page 177 in the AC. I used Marina Mist to highlight the snow drifts, and used a blender pen, to color the images with our classic inks.

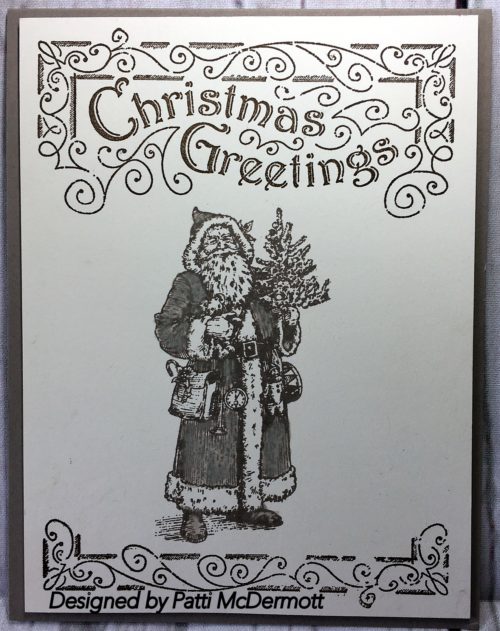
I love this set because it is so vintage looking. IN this card I used a monochromatic technique which requires different shades of one color. Here I selected the brown family using Tip Top taupe, crumb cake and soft suede. The image is stamped on Very Vanilla card stock. The set can be found on page 22 of the HC.
I’ve always thought the Moroccan Nights set (and suite of products) is so cool, so I asked one of our artists to make some unique projects for me to share with you.
The first Moroccan Nights project was Shalae’s birthday packaging. The center part is just the DSP rolled into a tube and secured after cutting fringe on both edges—a perfect place to put rolled up birthday bills so they don’t fall out or get lost.

The other projects—all four fabulous cards—are great ideas for World Card Making Day! As always, photos just don’t do these cards justice. I wish you could touch them and see them up close. They’re beautiful cards with lots of texture!


If you like options (like me) and you’re looking for a simpler way to prepare for World Card Making Day, order the Oh, Happy Day card kit (if you haven’t already) and join Sara and me during her Facebook event on September 20 for tips on making some fun cards for any time—night or day. (Get it? Moroccan Nights or Oh, Happy Day! I thought it was a cute…thanks for humoring me just a little!)

There is no better way to show someone you care like sending handmade card. In a sea of junk mail and bills, a card is a simple thing that really stands out. October 1, 2016, is World Card Making Day and it’s a great time to make and send a card to someone to just say hello or give them a little recognition or love! And what’s even better is that from October 1-5, cardmaking essentials are up to 25% off. Stock up so you can share your love all year long! Contact your demonstrator to place an order, or shop now!
Here’s a list of cardmaking staples that are being discounted in celebration of World Card Making Day:
| Item | Description | Discount | Retail Price | Sale Price |
| 138339 | 2015-2017 In Color Card stock | 15% | $8 USD/$10 CAD | $6.80 USD/$8.50 CAD |
| 141413 | 2016-2018 In Color Card stock | 15% | $8 USD/$10 CAD | $6.80 USD/$8.50 CAD |
| 141697 | 2015-2017 In Color Envelope Paper | 25% | $11 USD/$14.50 CAD | $8.25 USD/$10.88 CAD |
| 141698 | 2016-2018 In Color Envelope Paper | 25% | $11 USD/$14.50 CAD | $8.25 USD/$10.88 CAD |
| 133774 | Envelope Punch Board | 25% | $20 USD/$27 CAD | $15 USD/$20.25 CAD |
| 141651 | Designer Tin of Cards Project Kit | 25% | $27 USD/$36 CAD | $20.25 USD/$27 CAD |
| 129027 | Fast Fuse Adhesive Refill – Buy a Fast Fuse Adhesive (item 129026) and get a Refill for FREE! | $7.50 USD/$10 CAD | FREE with purchase of Fast Fuse Adhesive |
Details
- Promotion period: October 1-5, 2016
- Ordering Deadlines:
- Phone/Fax/Mail: October 5, 2016, by 6:50 PM (MT)
- Online: October 5, 2016, by 11:50 PM (MT)

We can all use more Designer Series Paper, so we’re confident that you’re going to love this news: October 1 through 31, buy three packages of Designer Series Paper and get one free! That means now is a great time to save on some of our most popular paper designs. Contact your demonstrator to place your order, or shop now!
Here’s a handy list of our current Designer Series Paper you can save on during this promotion:
| Item # | Product Name |
| 141663 | Floral Boutique Designer Series Paper |
| 141645 | Moroccan Designer Series Paper |
| 141660 | Fruit Stand Designer Series Paper |
| 141654 | Blooms & Bliss Designer Series Paper |
| 141630 | Festive Birthday Designer Series Paper |
| 141640 | By the Shore Designer Series Paper |
| 141986 | Presents & Pinecones Designer Series Paper |
| 141981 | Candy Cane Lane Designer Series Paper |
Details
- Promotion period: October 1–31, 2016
- There is no limit to how many times you can buy three packages of Designer Series Paper and get one free.
- Specialty Designer Series Paper and Designer Series Paper Stacks do not qualify for this promotion and cannot be redeemed through this offer.
- Designer Series Paper purchased with Stampin’ Rewards or the Stampin’ Rewards 50%-off perk does not qualify for the promotion.
- Designer Series Paper purchased as part of a Starter Kit does not qualify for this promotion.
- Promotion Deadlines:
- Phone: October 31, 2016, by 6:50 PM (MT)
- Online: October 31, 2016, by 11:50 PM (MT
I’m Addicted to Doilies, By Golly
I have a confession to make. It’s hard for me to make a card without using a doily. I love how they instantly add a touch of polish without any cutting or stamping. They layer beautifully and are a simple, yet pretty way to highlight a focal image. Plus, they’re an inexpensive way to embellish your cards (especially when you factor in the per unit cost, which amounts to only pennies).
I was recently stamping with the Be Jolly, By Golly Stamp Set (item 142134) and found myself using all of the doilies that Stampin’ Up! offers, so I thought I’d share how you can use all three doily varieties with this fun set.

The Delicate White Doilies (item 141701) coordinate with just about any color palette. I often use pieces of them rather than include the whole doily on one card.

For this first card, I cut the doily in half and layered the two pieces under a strip of Real Red 3/4″ Stitched Edge Ribbon (item 141984) and Candy Cane Lane Designer Series Paper (item 141981). The focal image was embossed with Gold Stampin’ Emboss Powder (item 109129) and cut out with the Big Shot (item 143263) and a Layering Circles Framelits Die (item 141705). Some gold twine from the Baker’s Twine Trio Pack (item 141999) was tied in a bow for a finishing touch. You’ll notice that I’m addicted to Baker’s Twine, too, but that will have to be discussed in another post!
Because you can never have too much of a good thing, it’s fun to layer different doily styles, as well. With this next card, I layered a Cucumber Crush 2015–2017 In Color Doily (item 141674) over a Delicate White Doily.

The card base was made by stamping the Diagonal Stripe Stamp (item 141917) with Versamark ink (item 102283) on a piece of Real Red Cardstock (item 102482).The doilies and Baker’s Twine from Candy Cane Lane Baker’s Twine (item 141983) and the Baker’s Twine Trio Pack were layered with a strip of Warmth & Cheer Designer Series Paper (item 141991) and Gold Glimmer Paper (item 133719). Some gold Metallic Sequins (item 138390) and fun Mini Jingle Bells (142002) were added as finishing touches.
On this last card, I used one of the gold Metallic Foil Doilies (item 138392). These come in two sizes (both gold and silver) and the larger one was used here.

A piece of Candy Cane Lane Designer Series Paper was added to the card base, and a strip of Real Red 3/8″ Stitched Satin Ribbon was looped underneath the focal image. This image was embossed with Real Red Glitter Stampin’ Emboss Powder (item 142635) and cut out with the Lots of Labels Framelits Die (item 138281).
Some sprigs of holly from the Holly Berry Happiness Stamp Set (item 142061) and Holly Berry Punch (item 141843) were then added with some gold Baker’s Twine and Brights Enamel Shapes (item 141680).
I hope these projects will inspire you to give all of the different doily styles that Stampin’ Up! offers a try. I’d love to see how you incorporate these versatile accessories into your own projects!
Amy O’Neill
Artisan Design Team 2015–2016
September Paper Pumpkin: Something Good to Eat

This kit comes together quickly so you can party right away. No tricks, just treats! Watch it in action at PumpkinHowTo.com.
While you’re experimenting with your trendy treat tubes, don’t forget to try some other projects. Here are some additional ideas to get you started.
For instance, if you’re going for a strictly spooky theme for Halloween, pull in some holiday catalog products like the Halloween Night Designer Washi Tape and Baker’s Twine. Then, stamp the Jack-o’-lantern face and bat from the Spooky Fun Photopolymer Stamp Set using a Basic Black Archival Stampin’ Pad.

The stamps in the kit are great for cardmaking too! Use the sentiment to stamp a fun background and banner. To achieve a two-tone pumpkin, stamp the solid pumpkin image on some scrap paper first, then (without re-inking) stamp it again to get a lighter tone. (This technique is called stamping off and it’s one that you can use again and again in your projects.) To finish, stamp the outline image on top of the solid image. (That’s called two-step stamping, another technique you’ll use a lot.)

Here’s another card with a completely different look, proving the versatility of this kit. When we were planning this stamp set, we couldn’t help but “oooh” and “ahhhh” over this adorable little sunflower! Isn’t it lovely? Use the Crumb Cake Note Cards & Envelopes to create a simply sunny card and you’re sure to put a smile on a friend’s face.

Now is a great time to stock up on refills so you can keep using the treat tubes for more projects this season. They’d be great filled with bath salts as a stocking stuffer or neighbor gift. Grab yours now before they disappear.

Speaking of disappearing, our BOGO offer will disappear on October 10! First-time subscribers can buy the October kit at regular price and get the November kit for FREE! Contact your demonstrator and use promo code “BOGO” at PaperPumpkin.com to get started. If you’re already a subscriber, be sure to tell your friends about this amazing offer before it’s too late!
*Fine Print: For first-time subscribers only, not valid on prepaid subscriptions. Offer invalid if subscription is suspended or cancelled during the first two months. After that, the subscription will continue for $19.95 USD/$26.95 CAD + tax per month (shipping included) unless cancelled or suspended. Offer ends October


