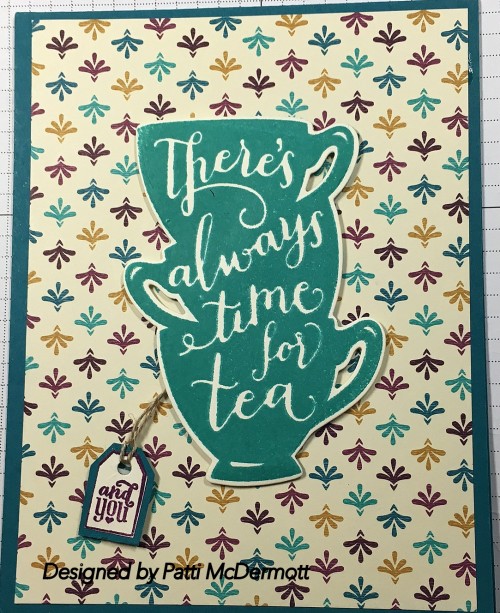
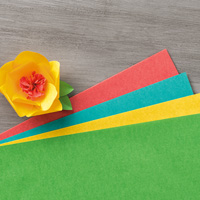
So true! Who doesn’t have time for a cup of tea? I love this set, A Nice Cuppa, page 35 of the OC. It so versatile and has terrific sentiments. I used Colors Bermuda Bay, and Blackberry Bliss. The background DSP is Bohemian from the AC page 142. This is what I consider a CAS card.
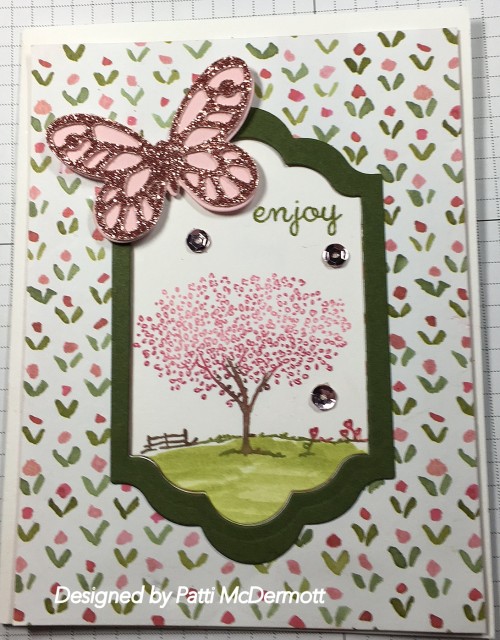
If you go back a few days you will see this same card with a different take for Easter. I was playing around with the set, Happy Home, page 21 in the OC and when I used this in the opening I really liked how it looked. The colors are also perfect for the background which is English Garden DSP page 142 in the AC. The butterfly is cut out with Blushing Bride card Stock and Blushing bride Glimmer paper, page 17 of the OC. I used the Butterfly Framelits and Thinlits page 172 in the AC.
Today I am featuring our {Birthday Bouquet DSP} and our {Grateful Bunch stamp set} plus I decided I would use up some of our retiring SAB items before they are gone. I used our {Glitter Washi Tape} on both my projects, gosh I loved this tape. I sure hope they come up with something awesome like this for our next catalogue.

|
|
|


I splattered some {Gold Wink of Stella} on my bag, for some added sparkle. Have you used our wink of stella in other ways, what kind of tips might you suggest to get the most out of our products?

I wanted to create that folded ribbon look, with the {Mint Macaron dotted lace trim} so I added a piece of our {Glitter Ribbon washi tape} and sewed it together, I love how this turned out. Looks super vintage, and a great added texture to the project.

I’m always looking for cute projects ideas—especially projects that hold memories or highlight fabulous things in our lives. So I was very happy to receive a wonderful bookbinding tool for Christmas. I’ve wanted to add one to my tool collection for quite some time because I’ve seen so many adorable projects made with them. And it helped me come up with a great memory book keepsake of my own!

I used our fabulous line of Birthday Bouquet Designer Series Paper (item 140557) for this memory book, along with Pool Party 3/8″ Glitter Ribbon (item 140561) and Watermelon Wonder 1″ Stitched Satin Ribbon (item 140580). I really enjoy the color concept for this project, and included some bright additions to the spring colors.
I used our Vanilla Coaster Board (item 129392) to create a hard cover; then, for texture, I adhered Designer Series Paper to both sides using Fast Fuse Adhesive (item 129026). To create my flower, I stamped the large flower image from the Birthday Blooms Stamp Set in VersaMark ink on Shimmery White 8–1/2″ x 11″ Cardstock (item 101910); then I heat embossed the image using White Stampin’ Emboss Powder (item 109132). Finally, I painted the flower using Aqua Painters (item 103954) to create a soft look.

On every other page, I included an envelope. (Tip: Cut off the envelope flap so you can slide in a card displaying a photo or special keepsake.)


I picked a cute saying from the This Is the Life Stamp Set (item 138736) and embossed some of the cards using our Softly Falling Textured Impressions Embossing Folder (item 139672). I am such a huge fan of this embossing folder! It can be used on almost anything and is so versatile!

I hope you enjoyed my project today—and that I was able to inspire you to make a memorable project of your own to keep your special items or photos in!
Joyce Fowler
Artisan Design Team 2015–2016


Love this adorable collection of cards made with the Honeycomb Happiness stamp set from Sale-A-Bration, created by Bibi Cameron.
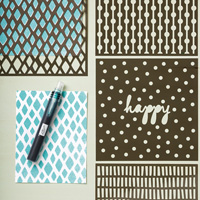
This set can be found on page 45 of the AC and the background, Watercolor wash is on page 129. I used sahara sand, Crumb cake and Basic black on Whisper White paper. The washi tape is everyday Chic, page 157 and the textured background is from Timeless Textures, page 29 in the OC.
|
|
|
||||||
|
|


Know what we love? This exclusive Sale-A-Bration stamp set! It includes 10 photopolymer stamps, perfect for layering and creating depth, so your flowers pop off the paper. Use it to say thanks, I love you, or just because.

See more ways to use this versatile stamp set in the video below:
Get this limited-time stamp set for FREE with your $50 usd/$60 cad purchase during Sale-A-Bration. But hurry—the Sale-A-Brating ends March 31! Contact your demonstrator today.
From my family to yours, May you have a blessed Easter! If you are traveling to see loved ones, have fun and safe travels back to us. Hugs, Patti
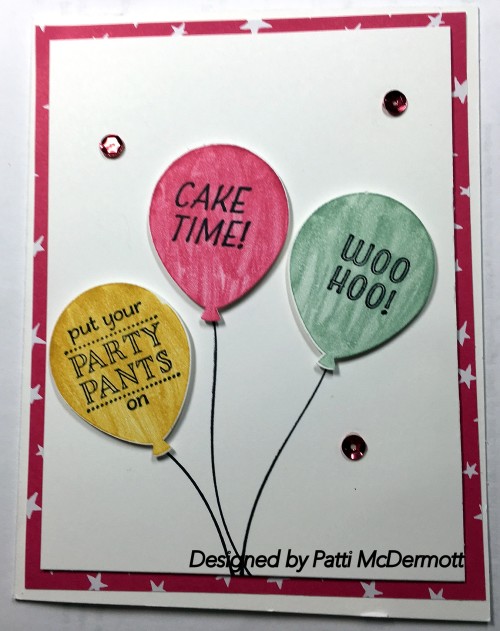
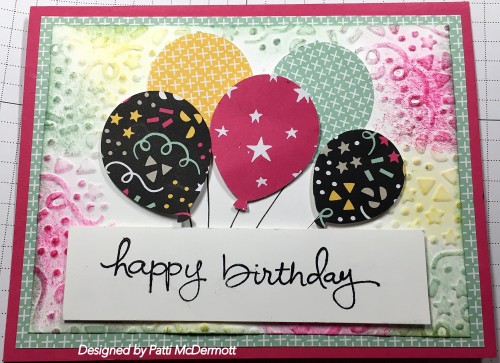
It sure seems like this is the year for balloons. They are everywhere! These balloons are from the set Party Pants, from the limited time SAB catalog. I love this set it is so stinkin’ cute! The balloon image can be punched out with the balloon bouquet punch, found on page 13 of the OC. This set is not for sale but can be yours FREE with a $50 purchase now through the end of this month. The DSP used in the background is from the Beautiful Stack of DSP, It’s My Party, page 5 in the OC.
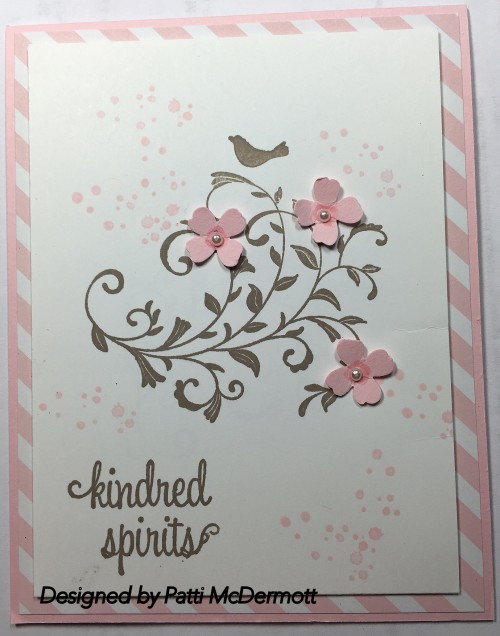
The sentiment on this card is from Suite Sayings, page 41 of the OC. The background paper is English Garden DSP page 142 of the AC. I used Mossy Meadow and Blushing Bride Card Stock. The butterfly was cut out with the Butterfly Thinlits, page 172 of the AC and I used the Blushing Bride Glimmer paper. In addition, I used the sequins from Love Blossoms embellishment kit, page 17 of the OC.

I created this card using the sets, Flowering Fields page 12 in the SAB catalog, and the set Timeless Textures page 29 in the OC. You can get this set contaning these beautiful flowers for FREE by purchasing $50 in merchandise before taxes and shipping. This is only through the end of this month so don’t lose out if this is one of your favorites. The colors I used are Blackberry Bliss and Mossy Meadow. The sentiment is from another SAB set which can be found on page 4 of the SAB Catty.

sale-
|
|
|
||||||
|
|


Here is that set again, Party Wishes, page 5, OC, and the match DSP, It’s My Party is used on the background. So festive! Who wouldn’t love this card on their special day? The balloons were punched out with one of the punches from the trio Party Punch Pack, page 4. The fancy pre-tied bow is from the kit, Love Blossoms Embellishments, page 17. I think that really sets this card off, don’t you? My Friday night ladies loved it!

This was one of the cards that we put together at our Friday evening Club. I chose Crumb Cake and Blushing Bride on Whisper White card stock and the stamp sets were, First Sight, page 36 and Timeless Textures, page 29 of the OC. I used the DSP from Soft Subtles for the background. The flowers were punched out with a punch from the set Itty Bitty Accents punches, page 166 of the AC.
I created this card with Balloon Celebration, page 12 that comes with a matching Balloon Bouquet Punch, page 13. This is another set that you can save 15% by buying the bundle. The set comes with 28 Stamps so you can certainly create a ton of cards with this set. I love a set that contains both images and sentiments.
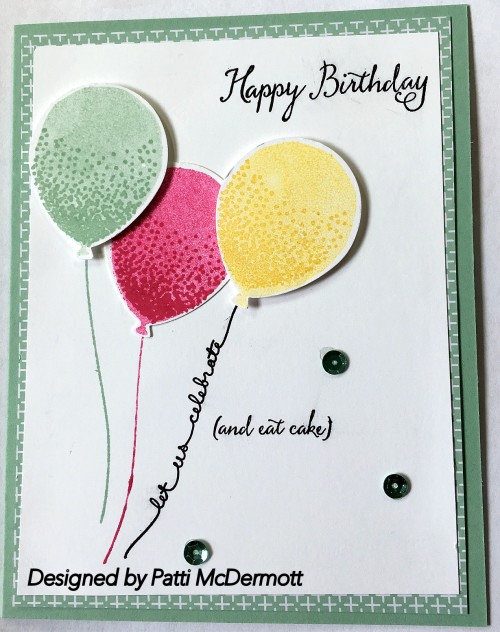
One of my favorite sets this Occasions catalog is the Party Wishes, page 5 and the matching DSP, It’s My Party, same page. What an incredible bundle this is. This set is so versatile you can make card after card and never run out of new ideas. I am posting a ton of cards made with this suite so watch for it this month.

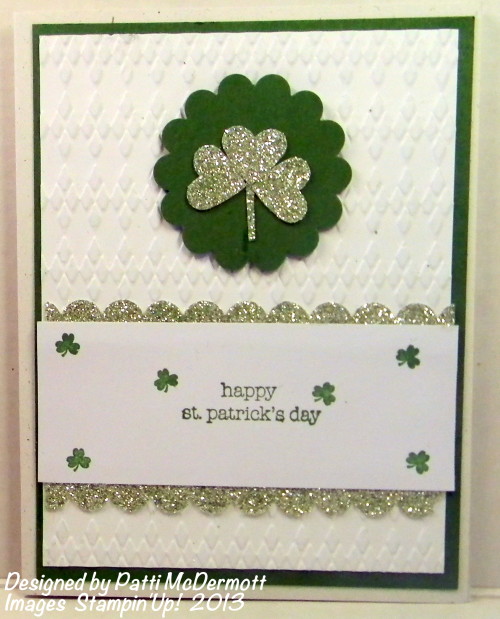
This is a card from a previous St Pat’s day. SU did not offer any Irish stamps this year but I wanted to use something generic that we can all enjoy! Hope y’all have a great day. As always, we will be enjoying some corn beef and cabbage and wearin’ the green!
I have a demo that has an extra set of Perfect Pairings and is willing to swap. Contact me here if you are interested.

The Perfect Pairings Stamp Set is more than meets the eye—it’s nine pieces, but you can mix and match the greetings for endless possibilities!Here’s what one of our artists said about it:
“This is the perfect set for a beginning stamper because it has a variety of greetings all in one. The greetings can stand alone or be combined in countless ways. Yes, this is a greeting set but the fonts are bold enough to stand alone so you don’t necessarily need an image set to go with it.”
So start playing and see how many greetings you can come up with! The best part? Get this set FREE with your $50 usd/$60 cad purchase through March 31!
|


Are you a card fanatic? Then don’t miss out on Sale-A- Bration’s Project Life® card collection. It’s perfect for memory making, but it’s just as fantastic for card making (get ideas here)! Either way, these gorgeous specialty cards are a must-have. And you can earn them for FREE with your $50 usd/$60 cad purchase during our annual Sale-A-Bration event. But hurry—Sale-A-Bration ends March 31! Contact a demonstrator today to earn your free limited-time Memories in the Making Project Life Specialty Card Collection.

Did you know that Easter is very early this year? It’s on March 27! Here’s a quick and simple Easter card that you can make using a WOW technique with the Balloon Celebration Stamp Set (item 140675) and the Balloon Bouquet Punch (item 140609). After stamping the balloon shape, simply snip the balloon end-piece off and you have an egg shape!

Stamp the large balloon image in Crumb Cake (item 126975), Perfect Plum (item 126963), Pool Party (item 126982), and So Saffron (item 126957) on a piece of Very Vanilla Cardstock (item 101650). (Stamp directly on the cardstock with Pool Party and So Saffron ink; stamp off the Crumb Cake and Perfect Plum balloon images.) Don’t forget to place your Stampin’ Pierce Mat (item 126199) beneath the cardstock to get a good, stamped image with your photopolymer stamps!

To create the first layer of speckle, stamp the splatter image from the Gorgeous Grunge Stamp Set (item 130517) in Early Espresso Classic ink (item 119789) across the wide half of the balloon image.

To create the next layer of speckle, use the Gold Wink of Stella Glitter Brush (item 141898). Squeeze the sides to push the ink into the barrel, then use your finger to tap hard on the brush. This will cause the ink to splatter across the cardstock.

Cut the stamped Very Vanilla Cardstock into strips so that you can slide them into the Balloon Bouquet Punch. Cut off the balloon end-piece. Now adhere the finished speckled eggs to a card using any simple Easter greeting.

Happy Easter!
Cindy Schuster
2015–2016 Artisan Design Team
Are you someone who likes to add a little creativity to each and every holiday occasion? I love to make little projects for gifting and decorating—and Easter is no exception! This year, I’ve created a sweet banner and a couple of different baskets for gifts and egg hunting.

Make the base pieces of the banner by cutting Kraft 12″ x 12″ Cardstock (item 133674) and Birthday Bouquet Designer Series Paper (item 140557) to 4″ x 6″, then cut the bottom of each piece into a banner shape. Next, trim the upper layer. (I took about 3/8″ or 1 cm off each side.) Create the bunny silhouette using the Circles Collection Framelits Dies (item 130911) and the small leaf shape from the Flower Fair Framelits Dies (item 133731).

Start by lining up the larger circle where you’d like the bunny body to be and use the Big Shot (item 113439) to cut. Next, put the smaller circle in place for the head and cut. Lastly, line up and cut one ear at a time. You can make the ears stand up
straight . . .

. . . or get a little fancy by half cutting and moving your leaf Framelit to create a floppy ear.

Add a sweet Honeycomb Embellishment (140566) for the tail or make a wee pom pom using Whisper White Baker’s Twine (item 124262) and adhere.
Once you’ve finished the bunny banner pieces, use the Flower Patch Stamp Set (134207) and coordinating Framelits to stamp, cut, and create an arrangement of blooms and leaves.

To complete the banner, punch holes in each of the banner pieces and thread with your favorite ribbon. I used both the Pool Party 1/4″ Cotton Ribbon (item 134568) and Bermuda Bay 1/8″ Stitched Ribbon (item 140569).

Of course, you’ll also need some baskets for Easter so I used the Berry Basket Bigz L Die (item 137366). Shine On Specialty Designer Series Paper (item 140579) is perfect for baskets because it’s heavyweight cardstock and you can choose between bright patterns or silver foil prints. I cut another basket out of the Birthday Bouquet Designer Series Paper and used it as a lining for my basket (to match my banner).
Once assembled, I added some ribbon and flowers for embellishments.

If you’re still saving up for your Big Shot and Berry Basket Bigz L Die, you can make use of the many other packaging options Stampin’ Up! offers. I used a Takeout Box (item 135827) as a gift box, but you could definitely use it for egg hunting, too. I love that the Takeout Boxes are made from kraft-colored cardstock! Kraft matches my theme perfectly and the boxes are also food safe.
I used a stamp from the Flower Patch Stamp Set with the VersaMark Pad (item 102283) to stamp a subtle design on the outside of my box. I then trimmed an inch from each flap as I wanted my gift box to be open. Once I assembled the box, I tied some ribbon around it to keep the flaps open and then used the cut outs from my bunny banner to put together a bunny-shaped tag. I stamped “Happy Easter” on the bunny using a sentiment from the Circle of Spring Photopolymer Stamp Set (item 138964). I added a little Honeycomb Embellishment tail, this time in Blushing Bride, and tied the bunny to the box using ribbons.

I hope this post gives you some ideas for decorative projects to make this Easter. Or—you can even change up the colors and re-use the same projects for a sweet, bunny-themed baby shower or birthday party.
Jessica Williams
Artisan Design Team 2015–2016
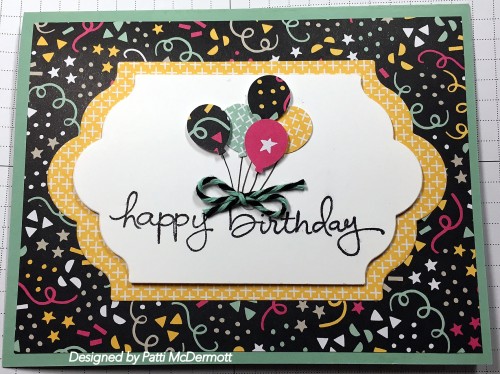
I used the Embossing Folder, Confetti Texture, page 5 of the OC and the sentiment is from the set, Endless Birthday Wishes, page 6 of the AC. The DSP is from the Paper Stack on page 5, OC, It’s my Party! The balloons are punched out with the Balloon Bouquet punch found on page 13 of the OC.
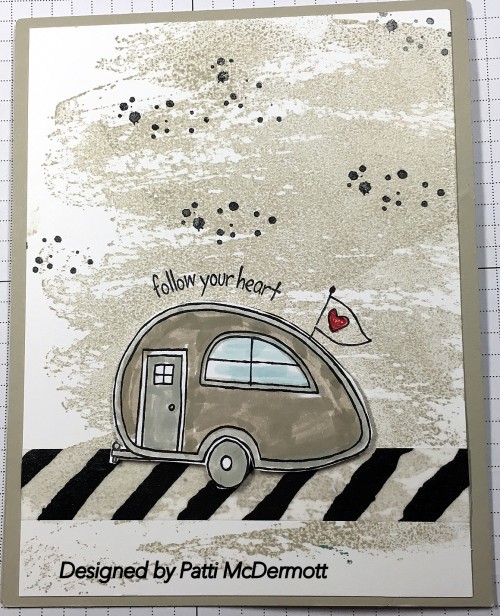
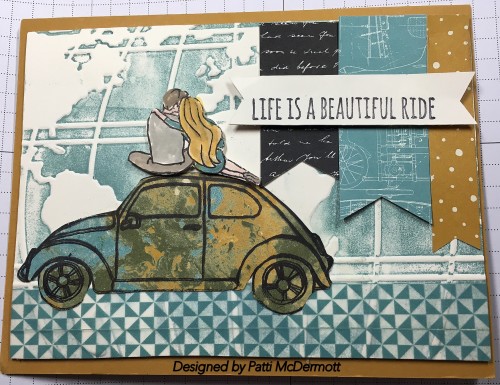
This was another card we made at our Wednesday morning club class along with the Diorama. I used the DSP. going places page 39, of the OC and the set, Beautiful Ride, page 15. I used the embossing folder, World Traveler and the colors I used were Old Olive and Lost Lagoon, and Delightful Dijon. I used Washi Tape, In-Color, page 157 of the AC. Hope you like it.
I borrowed this set, Party Wishes, page 5 OC, from my daughter Maureen (Mo). It was one of those sets that I said I didn’t need when the new OC came out. Again, was I wrong! This set is so awesome! I have made many cards with it and I keep telling myself why don’t I just go ahead and buy it. She purchased the stack of DSP, It’s my Party, page 5, which I did not purchase, another bummer! However, she is so kind to let me use as much as I want of hers. I can’t stop making cards with this bundle. The three Party Punch pack that matches the set is the BOMB! Watch for more to come on this great set.
 ok
ok
|
|
|
||||||
|
|


Personally, I think that the Best Thoughts Stamp Set (item 139234) is one of this year’s most beautiful hostess sets. I’ve already made an engagement card with it for a good friend. “The best is yet to come” text was very appropriate for the occasion and the set’s flower image is awesome in its simplicity . . . and so versatile. It’s perfect as a background stamp—or it can easily be the centre of attention (as it is with this card):

I used a watercoloring technique with the help of Aqua Painters (item 103954), Classic Stampin’ Ink Refills, and Shimmery White Cardstock (item 101910). For the card above I used the Rose Red Classic Stampin’ Ink Refill (item 102109) and the Melon Mambo Classic Stampin’ Ink Refill (item 115662). I put one drop of each ink color in an egg cup and filled an Aqua Painter with water.
Before doing this, I stamped the flower in VersaMark ink (item 102283) on Shimmery White Cardstock, then poured White Stampin’ Emboss Powder (item 109132) over it. Then I shook off the excess powder and heat embossed the image using the Heat Tool (item 129053). Once this was done, I squirted some water on my stamped flower using a Stampin’ Spritzer (item 126185) filled with water. That allowed me to blend the ink. Then I colored the flower using an Aqua Painter, changing the colors until I got a result that I liked. As the finished flower was very wet, I used the Heat Tool to dry it off a bit; then I cut out the flower using Paper Snips (item 103579).
For the next step, I assembled the card using Smoky Slate Cardstock (item 131202) for the base, a piece of striped Designer Series Paper from the Neutrals Designer Series Paper Stack (item 138435), and Whisper White Cardstock (item 100730) for the top layer—embossed using the Polka Dot Textured Impressions Embossing Folder (item 133739) and splashed with red/pink ink using an Aqua Painter.
I adhered the cut-out flower to the card (placing a small piece of thread underneath). I also stamped the “Friend” image from the Awesomely Artistic Stamp Set (item 139950) in Tuxedo Black Memento ink (item 132708) on Whisper White Cardstock, then cut it into a banner shape and adhered it to the flower. I also punched small flower accents from White Vellum Cardstock (item 101856) using the flower punch in the Itty Bitty Accents Punch Pack (item 133787), and added a few Rhinestone Basic Jewels (item 119246) to the finished card.

I made the same card using Pool Party Classic Stampin’ Ink Refill (item 122933) and Island Indigo Classic Stampin’ Ink Refill (item 122932), which gives the card an entirely different look. Have fun creating your own watercolor card!
Chantal de Kaste
Artisian Design Team 2015–2016

Have you talked to your demonstrator about Sale-A-Bration lately? If not, you may have missed this fantastic NEW addition to the line of FREE Sale-A-Bration rewards, which just became available February 16.To stamp with the Pedal Pusher Stamp Set is to love it! Create your own charming scene with its pieces; take advantage of the versatile photopolymer images—it really is amazing what you can create and how effortlessly the pieces come together. And during Sale-A-Bration, this 11-piece stamp set is FREE with your $50 USD/$60 CAD purchase! View this video for more ideas on using the limited-time Pedal Pusher Stamp Set.
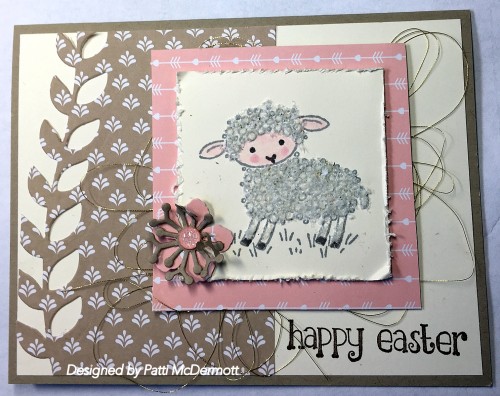
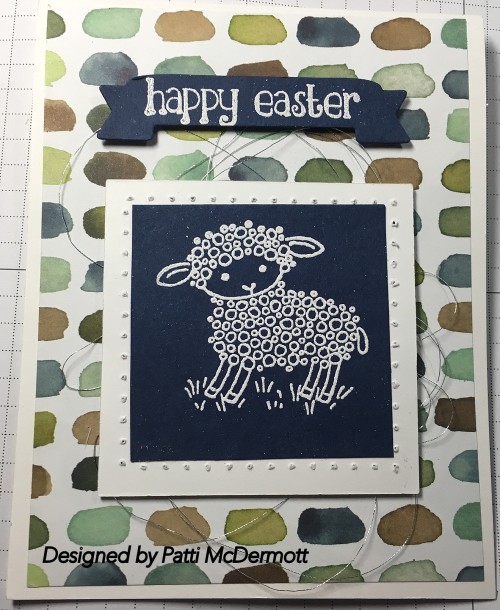
Not too soon to be thinking of Easter and this set, Easter Lamb, page 24 of the OC is so cute. I embossed the image in white on Navy Blue and used the DSP background paper, English Garden, page 142 from the AC and the silver Metallic thread, also from same, page 159.
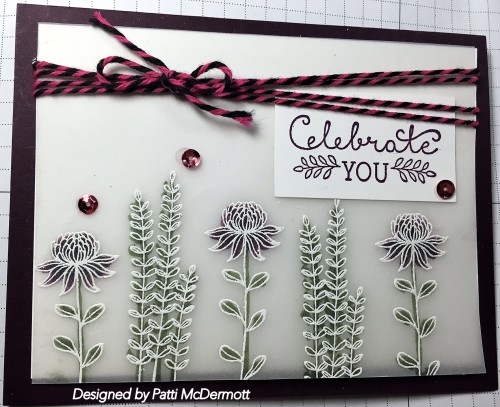
On this card I embossed the images in white on Vellum card stock and colored them with markers on the reverse side with Blackberry Bliss and Mossy Meadow. I love the way it came out. The stamp set is Flowering Fields from Sale-A-Bration catalog, page 12. I used the Bakers twine, page 6 of the OC. The sentiment if from the set Sweet Sayings, page 41.
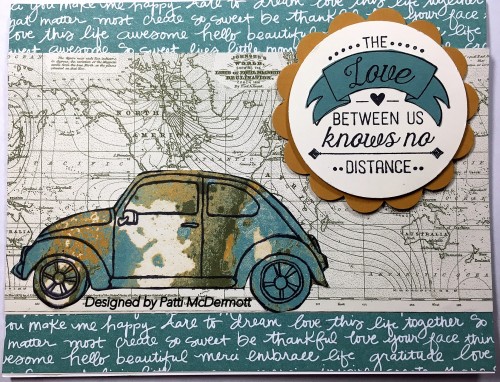
I love this stamp set, Beautiful Ride, page 15 of the OC. I used the Paper Stack, Going Places, page 39, which I thought went really well with this stamp set. Colors are Delightful Dijon, Lost Lagoon and Very Vanilla.
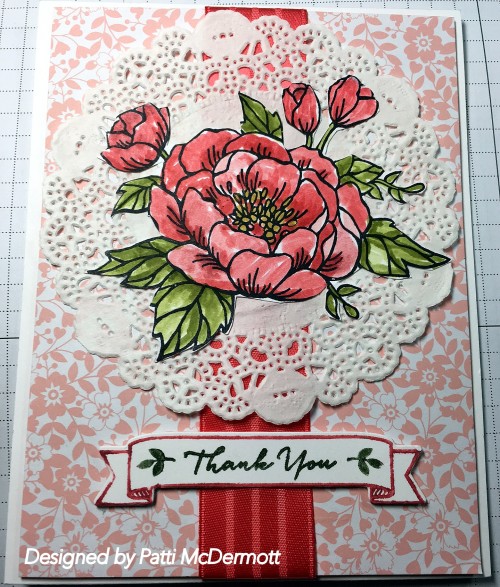
I love these colors together. Watermelon Wonder and Blushing Bride. The stamp set is Birthday Blooms page 9 of the OC and the background paper is from the stack, Love Blossoms, page 17. I used the Watermelon Wonder 1″ stitched Satin Ribbon, page 31. We colored the image with Blender pens and used Olive Green on the leaves.
|
|
|
||||||
|
|


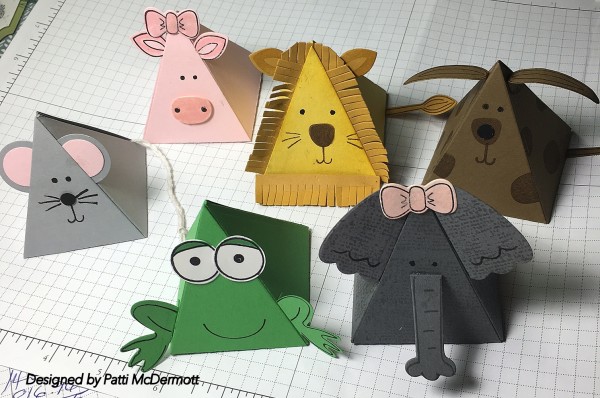
We did this little frog at Saturday’s camp and he came out so stinkin” cute. You can make these from the set, Playful Pals, page 45 in the OC. On page 44, they have the matching Pyramid Pals thinlits. You could go on forever making these adorable little animals. You can even put little treats or a piece of jewelry in them. Right now you can get the bundle of both for a reduced discount of 15%.