
I thought this was a perfect set to use with the SU Blends. The set is Bird Banter, page 42 of the OC. The DSP is Painted with Love, pg 19 of the OC. The ribbon is Love Mini Tinsel, same page, and the card base is Thick Whisper White. Colors I used were Pumpkin Pie, Calypso Coral, Cherry Cobbler, Old Olive and Daffodil Delight.

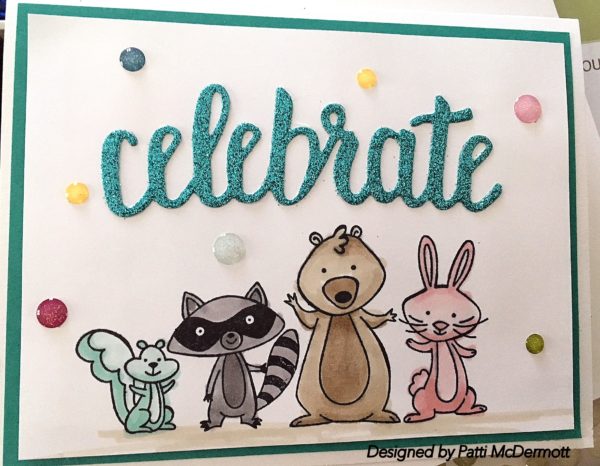
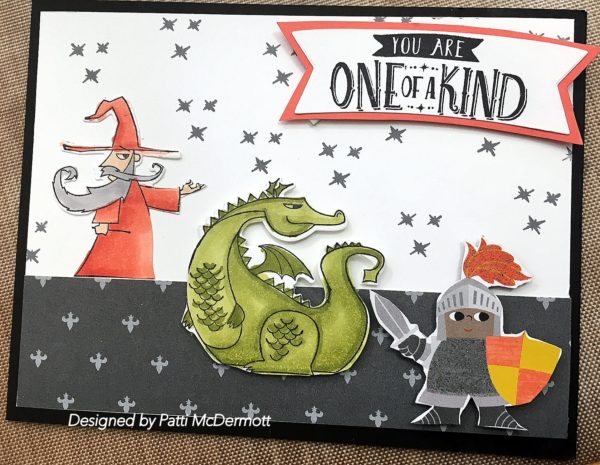
I created this fun card with the stamp set, We Must Celebrate, page 39 OC. The sentiment is from the SAB catalog, page 17, which you can get FREE with a $100 purchase in product. I used Myths & Magic, glimmer paper, page 37 OC, for the sentiment. I embellished with Glitter enamel dots, page 196 AC. In addition, I used the SU Blends, page 30, OC, to color the images.
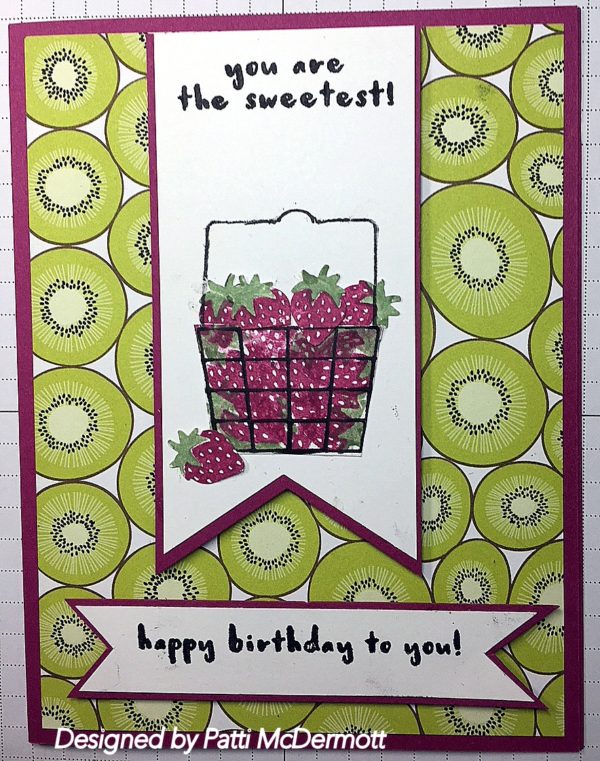
I love fruit and both of these are my favs. I created this card with the stamp set, Fruit Basket, pg 29 of the OC. The DSP is Is Tutti-frutti, same page. I punched the strawberries out with the matching punch, Itty Bitty fruit pack, also same page. Colors I used were Berry Burst and old olive. Card stock is whisper white and berry burst.
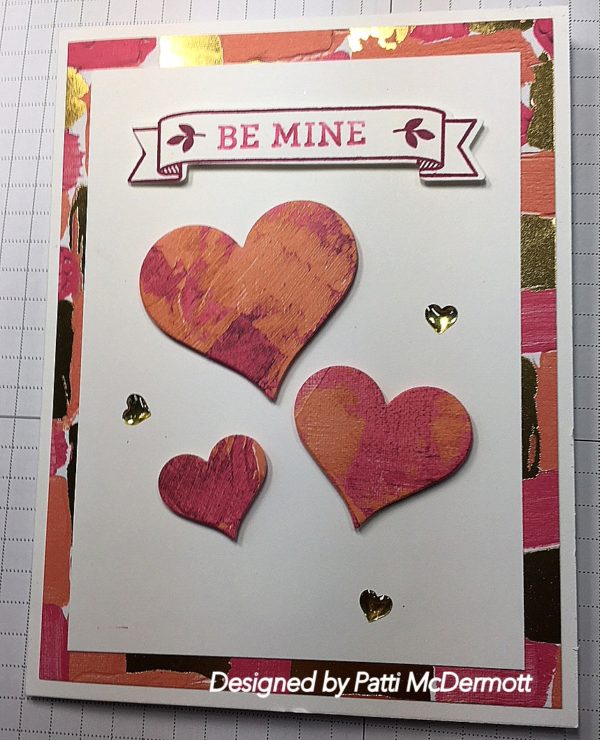
I am in love with the DSP, Painted with Love, page 10 of the OC. It is my fav paper ever. I used this as background on this card stamped with last year’s stamp, Bloomin’ Love, page 88 of the AC. I used Whisper white card stock and cut out the hearts from the DSP using the Big shot Sweet & Sassy Framelits on page 214 AC. In addition, I embellished the front of the card with the Metallic Enamel shapes, page 196 of AC. I used the Framelit to cut out the banner from the set Large Numbers Framelits, page 215 of AC.
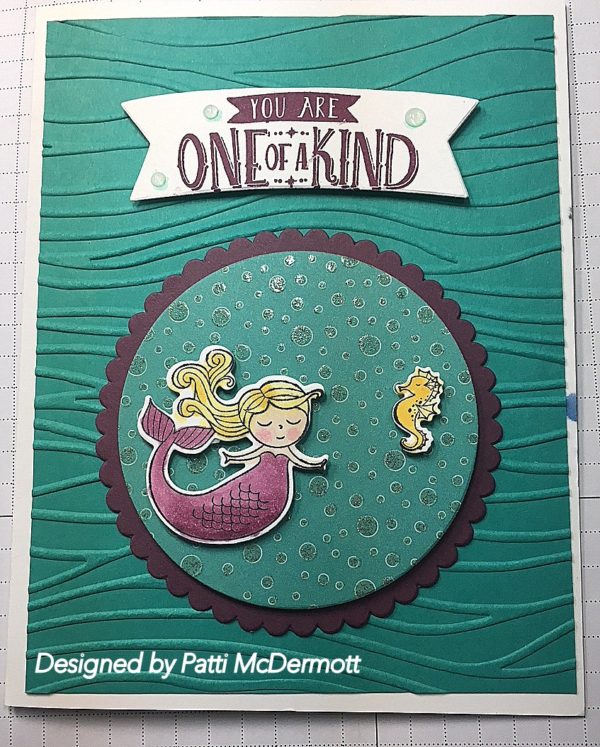
I absolutley LOVE this stamp set, Magical Day, page 37 of the OC. Right now you can get both the stamp set and the matching framelit dies, same page, for a 10% discount. I used Bermuda Bay for the background that I dry embossed with the Seaside Embossing Folder, page 210 of the AC. I used our new Rich Razzelberry SU Blends to color the mermaid and the seahorse. I stamped the image with Rich Razzleberry ink on Whisper White Card Stock. The gorgeous background of the mermaid is the DSP, Myths and Magic, same page in the OC. For embellishments I used the Glitter & Clear epoxy shapes, page 33 OC.
I love the new Sale-A-Bration (SAB) sets. I created this card with the set, Party Pandas, page 15 of the SAB catalog. You can get this set FREE if you purchase $50 in product from any of our catalogs, both the Annual Catalog (AC) and the Occasions catalog (OC). The DSP, Painted with Love, is from the OC, page 19, and the hearts were cut out with gold foil paper which can be found in the AC on pg 194. I used the Big Shot, pg 209, and the Sweet & Sassy Framelits, pg 214, both in the AC. In addition, I used the Metallic Enamel Shapes, pg 196 AC. For the base card I used Thick Whisper white and the front I used our regular Whisper White card stock, both found on pg 194 AC.

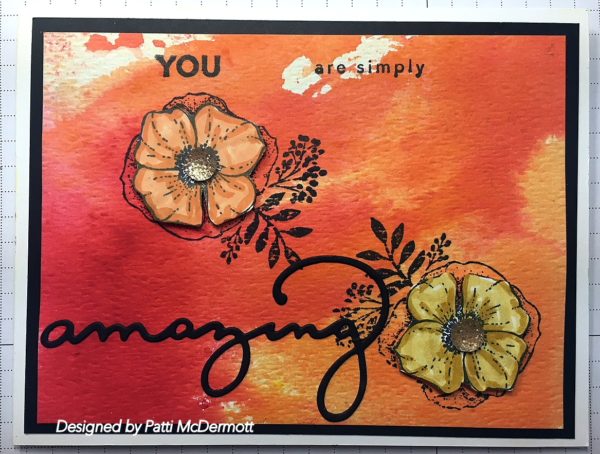
It is my first born’s birthday today. She is such an incredible person and I wanted to use this space to tell her so. What an AMAZING cook she is. I just spent time with her in TN and she cooked me the most incredible gourmet meals.
I used Brusho on this card. This time I shook the Brusho out on a large block and then spritzed with water to create this background. I moved the card stock over the block and picked up color from the block. I loved the way it came out. I used Brusho Yellow, Gamboge, and Brilliant Red colours.
I colored the flowers from the stamp set, Amazing You, page 16 of the SAB catalog, with our SU markers, Calypso Coral and Peek-a-boo Peach, and Daffodil delight, and Crushed Curry. The embellishments in the flowers centers are Gold faceted Gems.
Right now through March 31 you can get this stamp set FREE by purchasing $50 of product. In fact if you spend $100 in product, you can get the coordinating Thinlit dies FREE. See page 17, SAB for details. The possibilities are endless with these products.
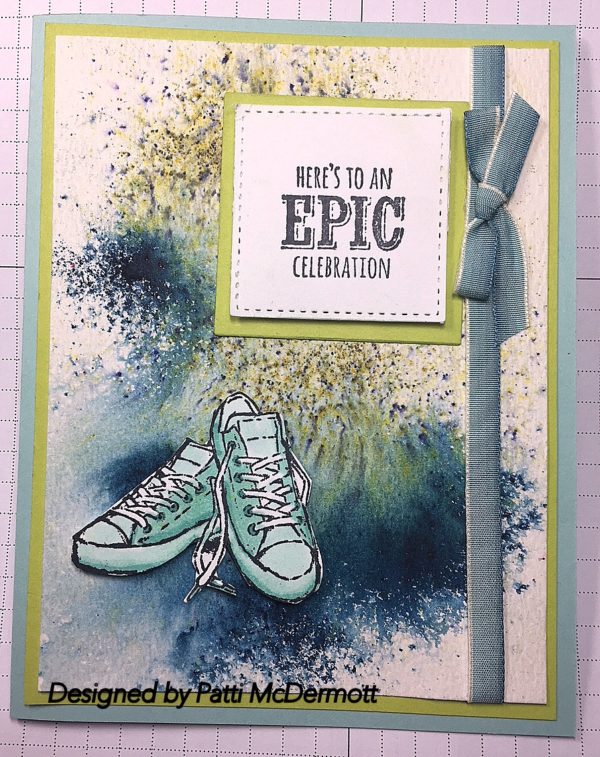
This card was created using Epic Celebration, page 12, SAB catalog. I used the Brusho (page 26 OC) technique on the background. This time I spritzed the watercolor paper with water and then applied Prussian Blue and Moss Green Brusho. Let it dry naturally and stamped. I used the beautiful Umbre ribbon, page 198, AC for embellishment. I colored the sneakers with Stampin Blends, page 30 of the OC.

This is Beautiful Peacock, pg 7 of the SAB catalog. I love this set. I used Night of Navy and Lemon Lime Twist for colors on Whisper White Card Stock. The embellishments, Tutti-Fruiti, are on pg 29 of the OC and the ribbon is from the AC. Now through the end of March you can get this set FREE if you purchase $50 in product.

I designed this card with the new stamp set Magical Day, page 37 of the OC. It is part of the Myths & Magic Suite. One of my favs. This set is so versatile. Right now you can get both the set and the framelit dies at a 10% discount if you buy the bundle. I fussy cut the little soldier from the DSP, also on same page. The rest are cut out with the dies. Hope you like it.

Go here to order: www.pattispad.stampinup.net
If the link does not direct you to my website, please copy and paste in your browswer.
 |
|
Sort By:
|
|
|


 |
|
Sort By:
|
|
|


This card was created using the new Stampin’ Blends containing Alcohol Inks. ON this card I used pool party along with Pumpkin pie inks. The stamp set, Color Me Happy, is also new, introduced along with the blends. You can purchase the set in both wood, 144062 $27.00, and clear mount,144069 $19.00.
What’s nice about these pens you can purchase them individually or as a complete set. Please contact me for more information.

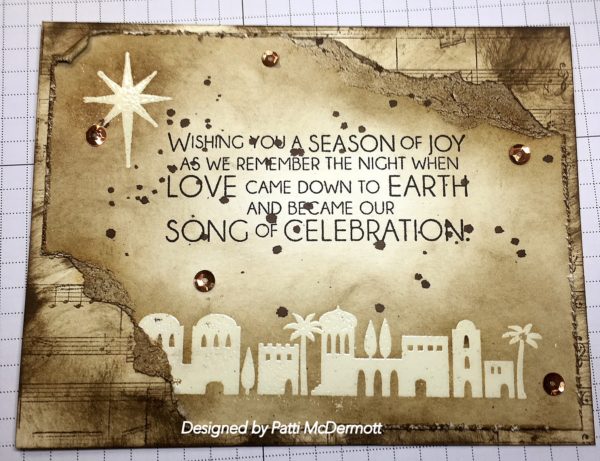
IN this card, I sponged soft suede ink and distressed the card stock to appear vintage style. The Stamp set, Night in Bethlehem was from the HC, page 26. I used clear embossing powder on the very vanilla card stock creating a emboss resist affect. I used the Metallic sequin Assortment, pg 197 AC. In addition, I used the background stamp, Sheet music, page 165 in the AC.
I created this card using the DSP, Merry Music found on page 13 on the HC. The sentiment is from Labels to love, pg 45 along with the matching Every day label punch, pg 12, HC. The Sleigh from Santa’s Sleigh, page 119 in the AC. I used our Cooper foil paper for the sleigh cut out with the Thinlits dies from Santa’s Sleigh, page 214 AC.

Is everyone loving the new holiday catalog so far?!? I know I am! I’m here today to show you how you can use the Year of Cheer Specialty Designer Series Paper (item 144640) for fall cards, as well. Who doesn’t love Designer Series Paper that can be used for more than just one occasion?

The 2017 holiday catalog has some great fall stamp sets. Today I’m using the Gourd Goodness (item 144785) and Labels to Love (item 144967) Stamp Sets.

First up is the Gourd Goodness Stamp Set and the pretty leafy sheet from the Designer Series Paper pack. I started by layering this on Berry Burst Cardstock (item 144243). Next, I stamped the bottom layer of the pumpkin image in Peekaboo Peach Classic Stampin’ ink (item 141398) on Shimmery White Cardstock (item 101910). I stamped the top layer of the pumpkin with none other than the Pumpkin Pie Classic Stampin’ Pad (item 126945).

I decided to add an additional highlight to the pumpkin by coloring in the white spot with the Crushed Curry Classic Stampin’ Pad (item 131173) and an Aqua Painter (item 103954). After stamping the pumpkin stems with the Chocolate Chip Classic Stampin’ Pad (item 126979), I cut out the pumpkins using my Paper Snips (item 103579). Next, I cut out some leaves using the Leaf Punch (item 144667).
I then die cut a circle from Whisper White Cardstock (item 100730) using the Stitched Shapes Framelits Dies (item 145372) and layered this onto a Berry Burst Cardstock scalloped circle cut using the Layering Circle Framelits Dies (item 141705).
I added my pumpkins to the circle with the leaves surrounding it. A sentiment stamped on Berry Burst Cardstock punched with the Classic Label Punch (item 141491) and Calypso Coral ¼” Ombre Ribbon (item 144235) finished off the card.

Now onto a Halloween card. I am using the Labels to Love Stamp Set for this fun card. I started with a piece of the Gold Plaid Paper from the Year of Cheer Specialty Designer Series Paper layered on Basic Black Cardstock (item 121045) and Pumpkin Pie Cardstock (item 105117).

On top of that I added a strip of Gold Glimmer Paper (item 133719) accented with Vintage Crochet Trim (item 144611). Just add the trim to the top and bottom of the Glimmer strip using Snail Adhesive (item 104332).
I stamped the sentiment using the Versamark Pad (item 102283 ) on Elegant Eggplant Cardstock (item 105126) and embossed with White Stampin’ Emboss Powder (item 109132) and the Heat Tool (item 129053). I then punched this out with the new Everyday Label Punch (item 144668). This punch has such a great look! Before I glued the Elegant Eggplant label to the card, I punched Basic Black cardstock using the Starburst Punch (item 143717) to layer behind the label.
I also stamped the sentiment three other times on Whisper White Cardstock so I could fussy cut those little bats and add them as accents on the card. I added some of the new Black Rhinestone Jewels (item 144639) as well!

For my final card, I used the starburst pattern from the Year of Cheer Specialty Designer Series Paper along with the Labels to Love Stamp Set.


I started by coloring the Designer Series Paper with Rich Razzleberry, Real Red, Pumpkin Pie and Daffodil Delight Watercolor Pencils (item 141709). Then I blended the colors with my Aqua Painter for a watercolor background. I splattered Fresh Fig Classic Stampin’ ink (item 144082) with my Aqua Painter on top of the watercoloring. I like how you can see the starbursts popping through the watercoloring.
Next I stamped the sentiment and border in Basic Black Archival Stampin’ ink (item 140931) on Crumb Cake Cardstock (item 120953) and punched using the Everyday Label Punch. Behind the label, I die cut a couple of leaves using the Seasonal Layers Thinlits Dies (item 143751), Old Olive Cardstock (item 100702), and Chocolate Chip Cardstock (item 102128). To finish the card, I added Gold Mini Sequin Trim (item 144128) and gold sequins from the Metallic Sequins Assortment (item 144214).
I hope this inspires you to think of ways to use your Year of Cheer Specialty Designer Series Paper for other occasions.
Jennifer Sootkoos
2017 Artisan Design Team
I like to think of myself as a “glass half full” kind of person, and as we head toward the end of 2017, I realized that there are many occasions approaching that are cause for celebration and a chance to gather with friends and loved ones. I can’t think of a better stamp set that can help celebrate all of them than the Half Full Stamp Set (144996). This is also a Million Sales Achiever set, inspired by Linda Bauwin.

The line art images in this set lend themselves perfectly to coloring. The sentiments are fun and the fonts perfectly mixed! I wanted to create a little something that could sit at a place setting on any celebratory table. Name place holders are always a good idea for a large group and to personalize this one I used the Labeler Alphabet Stamp Set (141936). Rather than sharing a large bottle of wine, I love the idea of a mini gift of bubbly for each person presented with a sweet tag! It doesn’t matter if it’s Thanksgiving, Christmas, a wedding or birthday party, this set works perfectly for any occasion.

I have used the same techniques on all three of my projects. Since the subject is wine I have incorporated the gorgeous new Champagne Foil Sheets (144748) as an accent for all of them. It seemed only fitting! I have used Watercolor Paper (122959) and an Aqua Painter (103954) to create my artwork. I first stamped in Archival Black Ink (140931) then used my Heat Tool (129053) to heat set it to ensure it wouldn’t run. I then applied a light wash of ink over each image in Soft Sky (131181), Always Artichoke (126972), So Saffron (126957), and just a touch of Peekaboo Peach (141398) thrown in for good measure. I’ve found that the trick to good watercolor is to let each layer dry before adding more. It helps to add depth and not have all the colors blend into one. Don’t be tempted to hurry.

A card to go along with the gift of wine is a must, and in keeping with the color theme of green, yellow, and blue, I used Soft Sky Cardstock (131203) for my card base and Always Artichoke Cardstock (105119) for my sentiment panel. I heat embossed the card sentiment in White Stampin’ Emboss Powder (109132) and used the Heat Tool to heat set it. After wrapping the watercolor panel with the Crushed Curry 3/8″ Stitched Satin Ribbon (144182) and tying off in a side bow, I added the sentiment panel over the top using Stampin’ Dimensionals (104430). I then completed all three projects with a few gold sequins from the Metallics Sequin Assortment (144214). I personally favor the Fine-Tip Glue Pen (138309) to adhere sequins to my projects, but Multipurpose Liquid Glue (110755) is also a good choice.

If you’re thinking of adding a bit of pizzazz to an occasions table yourself, then I think the Half Full Stamp Set is a great choice! You can certainly tailor it to any occasion and color scheme that you wish.
Paula Dobson
Artisan Design Team 2017
October Paper Pumpkin: Pining for Plaid

Does any of this sound familiar? You’ve decided that THIS YEAR nothing will stop you from making handmade holiday cards. But December fills up fast with fun activities–and before long your cardmaking aspirations end up in a snow pile. Yep, we hear you.
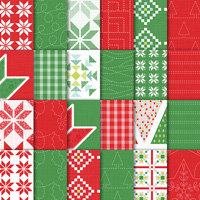
But we have good news. Paper Pumpkin can help! We’ve made it easy for you to get ‘er done with October’s Pining for Plaid kit. The cards are a snap to put together; plus, you’ll get an immediate dose of the Christmas spirit as you enjoy this kit’s rustic pine trees, shimmering “snowflakes,” and merry greetings. To round out this “sparkling” holiday offering, you can also look forward to November’s kit—which was made to match and coordinates perfectly with the shaker cards.
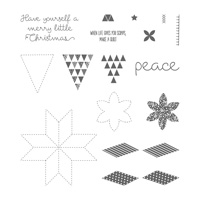
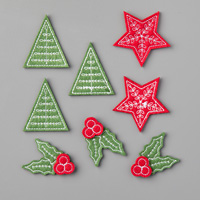
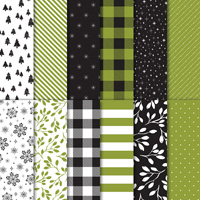
Each Pining for Plaid kit comes with 10 printed card bases, 10 printed envelopes, 1 sheet white die-cut banners, 1 sheet gold foil banners, 10 embossed card fronts, 10 printed background pieces, 10 acetate sheets in 2 sizes, 1200 sequins, 150 adhesive dots, and 5 dimensional circles. As with all of our full Paper Pumpkin kits, it also includes an exclusive stamp set and an ink spot (this month is Cherry Cobbler).

The creative possibilities for this kit are off the charts. For instance, our concept artist used the exclusive stamp set plus the holiday catalog’s Merry Little Christmas Designer Series Paper to make a card and envelope, then added a Pool Party Cardstock banner and some Dapper Denim, Old Olive, and Pool Party ink to really make her project pop.
For the card in the center, she backed one of the designed cards with Cherry Cobbler Cardstock, embellished with a Merry Little Christmas Designer Series Paper border, and stamped her greeting on Basic Black Paper for a sophisticated chalkboard look.
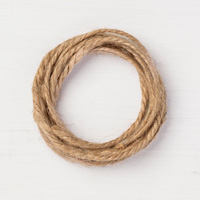
Finally, check out her awesome stepped-up project (which made the rounds here at Stampin’ Up! and had everyone oohing and ahhing)! She simply crafted tiny boxes out of the designed paper, stacked them up, and attached a fabulous tag with Jute Twine. You could enclose small treats or gifts in the boxes, or use the entire project as a gorgeous ornament to give to a friend!
For more festive ideas, be sure to check out our Pinterest page, and share your own ideas on social media. We love seeing your creations online!

You can feel the crisp chill in the air here on the East Coast of Canada. As I put on my mittens, you can almost hear the jingle bells in the distance. Honestly, it makes me a little bit giddy inside. I truly feel the magic every single year.
Every year, I vow to get organized early. Typically one of the first items on my agenda is to get our advent calendars ready. The tradition in our family is to select a wrapped holiday book every evening as well as a Lego advent calendar for each child in the mornings. However, this year my kids are now seven and five. It’s a great age to begin some Random Acts of Kindness. This Holiday List works the same way as a typical countdown to Christmas where my children will select a note each day.

The Trim Your Stocking Thinlits Dies (144682) is a perfect product to hold the twenty-four pieces of rolled-up paper containing the Random Act of Kindness.
To begin this project, I cut out 25 stockings using the Merry Little Christmas Designer Series Paper (144621) and the Merry Little Christmas 12″ x 12″ Cardstock Pack (144622). Carefully I pieced each holiday stocking together and placed a number made out of Real Red Cardstock (102482) and the Large Numbers Framelits Dies (140622). Finally, I attached each stocking with Real Red 1/8″ Solid Ribbon (144631) and hung it on a large decorative frame using the Jute Twine (144625). If you don’t have a large frame, you could quite easily use a three-foot Christmas tree to hang these stockings.

The Trim Your Stocking Thinlits Dies also come with a pillow box-shaped die, which fits a gift card perfectly. It allowed me to have a pocket on each holiday stocking where I could place a rolled-up Random Act of Kindness. Since my children are young, I selected Random Acts of Kindness that did not take a great deal of time and would not be a financial burden. While I researched online for some ideas, it was easy to select 24 acts. I encourage you to tailor your own family’s Random Acts of Kindness list to what best works for you.
Here’s the Caines Family Holiday Random Acts of Kindness List:
- Send a card to a stranger, such as an overseas service member.
- Donate new toys to the Happy Tree.
- “Sock” a friend by putting a treat in a holiday stocking on someone’s doorknob with a special note.
- Make five sticky note messages and place them on a mirror or door. A drawing or a note like “You are beautiful” would be perfect.
- Bring a joke to school to read to your class.
- Donate food to the food bank.
- Help Nanny put away the dirty dishes.
- Draw a picture for your teacher and give it to her along with a treat.
- Shovel for a neighbor or clear off their cars before they wake up.
- Donate 10 books you no longer need.
- Help clean the neighborhood on a walk. Be sure to wear your gloves and bring a garbage bag.
- Go through old towels and blankets to donate to the animal shelter.
- Drop by a senior’s home and bring a poinsettia. Be sure to say hello!
- Donate some cards to Ronald McDonald House.
- Write a list of five things you are thankful for
- Pay for someone’s coffee.
- Donate some money to a charity.
- Leave candy canes on someone’s windshield.
- Put a treat in the mailbox for the mail carrier.
- Call both your grandmas just to say hello.
- Bring coloring books to the doctor’s waiting room and the gymnastics viewing room.
- Decorate rocks using paint and place them around the neighborhood for strangers to find (“kindness rocks”).
- Be a helper by picking up 10 things off the floor each day.
- Give five people a compliment. Or more!
- Merry Christmas!

I am so excited to share these adventures with my children and I truly believe that these little gestures will make a big difference in our small community.
I’m wishing you all the best in your holiday preparations!
Cathy Caines
2017 Artisan Design Team
ew Stampin’ Blends
Documenting a Day in Amsterdam

Have you ever taken a mini-break in your own city? My husband and I did a few weeks ago and we loved it! We went to Amsterdam, acted like tourists (in our own city, LOL!), and took some lovely pictures.
Of course I had to document this little trip, and the best and easiest way to do that is with our Memories & More Card Packs!
For this project I picked the Perfect Days Memories & More Card Pack (144209). I really love the black and white patterns in combination with Lemon Lime Twist, Soft Sky, and Emerald Envy.
For this pocket page layout I printed my photos with my Instax printer. I like the size of the photos and it really worked out perfectly in combination with the Memories & More Card Pack and the Variety Pack 12″ x 12″ Photo Pocket Pages (144204).

I embellished the cards with a few wood veneer hearts from the Hearts & Stars Elements (144215), but the Memories & More Card Pack contains a lot of extras. On the card with the cute kitty I used some stickers from the pack.

And of course the Cat Punch (144666) is perfect to add to this card! Isn’t his little bow adorable? Here are some of the other cards in this layout.

For the card below with the beautiful canal houses I used some of the other punches: the Leaf Punch (144667) and the Circle Tab Punch (143754).
I stamped the word Amsterdam using the Labeler Alphabet Photopolymer Stamp Set (141936)—and there you go, the title of this layout!

It was so easy to document our little trip to Amsterdam, and the layout was done in no time!
Do you have some pictures left of your city trip? Grab your Memories & More Card Pack and a Pocket Page and document it!
Happy crafting!
Miriam van Eyden
2017 Artisan Design Team
Hi there! I’d like to show you a super-quick gift idea—because sometimes it’s the little things that best express our appreciation, gratitude, and joy.

“It’s the small gifts that maintain a friendship” is a fantastic German proverb that means a great deal. Sometimes you just want to tell someone “Hey, I’m so glad you’re there,” and then give them a little something.
Personally, I don’t think cost matters! The most important thing is that your gift comes from the heart, and (if possible), is handmade. Giving is simply fun and it also creates friendships!

In the summer, there are so many beautiful flowers to pick or buy, and who doesn’t like getting flowers? Wrapped nicely, a little bunch of flowers can also have a big effect! With little effort, you can create a lovely personal gift.

For my flower wrapper I used a piece of Crumb Cake Cardstock (item 120953), which I first cut to 21 x 21 cm, rolled into a cone, and then glued together with Fast Fuse (item 129026).
I die cut the heart from Whisper White Cardstock (item 100730) using the Bloomin’ Heart Thinlits Dies (item 140621), then I glued it onto the cone. I also die cut a smaller heart using the Sweet & Sassy Framelits Dies (item 141707) to match the flowers. As my roses are almost Melon Mambo, I decided to use that cardstock (item 115320). I embossed a sentiment from the Bloomin’ Love Stamp Set (item 140643) using Gold Stampin’ Emboss Powder (item 109129) and adhered the heart with Stampin’ Dimensionals (item 104430) for a 3D effect. Finally, I tied a bow with Linen Thread (item 104199) and added the small wooden heart from Hearts & Stars Elements (item 144215).
I hope you like the quick and flowery gift idea!
Happy creating!
Sylwia Schreck
2017 Artisan Design Team
Christmas at the Kids’ Table
It’s no secret that I absolutely love Christmas and I have fond childhood memories of sitting at the “kids’ table” for Christmas lunch. These days I’d probably rather be there than sitting at the “adults’ table” talking about how exhausted we are after all the seasonal preparations!
Handcrafted table settings are one of my favorite things to create and Stampin’ Up! makes it so easy. I created this fun Christmas setting for the “kids table” using the Tags & Trimmings Bundle (item 146062) from the holiday catalog and the super-adorable Christmas Around the World Designer Series Paper (item 144629) which is perfect for this table setting.

I created the cutlery pocket using the Trim Your Stocking Thinlits Dies (item 144682). I added texture to the Crumb Cake Cardstock (item 120953) using the Burlap Stamp Set (item 143982) and the Crumb Cake Classic Stampin’ Pad (item 126975). And I used the Tags & Trimmings Stamp Set (item 144832) to add the sweet holly using the Old Olive Classic Stampin’ Pad (item 100702) and Pear Pizzazz Classic Stampin’ Pad (item 131180). I stamped the buttons using Real Red Classic Stampin’ Pad (item 126949), then finished with a Linen Thread bow (item 104199).


The Tags & Trimmings Stamp Set did the rest of the work! I fussy cut the little cars for the straw and the card and used the paper to make the Christmas cracker. Then I tied the ends of the cracker with Real Red 1/8″ Solid Ribbon (item 144631). The best part is . . . you can use your Paper Snips to curl this ribbon, and it works beautifully!


Other products used for this project were the Big Shot (item 143263); Paper Snips (103579); Gusseted Cellophane Bag (item 141704); Vellum Cardstock (item 101856); Gold Binder Clips (item 141673), and Stitched Shapes Framelits Dies (145372).
It’s hard to believe Christmas is just around the corner and hopefully I have inspired you with other ways to get creative with your Christmas table this year!
Hugs,
Louise Sharp
2017 Artisan Design Team
Can you believe that it’s September already? Do you know what that means? That’s right! It’s time for a new Stampin’ Up! holiday catalog! This is always one of my favorite times of year—not because the kids go back to school or the end of summer is near, but because the holiday season is on its way, and Stampin’ Up! releases some pretty amazing products to celebrate the most wonderful time of the year.
This year’s catalog has got to be one of my favorites! It’s FULL of fun and gorgeous new stamps, papers, and embellishments that are truly must-haves. Today I’m sharing a few cards that were created with one of my favorites from the new holiday catalog, the Merry Café Stamp Set (144965).

This fun stamp set has sentiments and images for all seasons! The first card I created just had to have a pumpkin spice latte! This card features a few patterns from the new Painted Autumn Designer Series Paper (item 144613), a pumpkin spice latte created using the Big Shot Die Cutting Machine (143263), and the Coffee Cups Framelits Dies (143745). I used the gorgeous new Jute Twine (144625) to tie a bow around the card layer for added interest.

Isn’t this next card the cutest? To create the mummy, I began by cutting out a coffee cup using the Big Shot and the Coffee Cups Framelits Dies. Next, I used the Stampin’ Trimmer (126889) to cut 1/2″ strips of Very Vanilla Cardstock (101650). I sponged the edges with a Stamping Sponge (141337) and the Crumb Cake Classic Stampin’ Pad (126975). Then, using the Multipurpose Liquid Glue, I adhered the Very Vanilla strips to the coffee cup in an overlapping pattern. I created the eyes using the 1/2″ Circle Punch (119869) and the Cookie Cutter Builder Punch (140396) and inserted them between the Very Vanilla strips. Way too cute and lots of fun! My favorite for sure!

Here’s a close-up of the mummy card. It’s somewhat difficult to see exactly what’s behind the Vellum Cardstock (101856) cup topper but there’s whipped cream complete with sprinkles! The sprinkles were created by flicking the brush end of the Pumpkin Pie Stampin’ Write Marker (131259) into the cup top and onto the Whisper White Cardstock (100730) whipped cream. The close-up also shows a sampling of the fun new Spooky Night Designer Series Paper (144610).

Since I made an adorable card for Halloween, I felt it was only fitting that I create an equally cute one for Christmas. This card features two patterns from the Quilted Christmas Designer Series Paper Stack (144617) to make a Santa Claus-themed drink! The Merry and Christmas sentiments were stamped a few times onto a strip of Very Vanilla Cardstock. I used the Garden Green Classic Stampin’ Pad (126973) and Real Red Classic Stampin’ Pad (126949). I created Santa’s buckle using the Big Shot Die Cutting Machine, Gold Glimmer Paper (133719), and the Layering Squares Framelits Dies (141708).

Just as I did with the mummy card, I added a huge dollop of “whipped cream” to this one—this time with red and green peppermint sprinkles on top. I created a peppermint straw using the Coffee Cafe Stamp Set (143677) and adhered it behind the whipped cream.

Last, but certainly not least, is another card that features yet another cute cup of coffee. The “I love you and coffee” sentiment is an adorable way to share your affection! This valentine features two more patterns from the Quilted Christmas Designer Series Paper. That’s right, the Quilted Christmas Designer Series Paper works for more than just Christmas! The colors are perfect for all occasions and when paired with this particular sentiment, it makes the perfect Valentine’s Day card!

I hope I’ve inspired you to create a few (or twenty!) cards using the new Merry Café Stamp Set.
Dani Dziama
2017 Artisan Design Team
Year of Cheer with an Autumn Twist
Is everyone loving the new holiday catalog so far?!? I know I am! I’m here today to show you how you can use the Year of Cheer Specialty Designer Series Paper (item 144640) for fall cards, as well. Who doesn’t love Designer Series Paper that can be used for more than just one occasion?
The 2017 holiday catalog has some great fall stamp sets. Today I’m using the Gourd Goodness (item 144785) and Labels to Love (item 144967) Stamp Sets.
First up is the Gourd Goodness Stamp Set and the pretty leafy sheet from the Designer Series Paper pack. I started by layering this on Berry Burst Cardstock (item 144243). Next, I stamped the bottom layer of the pumpkin image in Peekaboo Peach Classic Stampin’ ink (item 141398) on Shimmery White Cardstock (item 101910). I stamped the top layer of the pumpkin with none other than the Pumpkin Pie Classic Stampin’ Pad (item 126945).
I decided to add an additional highlight to the pumpkin by coloring in the white spot with the Crushed Curry Classic Stampin’ Pad (item 131173) and an Aqua Painter (item 103954). After stamping the pumpkin stems with the Chocolate Chip Classic Stampin’ Pad (item 126979), I cut out the pumpkins using my Paper Snips (item 103579). Next, I cut out some leaves using the Leaf Punch (item 144667).
I then die cut a circle from Whisper White Cardstock (item 100730) using the Stitched Shapes Framelits Dies (item 145372) and layered this onto a Berry Burst Cardstock scalloped circle cut using the Layering Circle Framelits Dies (item 141705).
I added my pumpkins to the circle with the leaves surrounding it. A sentiment stamped on Berry Burst Cardstock punched with the Classic Label Punch (item 141491) and Calypso Coral ¼” Ombre Ribbon (item 144235) finished off the card.
Now onto a Halloween card. I am using the Labels to Love Stamp Set for this fun card. I started with a piece of the Gold Plaid Paper from the Year of Cheer Specialty Designer Series Paper layered on Basic Black Cardstock (item 121045) and Pumpkin Pie Cardstock (item 105117).
On top of that I added a strip of Gold Glimmer Paper (item 133719) accented with Vintage Crochet Trim (item 144611). Just add the trim to the top and bottom of the Glimmer strip using Snail Adhesive (item 104332).
I stamped the sentiment using the Versamark Pad (item 102283 ) on Elegant Eggplant Cardstock (item 105126) and embossed with White Stampin’ Emboss Powder (item 109132) and the Heat Tool (item 129053). I then punched this out with the new Everyday Label Punch (item 144668). This punch has such a great look! Before I glued the Elegant Eggplant label to the card, I punched Basic Black cardstock using the Starburst Punch (item 143717) to layer behind the label.
I also stamped the sentiment three other times on Whisper White Cardstock so I could fussy cut those little bats and add them as accents on the card. I added some of the new Black Rhinestone Jewels (item 144639) as well!
For my final card, I used the starburst pattern from the Year of Cheer Specialty Designer Series Paper along with the Labels to Love Stamp Set.
I started by coloring the Designer Series Paper with Rich Razzleberry, Real Red, Pumpkin Pie and Daffodil Delight Watercolor Pencils (item 141709). Then I blended the colors with my Aqua Painter for a watercolor background. I splattered Fresh Fig Classic Stampin’ ink (item 144082) with my Aqua Painter on top of the watercoloring. I like how you can see the starbursts popping through the watercoloring.
Next I stamped the sentiment and border in Basic Black Archival Stampin’ ink (item 140931) on Crumb Cake Cardstock (item 120953) and punched using the Everyday Label Punch. Behind the label, I die cut a couple of leaves using the Seasonal Layers Thinlits Dies (item 143751), Old Olive Cardstock (item 100702), and Chocolate Chip Cardstock (item 102128). To finish the card, I added Gold Mini Sequin Trim (item 144128) and gold sequins from the Metallic Sequins Assortment (item 144214).
I hope this inspires you to think of ways to use your Year of Cheer Specialty Designer Series Paper for other occasions.
Jennifer Sootkoos
2017 Artisan Design Team
By now you should have rec’d your Holiday catalog. It is another awesome catalog and I am sure you are anxious to browse through the pages. Contact me if you have not rec’d it by now. Hugs, Patti

It’s the most wonderful time of the year—2017 holiday catalog release! This year’s holiday catalog features tons of new products for all your holiday needs. There’s definitely something for everyone, including products for your favorite holidays: Halloween, Thanksgiving, Christmas, and more. Get started shopping right away in the online store, or contact your demonstrator to schedule your very own stamping event and take advantage of Stampin’ Rewards!

Have you been waiting for just the right time to host a Stampin’ Up! party? Do you love adorable Christmas stamp sets? If you said “Yes” to both questions, this may be the perfect time for you to contact your demonstrator (or click (US l CA) to find a demonstrator near you). What’s the occasion? Right now if you host a party with $300 USD/$375 CAD in sales, you can earn the exclusive, oh-so-cute Merry Patterns Stamp Set. This offer ends on October 31, so don’t wait! Get ready to take advantage of this exciting offer today!
Details
- Promotion period: September 1–October 31
- In order to qualify, the event merchandise total must reach $300 USD/$375 CAD (before shipping and handling)
- One stamp set may be redeemed per qualifying order, with no limit on how many stamp sets can be earned
- Orders must be closed by 11:50 PM (MT) on October 31
- The Merry Patterns Stamp Set is in addition to Stampin’ Rewards.
- The Merry Patterns Stamp Set is exclusive to the host promotion and will not be available after October 31
- The Merry Patterns Stamp Set may not be exchanged for another stamp set
Texture and Ombre: A Perfect Combination
Are you loving the 2017–2018 Stampin’ Up! annual catalog as much as I am? I have been asked to choose my top five picks time and again, and to be honest, it changes every time as I discover new things I didn’t notice the first time around!

I decided to focus on two items that perhaps YOU may have missed when skipping through the catalog in your excitement! All three of my projects feature the same technique, texture and ombre, and the same stamp set, You’re Priceless (143760)—along with the coordinating Eclectic Layers Thinlits Dies (143774)—but I have changed them all slightly for different looks.
I can’t say enough about Sponge Brayers (141714). They make adding color to projects so quick and easy and they’re a lot more forgiving than a rubber brayer. They can also be cleaned just by rinsing under cold water. I urge you to try these great color applicators! I have also used two of the new 3D Dynamic Textured Impressions Embossing Folders on these cards. These new embossing folders create deep impressions on your card giving a more dimensional look than traditional embossing folders.

Using original Whisper White Cardstock (100730) and the Sponge Brayer, I sponged color on my card across the diagonal in Peekaboo Peach (141398), Powder Pink (144084) and Berry Burst (144083) ink. (Tip: Always start with your lightest color first. I only needed to use one sponge roller by moving from light to dark.)
I then ran this through my Big Shot Die Cutting Machine (143263) using the Ruffled Dynamic Textured Impressions Embossing Folder (143699) to add those gorgeous pleats over the card. Before I adhered this to my card, I spritzed the card with Clear Wink of Stella Glitter (141897) and rubbing alcohol, which I mixed together in a Stampin Spritzer (126185). This made the whole card front so sparkly!
I then used the Heat Tool (129053) to heat emboss a sentiment using VersaMark ink (102283) and White Stampin’ Emboss Powder (109132) on Vellum Cardstock (101856). Die cut three diamond shapes from Whisper White Cardstock and adhere them to the card front –with some Iridescent Sequin Assortment (144212) sequins—using a Fine-Tip Glue Pen (138309).

I made my second card much the same way except for a few minor changes. The ink colors I used were Lemon Lime Twist (144086), Pool Party (126982), Bermuda Bay (131171), and Island Indigo (126986). I brayered these starting at the bottom of my card with the lightest ink and transitioning to darker inks as I moved toward the top. This time I ran my card through the Big Shot using the Hexagons Dynamic Textured Impressions Embossing Folder (143231) and die cut the diamond shapes from Dazzling Diamonds Glimmer Paper (135315), adding even more sparkle.

My last card was inspired by a gemstone called hematite, which is normally grey/black in color. I brayered along the length of the card front in Smoky Slate (131179), Basic Gray (140932), and Basic Black Archival (140931) ink. Instead of using die cuts on my card front, I stamped gem images from the You’re Priceless Stamp Set, first in Whisper White Craft ink (145406) on the dark side of the card and then in Smoky Slate ink on the white side of the card. I then ran this through my Big Shot again using the Hexagons Dynamic Textured Impressions Embossing Folder. I finished this card with the Metallics Sequin Assortment (144214) and a little Fine-Tip Glue.
I wish you could see the sparkle of these cards in person; it was tough to capture this in a photograph!
Paula Dobson
Artisan Design Team 2017


