From #ArtisanDesignTeam member Connie Collins (@CONSTANTLYSTAMPING): “The Simple Stripes Textured Impressions Embossing Folder by Stampin’ Up! is the perfect tool for making fast and fun rosettes. You can easily emboss 6”x6” designer series paper or cardstock. You can even emboss longer pieces (ie. 6”x12”) by embossing once, moving the paper, and embossing again. To prevent paper cracking or tearing, use the lightest possible embossing sandwich. Also, gently pinch the creases when creating the accordion folds. Cut your strips before folding and attach them end-to-end to achieve the desired fullness of your rosette.” #ADTTipsAndTricks #TechniqueTuesday
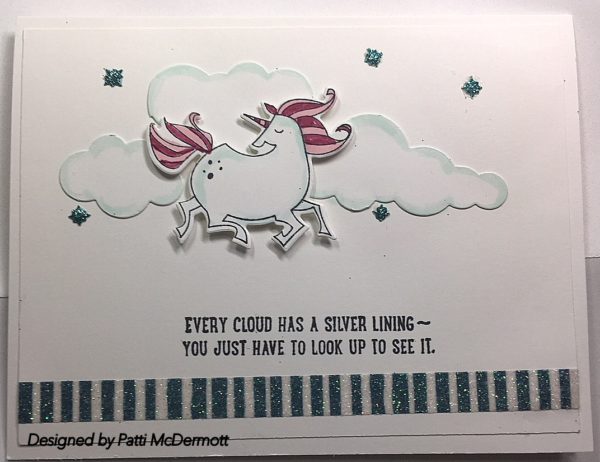
Another card made with the set Magical Day, pg 37, OC. Here I colored the Unicorn with Berry Burst marker and Pink Pirouette blender. I outline the clouds and unicorn in light Pool Party Blender. I cut out the embellishments from the Magical Framelit dies, glimmer paper, and Washi tape, all on same page to finish off the card. I love the whimsical look and hope you like it too. The sentiment is from Sprinkles of Life, pg 78 AC.
01. April 2018 · Comments Off on Wishing Y’all a Blessed Easter, from my family to you and yours! · Categories: Cards
Happy birthday to us! March 2018 is Paper Pumpkin’s 5th anniversary, and along with celebrating five amazing years of creating and sharing together, we also wanted to find a way to say thank you to our friends with an amazing March kit which includes a fantastic, FREE gift—a pack of beautiful wood embellishments.
Because this is such a special anniversary for Paper Pumpkin, a lot of love went into creating this kit, and we hope you’re as crazy about it as we are. Its vintage floral design with seed packet envelopes is a first for Stampin’ Up! and we have to say—the Paper Pumpkin team just about fell out of their chairs when they first saw it. It’s uniquely beautiful, collectible, and almost sure to go down in Paper Pumpkin history as an all-time customer favorite!
So don’t wait another minute! Watch the monthly unboxing video, pour yourself some tea, then unwind while you make these cards and bask in their vintage vibe.
Kit Features
Kit Contents
Besides the exclusive stamp set and Early Espresso ink spot, each May Good Things Grow kit contains 8 card bases, 8 card panels, 8 envelopes, 4 die-cut element sheets, 1 laser-cut element sheet, 1 sticker strip sheet, 4-1/2 yds. purple ribbon, 16 yds. white linen thread, 16 antique brass brads, 12 pink pearls (in 2 sizes), 12 purple pearls (in 2 sizes), 4 purple pearls, 275 dimensionals, and 100 adhesive dots.
Alternate Uses
Alternate Samples
If you’re new to Paper Pumpkin, you may not know that our suggested projects and instructions are just the beginning of what you can do with our fun kits. Feel free to break the mold and try something entirely new, like our fresh and lovely Hello card made using Crumb Cake Cardstock.
Alternate Sample 1
Our concept artist adhered a designed panel from the March kit and a Fresh Fig Cardstock banner to the card front. She then added a stamped Whisper White Cardstock panel spattered with a bit of Fresh Fig ink and colored with Stampin’ Blends. She finished by popping up the panel and sentiment with dimensionals and tying with a White Baker’s Twine bow doubled up with Linen Thread. This card is truly easy to make, and who wouldn’t love receiving it from a friend?
Alternate Sample 2
This card’s sweet floral centerpiece was created with kit elements, Crumb Cake Cardstock branches (made using the Big Shot and the Sweet Cake Framelits Dies), and wooden embellishments included with this very special fifth anniversary kit. Finish it off with a Baker’s Twine bow and a few pink pearls and you have what may be one of the prettiest Mother’s Day cards ever.
Check our Pinterest page to see more amazing ideas, and be sure to share your own ideas on social media.
Samples using the Free Gift
Free Gift Samples
This post wouldn’t be complete without showing off a few card samples made using the wooden elements our Paper Pumpkin subscribers received for FREE with this month’s anniversary kit.
Free Gift Sample 1
The Happy Birthday card is made from Fresh Fig Cardstock and features a scalloped circle cut from Fresh Florals Designer Series Paper Stack using the Big Shot and Layering Circles Framelits. Embellish the card with elements from the kit, the free wooden embellishments, and a banner made using the cute Pear Pizzazz-striped paper from the Coffee Break Designer Series Paper. Such a pretty card. You could make multiples of this one and keep them on hand so you’re never caught without a handmade birthday card to give to a friend!
Finally, this beautifully understated card (a perfect masculine card, by the way!) was created using Crumb Cake Cardstock. Our artist layered the card front with a designed panel from the kit, a Whisper White Cardstock piece, and a Very Vanilla Cardstock piece stamped in Crumb Cake ink. She then added lots of warm-looking wooden elements and a Linen Thread bow for an extremely versatile look that could be adapted for many occasions.
If you want even more inspiration and ideas to help you use your wooden embellishments we’ve got you covered! We reached out to some Stampin’ Up! demonstrators and asked them to show us how they are using their free gift. Click here to see projects from demonstrators like the ones shown here! We have a lot more to share!
Stampin’ Up! Demonstrator Jeanne Ciolli’s Project
We hope you loved the March kit and the free wooden embellishments! And sincere thanks to everyone for supporting Paper Pumpkin and helping us reach our fifth anniversary. Make sure you’re following us on Facebook, Instagram, Pinterest, and YouTube for all the latest and please, please, please stay subscribed to Paper Pumpkin! There are even more amazing kits on their way in 2018, and we don’t want you to miss a single one!

 Fr
Fr