26. June 2017 · Comments Off on By Allison Okamitsu · Categories: Cards

For the Love of Lemon Lime

Hello, my friends, and welcome! I’m Canadian Stampin’ Up! demonstrator and Artisan Design Team member, Allison Okamitsu. It’s a thrilling experience to be a guest blogger for Stampin’ Up! and I’m very excited to share my deep love for the new kid on the color block, Lemon Lime Twist. This bright, bold, and beautiful color is new to the Stampin’ Up! family, and I’m here to show you how this electric green fits in perfectly with the existing family of colors.

I’ve had a great time experimenting and have come up with three fun color combos to share with you.

1

This first combination is bright, flirty, and fun. Lemon Lime Twist, Flirty Flamingo, Tempting Turquoise, and Smoky Slate team up to create a super-fab card.

2

I used the Bike Ride Stamp Set (143716) and Lift Me Up Stamp Set (142893) to make an uplifting card for a long-distance friend. The bright color combo will put a smile on the face of anyone lucky enough to receive it. What better way to show your out-of-town bestie that you’re thinking of them?

Next up, I reached for a selection of Brights colors to complement Lemon Lime Twist.

3

Real Red, Tangerine Tango, and Pacific Point look even more bold and brilliant than usual next to Lemon Lime Twist.

4

This card features a Lemon Lime Twist dinosaur from the Pieces & Patterns Stamp Set (143840) and bold vertical stripes from the Banners for You Stamp Set (141710). It’ll be a hit with my nephews, for sure!

Last but certainly not least is what I think is my favorite color combination of all.

5

It’s rare for me to use so many colors on one project, but somehow this combination just works without looking overdone.

6

Because Stampin’ Up! has such a large selection of colors, it’s easy to create a card with a range of blues and greens, and it’s the perfect way to showcase the Feather Together Stamp Set (141597). I love that Lemon Lime Twist can go from loud and electric (see the previous card) to beautifully bold on this card. It just depends on what other colors it’s partnered with.

Thank you so much for visiting today. I hope I’ve inspired you to embrace the Lemon Lime Twist Classic Stampin’ Pad (14486) and Lemon Lime Twist Cardstock (144245) and come up with your own innovative color combinations. This color has become a fast favorite of mine, and one you’ll be seeing a lot of in my upcoming projects.

Allison Okamitsu
2017 Artisan Design Team

25. June 2017 · Comments Off on June Paper Pumpkin: One in a Melon · Categories: Cards
Paper_Pumpkin_June2017_Main

The long days of summer are here, and for some of us that can only mean one thing: more hours to spend crafting! Paper Pumpkin can go anywhere you do, so whether you’re on your way to the beach (or heading to your lounge chair in the backyard!) be sure to bring this kit with you. You’ll feel refreshed just looking at the designed paper with its watermelons, pineapples, lemons, and limes; then there’s the fun of putting together our yummy, summer-themed projects! Check out the how-to’s below.

Each One in a Melon kit comes with 6 printed card bases, 4 printed bags, 6 white envelopes, 2 sheets watercolor die-cut pieces, 2 sheets white die-cut pieces, 1 sheet laser-cut leaf stickers, 4 sheets printed cotton paper, 4 yds. pink baker’s twine, 4 green mini clothespins, 100 dimensionals, and 100 adhesive dots.

PP_June_AltImages

We’re pretty sure this kit will be the pine-apple of your eye (wink, wink) once you start playing with all of the elements inside! And the creative possibilities are endless. Check out the projects above for some sweet alternate ideas—like our stamped fruit slices tied to Crumb Cake envelopes and secured with White Baker’s Twine. Wouldn’t they make great gift card enclosures?

You could also fussy cut a few pineapple images from the designed paper and pop them up with dimensionals on one of the kit’s die-cut banners. For a perfect finishing touch, embellish with a pink baker’s twine bow.

Or make the Hooray card using Pool Party Cardstock and some of the fun die- and laser-cut pieces included with this month’s kit. With the sunny yellow banner as a focal point, it’s the perfect summer birthday card.

And don’t forget to check our Pinterest page for more fun ideas!

Save

23. June 2017 · Comments Off on Another Artisan Design Team Member · Categories: Cards

Everyday Adventure

I can’t get over how quickly the time has come for another annual catalog launch. The new catalog always brings so much excitement to the stamping community with its fresh new In Colors, stamp images, and accessories.

Each year I love to put together a collection of cards that showcases the new In Colors along with other coordinating products. I chose the Fresh Florals Designer Series Paper Stack (item 144131) along with the Dare to Dream Host Stamp Set (item 143769) to create a fun set of cards.

1

This year’s Host stamp sets are fantastic, but the Dare to Dream Stamp Set stood out for me because of the beautiful greetings and fonts. I love when I can create my own greeting from a collection of words in a set. The Dare to Dream Stamp Set gives you this opportunity and so much more.

2

Keeping a monochromatic theme made these cards quick and easy to duplicate. While I kept the added accessories simple, they added just enough “WOW” to the card.

Each card starts with a Whisper White Thick Cardstock (item 140272) base (4-1/4″ x 11″). Then I added two layers from the Fresh Floral Designer Series Paper Stack measuring 3-1/2″ x 5″ and 3-1/8″ x 4-3/4″.

The adventure image was stamped on each of the five new 2017–2019 In Color Cardstock (item 144247) pieces measuring 1″ x 4-1/4″. I added a 1″ x 4-1/4″ strip under the greeting using the Fresh Florals Designer Series Paper Stack.

3

I wanted to break up some of the patterns from the Fresh Florals Designer Series Paper so the greeting would remain the focal point. To do this, I added a piece of Whisper White Cardstock (item 100730) and stamped the fun floral spray image from the Dare to Dream Stamp Set using each of the five new In Colors.

4

Lastly, I added a few new embellishments to each of the cards such as the 1/2″ Finely Woven Ribbon in Berry Burst (144133), Fresh Fig (item 144132), and Lemon Lime Twist (item 144135). I also added the new Glitter Enamel Dots (item 144200). The Glitter Enamel Dots are unique because the many ombre shades coordinate with the new In Colors.

5

I hope this inspires you to create a collection of cards using the new 2017–2019 In Colors products. The possibilities are endless with these fun new products!

Kimberly Van Diepen
Artisan Design Team 2017

Save

21. June 2017 · Comments Off on View some of our gorgeous DSP · Categories: Cards, Videos

19. June 2017 · Comments Off on Coffee Cup Rings True! · Categories: Cards · Tags: , , , ,

This set is so awesome!  You can find this set, Coffee Cafe’ on page 31 of the AC.  It has matching dies, Coffee Cups Framelits, page 213, matching DSP, Coffee Break, page188, Corrugated Elements, page 196.  It also has a Cardstock pack that matches all the colors in the DSP.

The best part: You can bundle the set and dies and receive a 10% discount.  This is going to be a fantastic item for the Holidays.  I can see this being used for SB gift cards, etc.  The coffee splatter is made with our new Embossing Paste, page 201.  I dyed the paste with Soft Suede ink.  The stencil, however, is not SU.   It is Tim Holz and I have had it a long time for use in my Art journals.

Card stock used is Very Vanilla over Soft Suede and based on Crumb Cake.

Save

Save

Save

Save

Save

18. June 2017 · Comments Off on Hogs & Kisses for Father’s Day! · Categories: Cards · Tags: , ,

Tell me you don’t think these piggies are stinkin’ cute!  I love this set, This little Piggy, page 48 in the AC.  I will be using this set quite a bit.  The images and sentiments are super!  Here I used our new Powder Pink ink along with Pink Pirouette and Basic Black Ink.  The DSP is Wood Textures, page 148.

Save

Save

15. June 2017 · Comments Off on Artisan Design team projects · Categories: Cards

My Heart Is Glossed Over with Happiness

Hello, friends! I’m thrilled to be writing for the Stampin’ Up! blog this week. I’ve been playing with some of my new favorites from the 2017–2018 annual catalog (US/CA) and I’m bursting at the seams with my excitement over these new products!

If you’ve been stamping for a long time, you may have been as thrilled as I was to find that Glossy White Cardstock (item 144240) has made its triumphant return! The glossy surface is non-porous, which lends itself to some amazing techniques with ink.

One of my favorite tricks with Glossy White Cardstock is to use alcohol to blend the ink. I’ve filled a Stampin’ Spritzer (item 126185) with isopropyl alcohol for this purpose—it has a permanent home in my craft room!

After spending several days playing with ink, I am covered in stains and happy to share three of my favorite techniques with you.

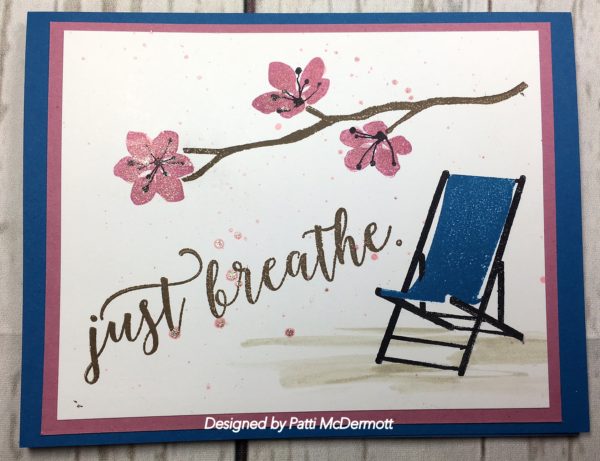
Technique #1: The Brushstroke

1

This technique couldn’t be easier, and it results in an amazing layered background that looks like it was painted by a master. How perfect to pair with paint brushes! These stamps, from the Crafting Forever Stamp Set (item 143955) and the Just Add Text Stamp Set (item 143931) fit this artistic technique to a tee.

To recreate this technique, start with a dry sheet of Glossy White Cardstock and an ink pad of your choice. I used a Bermuda Bay Classic Stampin’ Pad (item 131171) and an Old Olive Classic Stampin’ Pad (item 126953). Holding your ink pad at a 45-degree angle to your cardstock, simply drag the ink along the surface. Varying your pressure and angle will change the look slightly. Adding a variety of layers and textures with your ink will perfect the “painted” look!

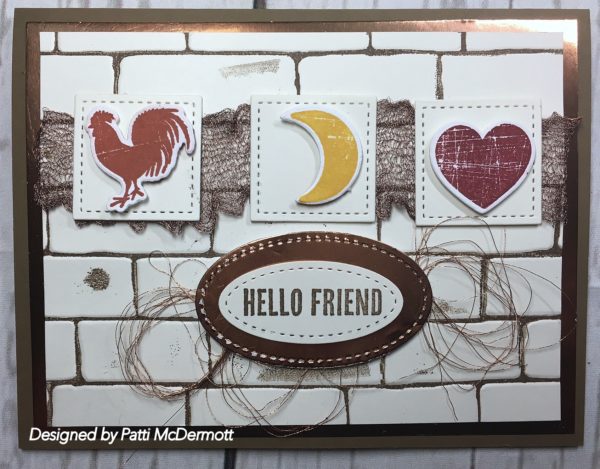
Technique #2: The Fade

2

The fade is so easy with Glossy White Cardstock, and it creates a subtle effect of a spotlight on a stamped image. Start by embossing the image of your choice. I used White Stampin’ Emboss Powder (item 109132). Heat-set with your Heat Tool (item 129053). Choose three Classic Stampin’ Pads in the same color scheme—I used Pool Party (item 126982), Bermuda Bay (131171), and Island Indigo (item 126986); then, using Sponge Daubers (item 133773), sponge the ink in a circular motion, starting with the lightest color in the center. Continue adding colors one at a time to the outer edges, proceeding from lightest to darkest. When your colors have been added, add some isopropyl alcohol to a clean Sponge Dauber and blend the inks.

I used this technique to spotlight the scissors from the Crafting Forever Stamp Set and added the coordinating sentiment die-cut using Stitched Shapes Framelits Dies (item 145372). Accented with a background stamp from the Tabs for Everything Stamp Set (item 143907) and Bermuda Bay 3/8″ Mini Chevron Ribbon (item 144198), this card makes a great clean-and-simple note for a friend.

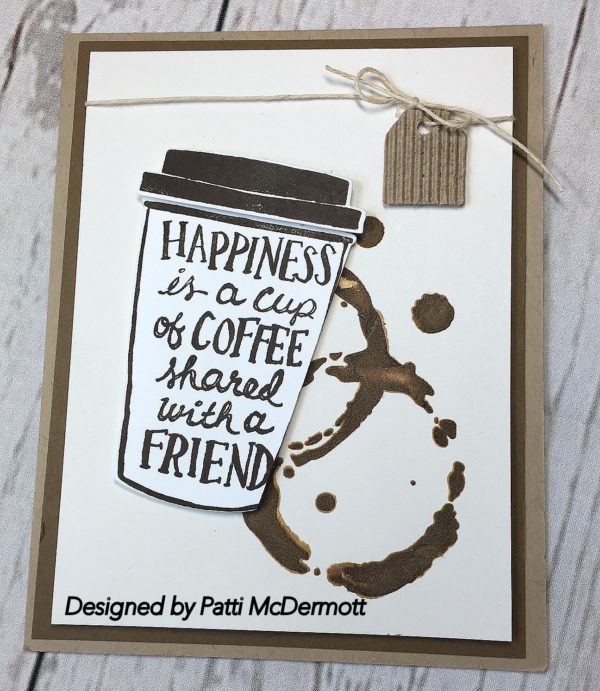
Technique #3: The Faux Watercolor

3

Talk about wow factor! This background technique is SO easy but it packs a major punch. You’ll need Glossy White Cardstock, isopropyl alcohol in a Stampin’ Spritzer, and a Classic Stampin’ Ink Refill in your choice of color. Shown here is Berry Burst (item 144089.) And there’s a little bonus! This technique yields TWO background pieces, so you have half the work per card!

To create this background, start by cutting two pieces of Glossy White Cardstock to your desired size (mine are 4-1/8″ x 5-3/8″). On ONE sheet of your cardstock, spray thoroughly with isopropyl alcohol, then drip your Classic Stampin’ Ink Refill over the surface. I recommend around 8–10 drops in various locations. Spray your cardstock again (it should be very wet) and tilt it in various directions until the ink runs. Set it flat on your protected surface, then place the second piece of Glossy White Cardstock shiny-side-down on the wet surface. You may want to slide your top piece of cardstock slightly to achieve a more blended look. Separate the two pieces of cardstock and your background design is finished; set it aside to dry and you’re ready to go!

If you find your ink didn’t blend as desired, simply add more alcohol while it’s still wet (since the alcohol is what helps it blend).

The focal point of this card was created with the Color Theory Designer Series Paper Stack (item 144193), Crafting Forever Stamp Set, Berry Burst 1/2″ Finely Woven Ribbon (item 144133), and a sentiment from the Wood Words Stamp Set (item 143928). Layering these elements in the corner lets the background shine.

Speaking of the Crafting Forever Stamp Set, in addition to the fabulous stamps used here, there’s one more great stamp included in this set that’s a must-have for every crafter.

4

The Stampin’ Up! Angel Policy means you can sell projects you’ve made with Stampin’ Up! copyright images as long as they include “© Stampin’ Up!” on them. Each catalog has one of these sets, and this year’s is Crafting Forever! How fabulous is that?!

5

Thank you so much for joining me today. I hope this blog inspired you to get out your new Glossy White Cardstock and start playing. Enjoy those inky hands!

Cheers,

Shannon Lane
2017 Artisan Design Team

Save

10. June 2017 · Comments Off on Wood Textures Suite · Categories: Cards · Tags: , , ,

We all rec’d this set FREE at the OnStage in Savannah Georgia.  It was so much fun and I couldn’t wait to get home to start playing with this set and some of the embellishments.  The set, Wood Words, page 159 of the AC can be purchased with matching dies, Wood Crate framelits, page 212.  You get 10% off if you bundle them.  I used copper foil on this card and love the way it turned out.  In addition, I used the stitched Shaped framelits, page 214.  The ribbon, Copper Trim, can be found on page 199.  I stretched the ribbon and layered it behind the images.  I also used the copper metalic thread, 198 in back of the sentiment.  The back ground is embossed with the Brick Wall Embossing Folder, page 210.

Save

08. June 2017 · Comments Off on More from the Artisan Design Team · Categories: Cards

Dads & Grads

Hello, crafty friends! I’m excited to share some my favorite things with you today and the Eastern Palace Suite Premier Bundle (147207) is at the top of my list right now.

I’m especially loving the Eastern Palace Specialty Designer Series Paper which is included with this awesome product collection! As soon as I saw it, I knew its rich fresh colors would be perfect for just about any occasion. Today I wanted to share a couple of cards that will be perfect for the guys in your life!

1

Aren’t these colors so yummy together?! I may be seriously crushing on Lemon Lime Twist at the moment. Lol!

2

I wanted to make sure the papers were the star of the show so I grabbed my Large Letters Framelits (141712) and  used the fabulous sentiments in the Eastern Beauty Stamp Set and the Eastern Medallion Thinlits to bring it all together.

3

Since I wasn’t about to toss any part of that beautiful paper, I decided to use the negative cutouts to create a great focal point for my “Dad” card. If you’re a little . . . uh . . . fussy about things being just right, here’s a tip for lining things up perfectly.

4

So all you have to do is lay the cutouts back into the shapes and add adhesive to the ones you want to stay in place. Then just remove the letters and everything should look just right.

Hope you’re inspired to use this amazing product suite to make a few cards to celebrate all the dudes you know!

Mercedes Weber
Artisan Design Team 2017

07. June 2017 · Comments Off on Colorful Seasons · Categories: Cards · Tags: , ,

This set can be found on page 147 of the AC.  I used Sweet Sugarplum on the flowers and Pacific Point on the chair, Soft Suede on the sentiment.  I love this set it is so versatile.  You can see several samples of this set on the internet or even Pinterest.  I added Wink of Stella (tinted with ink refill & alcohol) on the flowers and then a slight splatter over the front of the card.  It does have matching dies (Seasonal Layers), page 216, and you can get both of these items as a bundle and save %10.  Seasonal Layers contains 17 dies and the possibilities are endless with this combination.

Save

Save

05. June 2017 · Comments Off on Artisan Design Team · Categories: Cards

Everyday Adventure

I can’t get over how quickly the time has come for another annual catalog launch. The new catalog always brings so much excitement to the stamping community with its fresh new In Colors, stamp images, and accessories.

Each year I love to put together a collection of cards that showcases the new In Colors along with other coordinating products. I chose the Fresh Florals Designer Series Paper Stack (item 144131) along with the Dare to Dream Host Stamp Set (item 143769) to create a fun set of cards.

1

This year’s Host stamp sets are fantastic, but the Dare to Dream Stamp Set stood out for me because of the beautiful greetings and fonts. I love when I can create my own greeting from a collection of words in a set. The Dare to Dream Stamp Set gives you this opportunity and so much more.

2

Keeping a monochromatic theme made these cards quick and easy to duplicate. While I kept the added accessories simple, they added just enough “WOW” to the card.

Each card starts with a Whisper White Thick Cardstock (item 140272) base (4-1/4″ x 11″). Then I added two layers from the Fresh Floral Designer Series Paper Stack measuring 3-1/2″ x 5″ and 3-1/8″ x 4-3/4″.

The adventure image was stamped on each of the five new 2017–2019 In Color Cardstock (item 144247) pieces measuring 1″ x 4-1/4″. I added a 1″ x 4-1/4″ strip under the greeting using the Fresh Florals Designer Series Paper Stack.

3

I wanted to break up some of the patterns from the Fresh Florals Designer Series Paper so the greeting would remain the focal point. To do this, I added a piece of Whisper White Cardstock (item 100730) and stamped the fun floral spray image from the Dare to Dream Stamp Set using each of the five new In Colors.

4

Lastly, I added a few new embellishments to each of the cards such as the 1/2″ Finely Woven Ribbon in Berry Burst (144133), Fresh Fig (item 144132), and Lemon Lime Twist (item 144135). I also added the new Glitter Enamel Dots (item 144200). The Glitter Enamel Dots are unique because the many ombre shades coordinate with the new In Colors.

5

I hope this inspires you to create a collection of cards using the new 2017–2019 In Colors products. The possibilities are endless with these fun new products!

Kimberly Van Diepen
Artisan Design Team 2017

Save

04. June 2017 · Comments Off on Just do it! · Categories: Cards · Tags: , , ,

This set, Crafting Forever, you will find in the new Annual Catalog (AC), page 181.  I used water color paper and our classic ink pads and an Aqua Painter, page 200.  The background paper is from the new Color Theory DSP Paper stack, page 187.  The dies I used are, Layering Circle Framelits, Layering Oval Framelits and Stitched Shapes Framelits, both on page 214. I used whisper White and layered these on Basic Black Card Stock, page 185.

Save

Save

Save

Save

03. June 2017 · Comments Off on New catalogs are now here! · Categories: Cards

Hello Crafters and Stampers,

I am so excited about our new catalog.  It is the best ever!  So many gorgeous stamp sets and loads of wonderful embellishments.  SU has added more dies, framelits, thinlits and punches to go with these new sets.  Many of them are sold as bundles which means you get 10% off by buying both the stamp set and the matching framelits, thinlits, or punches.

If you have not receive your catalog, please contact me at www.patmojac@bellsouth.net and I will send one out to you.

In addition, June is the month to hold a workshop, either in your home or mine.   All my hostesses that have a $350 workshop in June will receive an addition $35 in FREE rewards over and above the $42.  Call ASAP so we can schedule your workshop.

Hugs, Patti


01. June 2017 · Comments Off on Coastal Waters · Categories: Cards · Tags: , , ,

I am so glad that they carried over this set, High Tide, page 25 of the OC.  It is one of my favs.  Here I used it with the DSP, By the Shore, page 173 AC.  This is a very versatile set because it not only has wonderful images, but it has terrific sentiments.  Of course, living here by the coast, this set is very special to me.  I will get a lot of use out of this set.

Save

Save