30. September 2016 · Comments Off on From Artisan Design Team · Categories: Cards

 I’m Addicted to Doilies, By Golly

I have a confession to make. It’s hard for me to make a card without using a doily. I love how they instantly add a touch of polish without any cutting or stamping. They layer beautifully and are a simple, yet pretty way to highlight a focal image. Plus, they’re an inexpensive way to embellish your cards (especially when you factor in the per unit cost, which amounts to only pennies).

I was recently stamping with the Be Jolly, By Golly Stamp Set (item 142134) and found myself using all of the doilies that Stampin’ Up! offers, so I thought I’d share how you can use all three doily varieties with this fun set.

1

The Delicate White Doilies (item 141701) coordinate with just about any color palette. I often use pieces of them rather than include the whole doily on one card.

2

For this first card, I cut the doily in half and layered the two pieces under a strip of Real Red 3/4″ Stitched Edge Ribbon (item 141984) and Candy Cane Lane Designer Series Paper (item 141981). The focal image was embossed with Gold Stampin’ Emboss Powder (item 109129) and cut out with the Big Shot (item 143263) and a Layering Circles Framelits Die (item 141705). Some gold twine from the Baker’s Twine Trio Pack (item 141999) was tied in a bow for a finishing touch. You’ll notice that I’m addicted to Baker’s Twine, too, but that will have to be discussed in another post!

Because you can never have too much of a good thing, it’s fun to layer different doily styles, as well.  With this next card, I layered a Cucumber Crush 2015–2017 In Color Doily (item 141674) over a Delicate White Doily.

3

The card base was made by stamping the Diagonal Stripe Stamp (item 141917) with Versamark ink (item 102283) on a piece of Real Red Cardstock (item 102482).The doilies and Baker’s Twine from Candy Cane Lane Baker’s Twine (item 141983) and the Baker’s Twine Trio Pack were layered with a strip of Warmth & Cheer Designer Series Paper (item 141991) and Gold Glimmer Paper (item 133719). Some gold Metallic Sequins (item 138390) and fun Mini Jingle Bells (142002) were added as finishing touches.

On this last card, I used one of the gold Metallic Foil Doilies (item 138392). These come in two sizes (both gold and silver) and the larger one was used here.

4

A piece of Candy Cane Lane Designer Series Paper was added to the card base, and a strip of Real Red 3/8″ Stitched Satin Ribbon was looped underneath the focal image. This image was embossed with Real Red Glitter Stampin’ Emboss Powder (item 142635) and cut out with the Lots of Labels Framelits Die (item 138281).

Some sprigs of holly from the Holly Berry Happiness Stamp Set (item 142061) and Holly Berry Punch (item 141843) were then added with some gold Baker’s Twine and Brights Enamel Shapes (item 141680).

I hope these projects will inspire you to give all of the different doily styles that Stampin’ Up! offers a try.  I’d love to see how you incorporate these versatile accessories into your own projects!

Amy O’Neill
Artisan Design Team 2015–2016

29. September 2016 · Comments Off on Time is running out! · Categories: Cards

September Paper Pumpkin: Something Good to Eat

Whether you’re planning Thanksgiving, Halloween, or other fall festivities, Paper Pumpkin has everything you need. This month’s kit, Something Good to Eat, includes 16 food-safe treat tubes plus stamps, stickers, and embellishments to help you dress them up for any occasion.

Sept_PP

This kit comes together quickly so you can party right away. No tricks, just treats! Watch it in action at PumpkinHowTo.com.

While you’re experimenting with your trendy treat tubes, don’t forget to try some other projects. Here are some additional ideas to get you started.

For instance, if you’re going for a strictly spooky theme for Halloween, pull in some holiday catalog products like the Halloween Night Designer Washi Tape and Baker’s Twine. Then, stamp the Jack-o’-lantern face and bat from the Spooky Fun Photopolymer Stamp Set using a Basic Black Archival Stampin’ Pad.

PP_Sept_alternates-4

The stamps in the kit are great for cardmaking too! Use the sentiment to stamp a fun background and banner. To achieve a two-tone pumpkin, stamp the solid pumpkin image on some scrap paper first, then (without re-inking) stamp it again to get a lighter tone. (This technique is called stamping off and it’s one that you can use again and again in your projects.) To finish, stamp the outline image on top of the solid image. (That’s called two-step stamping, another technique you’ll use a lot.)

PP_Sept_alternates-2

Here’s another card with a completely different look, proving the versatility of this kit. When we were planning this stamp set, we couldn’t help but “oooh” and “ahhhh” over this adorable little sunflower! Isn’t it lovely? Use the Crumb Cake Note Cards & Envelopes to create a simply sunny card and you’re sure to put a smile on a friend’s face.

PP_Sept_alternates-1

Now is a great time to stock up on refills so you can keep using the treat tubes for more projects this season. They’d be great filled with bath salts as a stocking stuffer or neighbor gift. Grab yours now before they disappear.

PP_BOGO_Succeed-Weekly_end-date

Speaking of disappearing, our BOGO offer will disappear on October 10! First-time subscribers can buy the October kit at regular price and get the November kit for FREE! Contact your demonstrator and use promo code “BOGO” at PaperPumpkin.com to get started. If you’re already a subscriber, be sure to tell your friends about this amazing offer before it’s too late!

*Fine Print: For first-time subscribers only, not valid on prepaid subscriptions. Offer invalid if subscription is suspended or cancelled during the first two months. After that, the subscription will continue for $19.95 USD/$26.95 CAD + tax per month (shipping included) unless cancelled or suspended. Offer ends October

28. September 2016 · Comments Off on Ho Ho Ho · Categories: Cards · Tags: , , , , ,

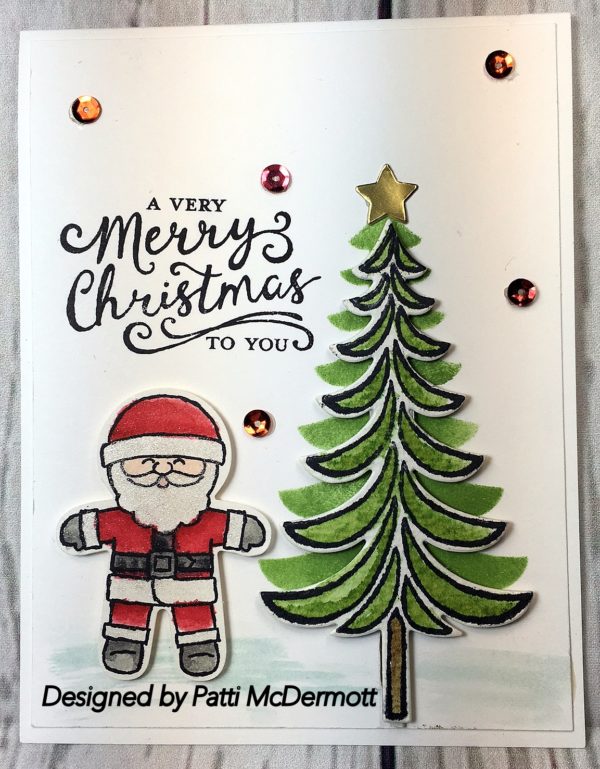
I painted this tree, from Santa’s Sleigh, on water color paper and then cut it out with the matching Thinlits dies, page 24 of the HC.  Tha Santa was stamped from the set Cookie Cutter Christmas, also on water color paper, and cut out with the matching punch, page 6 of the HC.

I used the negative piece of the cut out tree as a stencil, and sponged the tree on the card front.  I then, popped up with dimensionals, the cut tree and laid it on top of the stenciled image.  The sentiment is from the set Reason for the season, page 34 of the AC.   I thought it needed a little something so I added the Brights Sequins, page 177 in the AC.  It sounds like a lot of work but it was pretty simple.  What do you think?
img_1317

Save

Save

Save

27. September 2016 · Comments Off on Another Merry Mouse · Categories: Cards · Tags: , , ,

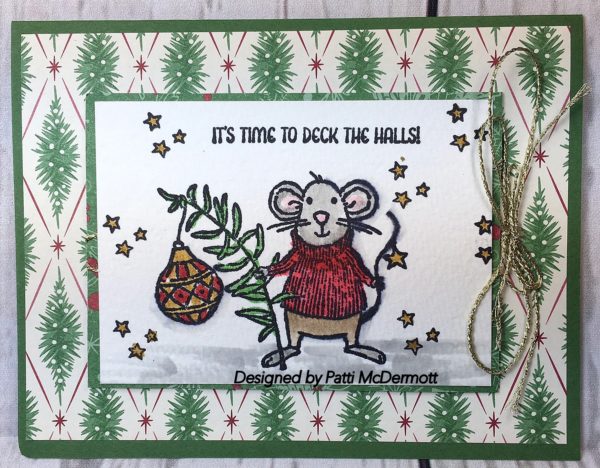
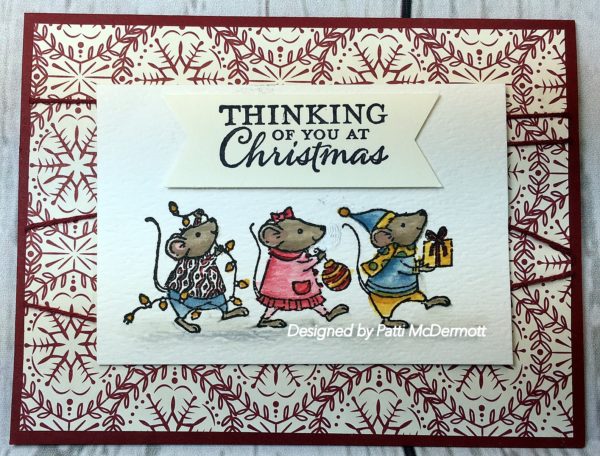
I created this card from the set Merry Mice, page 23 of the HC.  The DSP is This Christmas Specialty paper, page 172 of the AC.  The gold twine is from the Baker’s Twine Trio, page 16 of the HC.  I water colored the image on water color paper and stamped it in Black Archival ink.  I used our classic inks and an aqua painter to color the image.
img_1320

Save

Save

26. September 2016 · Comments Off on Candy Lane Christmas · Categories: Cards · Tags: , , , ,

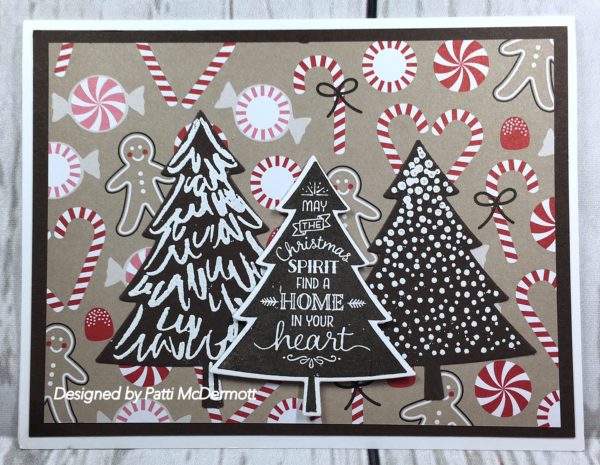
Don’t you just love this DSP, Candy Cane Lane, page 5 of the HC?  I love the colors red, white and brown together.  It is so country.  You can do so much with this DSP, like cutting the images out and using them separately on a card or a gingerbread house.  The trees are from a set that we carried over from last year, Peaceful Pines, page 28 of the AC with the matching dies, Perfect Pines, page 192, same catalog.  I white embossed the trees on Early Espresso Card Stock.  Fun card.
img_1297

Save

Save

25. September 2016 · Comments Off on Santa’s Sleigh · Categories: Cards · Tags: , , , , ,

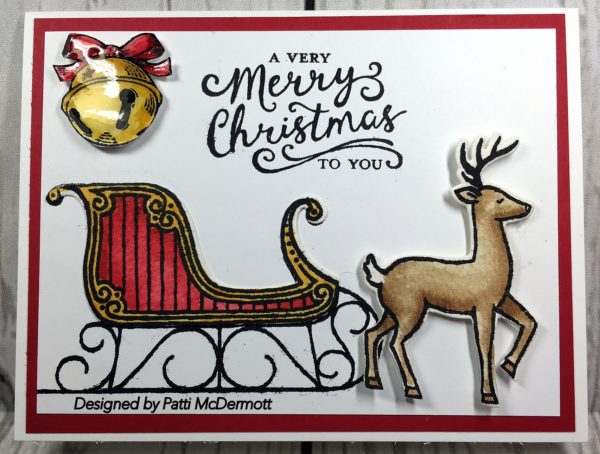
If you rec’d your Holiday catalog, you can find this set on page 24.  If you do not have a holiday catalog, please contact me and I will get one to you.  It has the matching thinlit dies where you can get a bundle price and save 10%.  Fantastic deal and such a wonderful set.  Has great images and also nice sentiments.  The bell is from the set Christmas Magic, page 22 and the sentiment is from the set Reason for the Season, page 34 in the Annual Catalog.  I used Crystal Effects on the bell and water colored the deer.
img_1291

Save

Save

Save

23. September 2016 · Comments Off on Merry Mice · Categories: Cards · Tags: , , ,

I love this set, Merry Mice, page 23 of the HC.  I used the DSP from the AC, This  Christmas Specialty paper, page 172. I stamped the images on water color paper and colored them with the aqua painter, page 180 in the AC.  I used the top of our classic ink pads as a palette.  Sentiment is from the set, Embellished Ornaments, page 33 of the AC.  Card stock used for base card is Cherry Cobbler.
img_1313

Save

22. September 2016 · Comments Off on Winter some where but not here! · Categories: Cards · Tags: , , ,

Living in South Carolina, we hardly get any fall, let alone winter.  However, I am not a stranger to snow.  Growing up in Syracuse, NY, we had the most unbelievable winter snow storms that when I finally left for the sunny south, I said I didn’t care if I ever saw snow again.

We moved to Atlanta and saw snow the first year there and then we moved here and saw the first snow again the winter after Hurricane Hugo hit. Of course, down here it is gone almost as soon as it hits the ground.  Although, I must admit sometimes it gets so cold down here (30’s) that I feel I should maybe move farther south.  My blood has certainly thinned. LOL

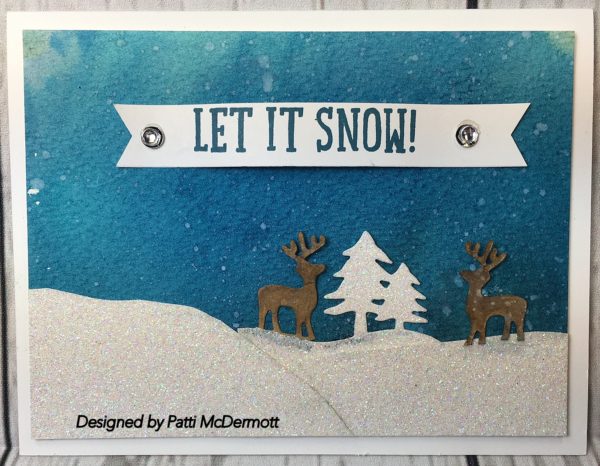
The background of this card is on watercolor paper washed with, Pacific Point, Island Indigo, Tempting Turquoise and Pool party.  The deer and trees are cut with the Framelit dies Merry Tags found on page 21 of the HC.  The snow is made with Dazzling Diamonds Glimmer paper, page 175 of the AC.  The sentiment is from the set Snow place, also from the AC on page 30.  The snow is splattered with a paint brush covered with a mixture of Whisper White craft Ink and water.
img_1308

21. September 2016 · Comments Off on Fall Magic · Categories: Cards · Tags: , , , , ,

I masked off this card on Whisper White CS to create the horizon.  Colors I used on this card were, Old Olive, Soft Suede, and Soft Sky.  The fence and pumpkins are cut from the Edgelits on page 52 in the HC.  The Wheat is made with shredding the burlap ribbon.  I finished off the card with Halloween Night’s Bakers Twine, page 51. Card base is Pumpkin Pie CS.
img_1312

20. September 2016 · Comments Off on Polar Express? · Categories: Cards · Tags: , , , ,

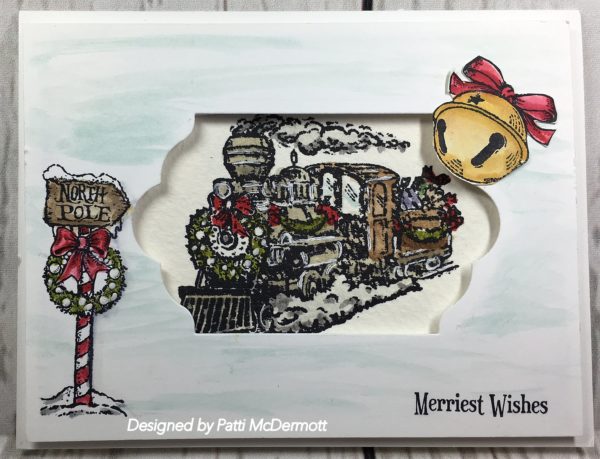
Well maybe not, but this is sure an old fashion train decorated for the Holidays.  The stamp set used on this card is from the Holiday catalog.    Christmas Wishes on page 22 is so versatile.  What’s great about this set is all the lovely images and great sentiments.  I will get a lot of different cards out of this set.

I stamped the train with black archival ink on watercolor paper. I made a palette with our inks and used the aqua painter to color it.  Although, the North Pole sign is not on watercolor paper, I did the same here trying not to wet the whisper white paper very much.

I cut out the window with Lots of Labels Framelits, page 193 of the AC and added our foam adhesive strips, page 182, to pop up the window.  In addition, I used Soft Sky on the front of the card.
img_1302

19. September 2016 · Comments Off on Pumpkin Patch · Categories: Cards · Tags: , , , ,

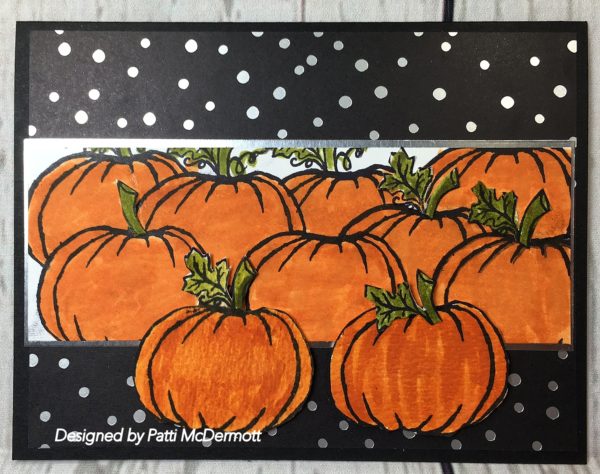
These pumpkins are from the set, Jar of Haunts, page 55 of the HC.  They are stamped with Basic Black Archival Ink on Whisper White card stock.  I colored with Old Olive and Pumpkin Pie markers.  The background paper is from the DSP, Halloween Night Specialty paper on page 51. I layers the pumpkins on our Silver Foil paper found in the AC on page 175.  Card base is Basic Black card stock.
img_1306

18. September 2016 · Comments Off on Clean and Simple · Categories: Cards · Tags: , , , , ,

Every now and then I like to do a clean and simple (CAS) card.  This stamp set, Cookie Cutter Halloween, page 53 of the HC, fits the bill for CAS.  Here I used the little scarecrow and colored him with our markers, and punched him out with the Cookie Cutter Builder punch, page 6 of the HC .  For the background I used the set Gorgeous Grunge, page 123 of the AC.  In addition, also from the AC, the sentiment is from the set Endless Thanks, page 42.  Hope you like it!
fullsizerender

17. September 2016 · Comments Off on Paper Pumpkin BOGO · Categories: Cards

PP_BOGO_customer-blog-post-header

For the first time ever, first-time subscribers can buy one month at the regular price of $19.95 US/$26.95 CAD and get the second month FREE! It’s a Paper Pumpkin BOGO deal that you don’t want to miss!

ppaugust_components_spot

Paper Pumpkin is a monthly subscription service by Stampin’ Up! that delivers all the stamps, ink, and paper you need to create a papercrafting project. Everything is cut and ready to go so you can skip to the fun!

Contact your demonstrator and use promo code “BOGO” at PaperPumpkin.com to get started.

Fine Print: For first-time subscribers only, not valid on prepaid subscriptions. Offer invalid if subscription is suspended or cancelled during the first two months. After that, the subscription will continue for $19.95 USD/$26.95 CAD + tax per month (shipping included) unless cancelled or suspended. Offer ends October 10, 2016.

16. September 2016 · Comments Off on Projects Filled with Project Life by Artisan Design Team member · Categories: Cards

Are you looking for new ways to use Project Life?

I always like to look for new projects, and I tend to use my Project Life cards for more than just scrapbooking; for instance, today I decided to put together a few 4″ x 4″ note cards using the Hello Lovely Project Life Card Collection (item 141668). All of the cards are very simple and easy to put together. I used the Hello Lovely Project Life Accessory Pack (item 142687) to complement the cards with a few embellishments.

1

I used our Silver Glimmer Paper (item 135314) and the Rose Garden Thinlits Dies (item 140619) to accent the cards. To create the little tags, I used Old Olive Cardstock (item 100702) along with some Basic Black Solid Baker’s Twine (item 141682). They’re super-simple cards to put together as there’s no stamping or cutting required. BONUS, right? That’s the beauty of Project Life.

2

3

4

Now, to add in a little extra fun, I made a Project Life frame. I’ve loved these kinds of projects lately, and I have decided to put together two walls of family love in our living room. Here is where this frame will be added.

5

Last fall we had family photos taken at an old barn near our house. Gosh, I am such a fan of vintage settings for photos; they never fail, I find. We had just gotten our little puppy a few months prior, so it was a perfect time to snap the family. Our kids were the focal point in these photos—as they usually are! How can they not be when they are just so sweet together? These times are precious as they only last for so long.

6

7

I used Fast Fuse Adhesive (item 129026) to glue down each of the cards, and yes, this is a permanent adhesive, but I was okay with that. If you don’t want it to be permanent, you can adhere the cards with Velcro®; this lets you reuse the cards for another project. I also used Stampin’ Dimensionals (item 104430) to adhere some of the cards and doubled up on a few to create more of a pop.

8

I hope you enjoyed my projects today and that I was able to inspire you to make a fun project using Project Life. Don’t be afraid to think outside the box; it will never fail to amaze you!

Joyce Fowler
Artisan Design Team 2015–2016
15. September 2016 · Comments Off on Trick or Treat! · Categories: Cards · Tags: , , , , ,

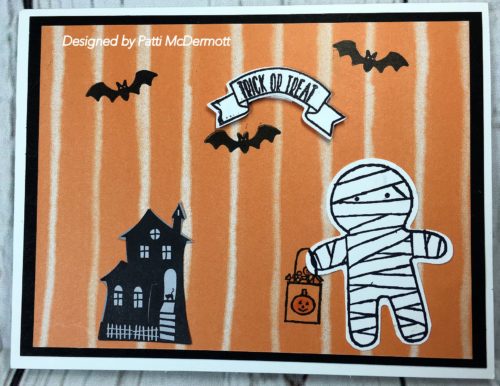
The background is created using the DSP, Halloween Specialty, page 51 of the HC.  The stamp sets used are Cookie Cutter Halloween, page 53, and Sweet Home, page 40, of the HC.  The cute little spooky house is cut out from the DSP above.  I just love this pack of DSP, it is so versatile that you can use it both for Halloween and Fall cards.  Of course, the little Mummy is cut out with the Cookie Cutter punch on page 6 of the HC.
img_1257

Save

Save

14. September 2016 · Comments Off on Cute Scarecrow! · Categories: Cards · Tags: , , , ,

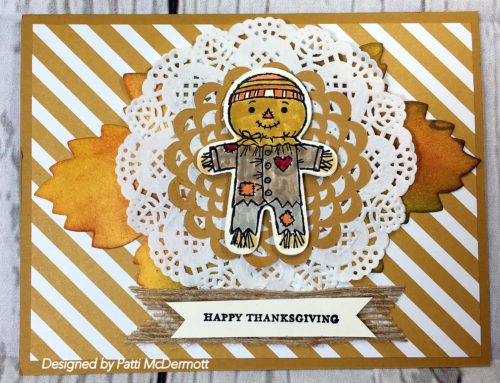
I made this card with the set Cookie Cutter Halloween, page 53 of the HC, and Teeny Tiny Wishes, page 90 of the AC.  I sponged leaves cut out with the Leaflets Framelits, page 193 of the AC, with Always Artichoke, Cajun Craze and Crushed Curry.  The embellishments are the Delicate White Doilies and the 2015-17 In-color doilies both on page 175 of the AC.  I used the Burlap Ribbon 178 of the AC in back of the sentiment.  DSP is In-color 2015-17.
img_1260

Save

13. September 2016 · Comments Off on Happy Halloween! · Categories: Cards · Tags: , , , ,

It’s a funny thing about Halloween cards.  I love to make them but I rarely send them except to little ones.  They are so much fun to put together and I always end up with a ton of unsent cards so if you need some let me know.  I also have friends that do not celebrate this Holiday so they are not interested in making Halloween cards.

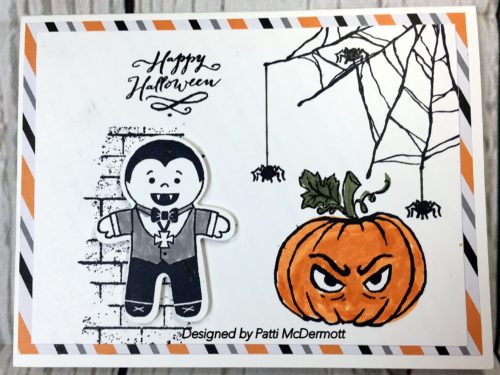
This card is made with the stamp sets Cookie Cutter Halloween, page 53, Jar of Haunts, page 55, and Ghoulish Grunge, page 52 of the HC.  I just love the little spiders, they are so stinkin’ cute!  If you love Halloween and making cards you will be in love with everything SU put together in this HC.  So much to pick from being scary to being cute and funny.
img_1258

Save

Save

12. September 2016 · Comments Off on Thanksgiving Card · Categories: Cards · Tags: , , , ,

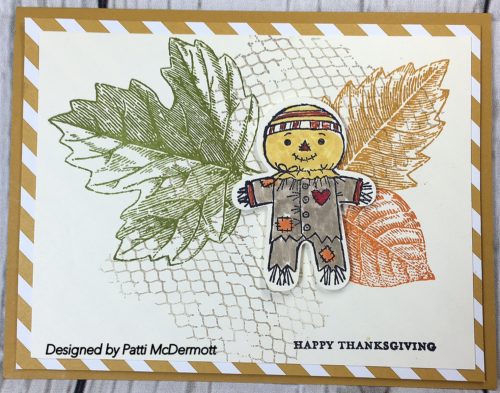
I love these little guys from the Cookie Cutter Halloween set on page 53.  They also go with the punch on page 6, both in the HC.  Here I used the leaves from the stamp set, Vintage Leaves, page 37 in the AC.  I used the In-color DSP Delightful Dijon page, 169 in the AC.  In addition, I used the Ghoulish Grunge stamp for the background.  This set can be found on page 52 of the HC.  Love this set and hope they carry it over after the Holidays.
img_1261

Save

11. September 2016 · Comments Off on Sweet Home · Categories: 3D Items · Tags: , , , ,

Hey Stampers, so sorry you have not heard from me in a few days.  I have been sick but back to my old former self now, and starting to post daily again.  Sure hope you missed me because I missed you!

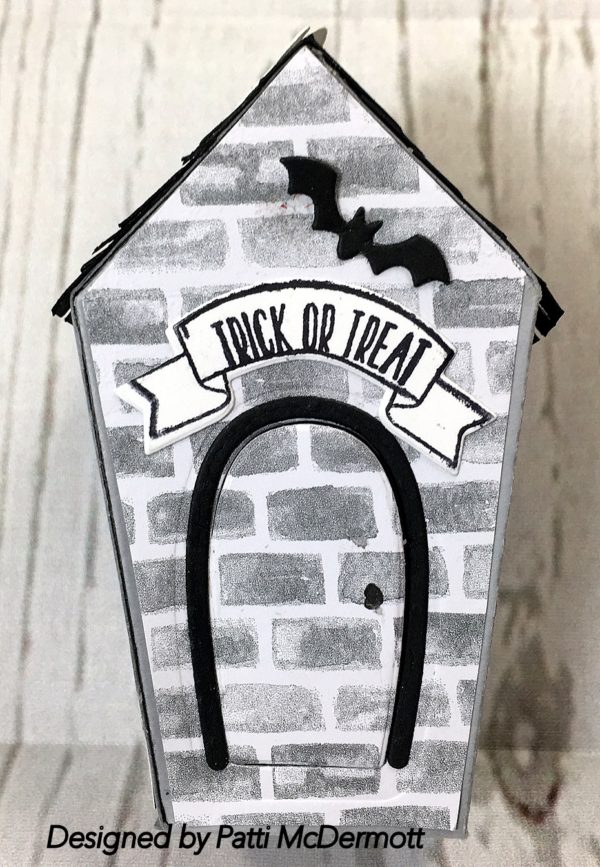
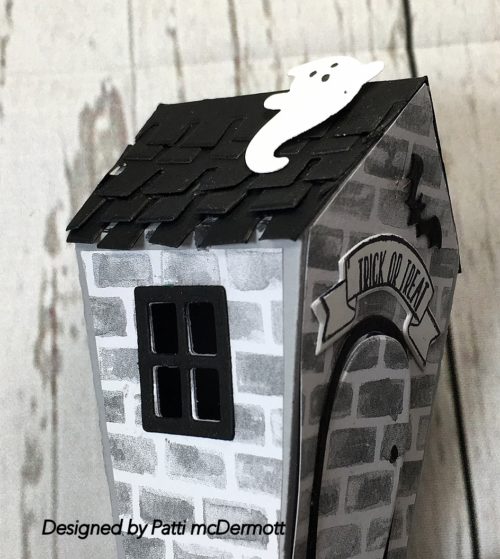
This project was made using the Stamp set Sweet Home and the Thinlits, page 40 of the HC.  It is almost like the sample on the same page except that I changed it around a little.  The DSP is Halloween Night Specialty on page 51.  Love this suite.  You can get a discount on the bundle if you buy both the set and thinlits together.
img_1263

img_1264

img_1265

Save

Save

Save

07. September 2016 · Comments Off on New Holiday Catalog · Categories: Cards

2016 Holiday Catalog

It seems like only yesterday that we announced the new annual catalog, and now we’re announcing another one: the holiday catalog! Some of the most wonderful times of the year are coming soon, and celebrating those moments is easy and fun with our newest products. Explore the new catalog now (US/CA).

Save

Save

Save

Save

Save

Save

Save

Save

Save

Save

06. September 2016 · Comments Off on Santa’s Sleigh · Categories: Cards · Tags: , , , ,

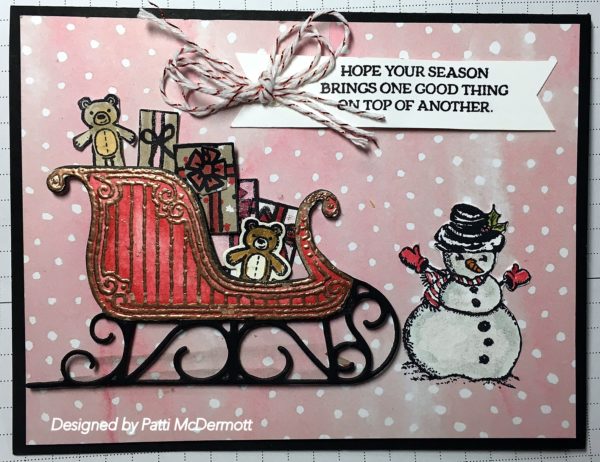
When I saw this set, page 24 in the HC, and the matching Thinlits, I knew I had to have it.  You can get this bundle with a 10% discount.  Both the set and the Thinlits are very versatile.  I embossed the top of the sleigh with Copper EP.  I used the Snowman from Christmas Magic, page 22.  The background paper is from the DSP Fruit Stand, page 172, in the AC.
IMG_1253

Save

05. September 2016 · Comments Off on Amy’s card · Categories: Cards

This card was created by my daughter Amy this weekend when she and the fam came to visit us over the Holiday wkend.  I thought she did a great job and she decided that this is the card she is going to make this year for sending out.  She did make a few changes, for the better and I can’t wait to see the final product.
She used all my stuff because she has not placed her Holiday order yet.  However, I had to write out everything she used so that she could buy it when she gets back to TN.  We had fun all stamping together again.
IMG_1249

Save

Save

04. September 2016 · Comments Off on Sue Plote, Artisan Design Team Member · Categories: Cards

Bits & Pieces

There’s an old proverb that says “Seeing is believing.” In other words, one needs to physically see something before it can be accepted as real. I truly wouldn’t have to see it to believe that most of you have something that looks a bit like this . . . your very own collection of what I call Bits & Pieces!

Photo 1

I save every cast-off die cut—something that just didn’t work at the time. I vow to use it on the next project or the one after, but I don’t, and before long there are lots and lots of Bits & Pieces. I wanted to try to use them in a useful way, so I started with a bit of sorting—and then layering.

Photo 2

Then, using a few embellishments or simple stamped sentiments, adorable note cards and gift packaging were made quickly and easily!

Photo 3

For the bag I created a tag made using die cuts from Sliding Star Framelits (item 141820), Birds & Blooms Thinlits (item 141477), and Flourish Thinlits (item 141478) in Watermelon Wonder, Night of Navy, and Old Olive Cardstock. The Petite Café Gift Bag (item 135826) is wrapped with Watermelon Wonder 5/8″ Mini Striped Ribbon (item 141433) and the tag is tied on with Linen Thread (item 104199); Whisper White Mini Pompom Trim (item 141486) is also included as a fun accent.

Next, the simple card uses Night of Navy and Cucumber Crush Cardstock and Affectionately Yours Specialty Designer Series Paper (item 141632) die-cut accents made using Stars Framelits (item 133723), Botanical Builder Framelits (item 140625), and Bold Butterflies Framelits (item 138135). The simple “Congratulations” sentiment from the Flourishing Phrases Stamp Set (item 141534) works perfectly with the silver Metallic Foil Doily (item 138392) and both a Metal Rimmed Pearl (item 138394) and Pearl Basic Jewels (item 119247).

The final project here includes a Sweet & Sassy Framelits (item 141707) die cut accent using 2015–2017 In Color Envelope Paper (item 141697) and a Flourish Thinlits die cut accent in Gold Glimmer Paper (item 133719). Embellished with a 2015–2017 In Color Doily (141674) and a Flourishing Phrases sentiment embossed on Emerald Envy Cardstock, this sweet element is perfect attached to a Glassine Gift Bag (item 141700).

Photo 4

I was thrilled to find just what I needed in my Bits & Pieces to create this coordinated card and gift box!  The little note card is simply made using Sliding Star Framelits, Birds & Blooms Thinlits, and Layering Squares Framelits (item 141708) die cuts and a Gold Glimmer Paper (item 133719) accent cut using the Stars Framelits Dies (item 133723). A touch of Sweet Sugarplum on the card inspired me to use the matching Sweet Sugarplum 3/8″ Ruched Ribbon (item 141428) to wrap the Clear Tiny Treat Box (item 141699)—where I also used die cuts from Birds & Blooms Thinlits and Flourish Thinlits. Soft Sky, Vellum, Bermuda Bay, and Crushed Curry Cardstock are also used in this sweet project.

Photo 6

Finally, I used Whisper White Note Cards & Envelopes (item 131527) to create this trio of note cards. Pieces include die-cut accents made using Flourish Thinlits, Everyday Jars Framelits (item 141490), Layering Squares Framelits, Sunshine Wishes Thinlits (item 141489), May Flowers Framelits (item 140276), and Botanical Builders Framelits. I chose cuts from the Playful Palette Designer Series Paper Stack (item 141657), Pop of Pink Specialty Designer Series Paper (item 141648), Kraft Cardstock (item Item 133674), and Gold Glimmer Paper—and Basic Black, Old Olive, and Soft Sky Cardstock. Embellishments include White Perfect Accents (item 138416), Gold Metallic Thread (item 138401), and stamped images with sentiments from the Watercolor Wings (item 139424), Rose Wonder (item 140697), and Sunburst Sayings (item 140725) Stamp Sets. I love that these cards were built so randomly but look seriously lovely together!

And now that you’ve seen it I hope you believe it! Bits & Pieces can easily become some of your favorite projects!

Sue Plote
Artisan Design Team 2015–2016
03. September 2016 · Comments Off on Thanksgiving · Categories: Cards · Tags: , , ,

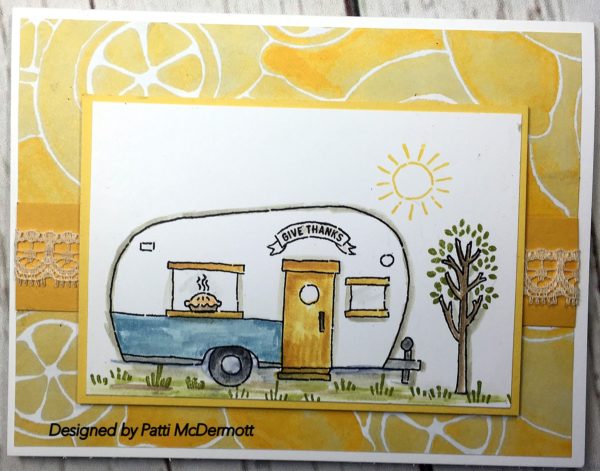
There were not a lot of Thanksgiving stamps in the Holiday Catalog so I used this as one.  I mean who doesn’t have Apple pie at Thanksgiving?

The set is Glamper Greetings on page 42.  The DSP is from the AC, Fruit Stand page 173.  I embellished it with Very Vanilla Lace trim, page 179 in the AC.  Ink Colors are Crushed Curry, Daffodil Delight, Old Olive, Crumb cake, Smokey Slate and Marina Mist.
IMG_1233

Save

Save

Save

Save

02. September 2016 · Comments Off on Wonder of Christmas · Categories: Cards · Tags: , , ,

This set, Wonder of Christmas can be found in the HC on page 14.  We have so many beautiful embossing folders this year and this one is called Holly, page 195 in the AC.  The colors I used are Sahara Sand, So Saffron, Soft Sky and Cucumber Crush.  Image was stamped in Black Archival ink.
IMG_1235

Save

01. September 2016 · Comments Off on Sweet Zombie · Categories: Cards · Tags: , , , ,

This was one of the cards we made at Camp on Saturday.  The Specialty DSP, Halloween Night, page 51 of the HC, really sets it off.  I used the set Jar of Haunts from the HC, page 55.  The sentiment is stamped on a banner cut from the Banner Framelits, page 193, AC and backed with silver foil, page 175.
I just love all the holiday stamps this year and this is one of my favs.  I usd the silver metallic thread, page 178 in back of the cute zombie.
IMG_1243

Save

Save